
New in RewardsWP: Points, Redesigned Rewards Widget & More
RewardsWP now includes Points, a redesigned Rewards Widget, and new tools to launch, run, and measure loyalty and referrals in one place.
Continue Reading →
RewardsWP now includes Points, a redesigned Rewards Widget, and new tools to launch, run, and measure loyalty and referrals in one place.
Continue Reading →
Want to set up referral tracking for Ninja Forms?
You’ve come to the right place – we’re going to show you how to quickly and efficiently set up referral tracking for Ninja Forms.
Let’s take a look.

Referral tracking for Ninja Forms is useful because leads are incredibly valuable for your business. We regularly use pay-per-click advertising to grow leads, but we tend not to think about pay-per-lead strategies like affiliate marketing.
This means you’re missing out on a great opportunity to boost your lead generation.
Ninja Forms gives you everything you need to convert visitors into leads, but what if you could get your forms in front of more people? As long as you’re reaching the right target audience, you’re going to get a lot more qualified leads and turn them into more customers.
One of the quickest, low-risk ways to get your lead forms in front of more people is through affiliate marketing. All you’ve got to do is offer a small commission to affiliates who send you leads, and you can quickly expand your reach.
You’ve already got the form builder you need to do it, now you’ve just got to set up referral tracking for Ninja Forms.
Setting up referral tracking for Ninja Forms is actually incredibly easy and we’re going to show you exactly how to do it.
You can get everything set up in just 3 steps, but we’re going to give you some extra tips to make sure you have everything you need for maximum success.
Here are the steps we’re going to look at:
Let’s take a look at each step in more detail.

AffiliateWP is the best affiliate management plugin for WordPress, and it will help you to set up an affiliate program in under 10 minutes. There’s no need for any technical or coding knowledge, and the easy setup wizard will walk you through every step.
Even better, it’s got a 1-click integration designed specifically for Ninja Forms so you can start tracking referrals.
With AffiliateWP, you can:
It’s also got advanced marketing tools that are designed to empower your affiliates to make more conversions, which means more leads for you and more commission for your affiliates.
Just go to the pricing page and choose the plan that best fits your needs.
You can quickly install the plugin following this handy guide and then you’re ready to set up your Ninja Forms affiliate program.
AffiliateWP Professional and Plus license holders will also have access to Affiliate Forms for Ninja Forms which gives you even greater customization options for your affiliate registration forms.
The next step is to open the setup wizard so you can integrate AffiliateWP with Ninja Forms.
Go to your AffiliateWP Settings and click the Launch Setup Wizard button.
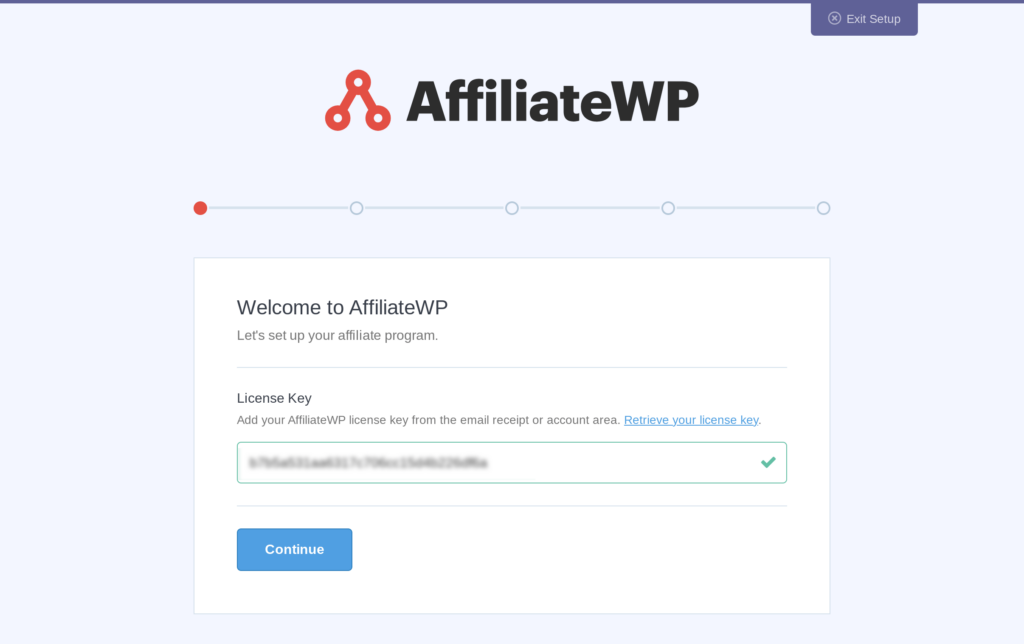
First, you’ll be asked to enter your license key which can be found in your AffiliateWP Account. Copy and paste the key into the box, then click Continue.
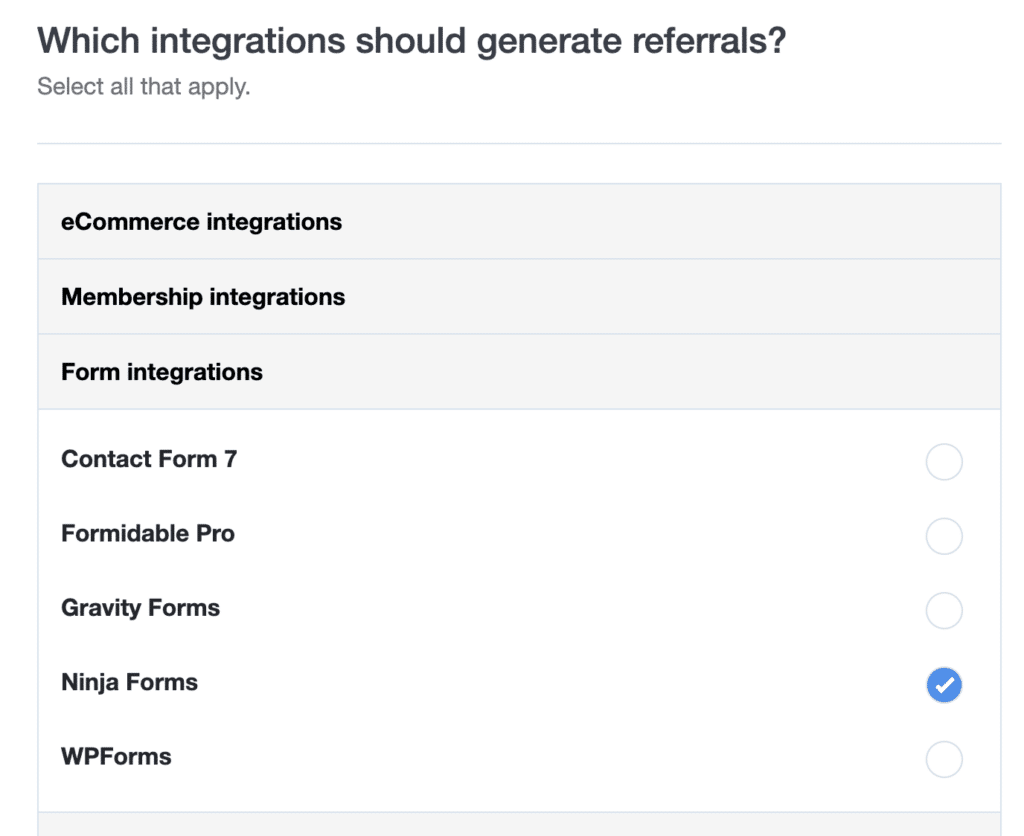
Now it’s time to integrate Ninja Forms. Just click on the Forms dropdown and you’ll see Ninja Forms. Check the corresponding checkbox, and then click Continue.
On the next page, you’ll be able to choose your currency and commission structure. Select your currency from the dropdown menu and then choose Flat Fee as your referral type. The last step is to choose how much you want to pay for each referral. We’ve got a great guide to help you with this, but if you’re not sure, you can always edit this at a later date from your Settings page.
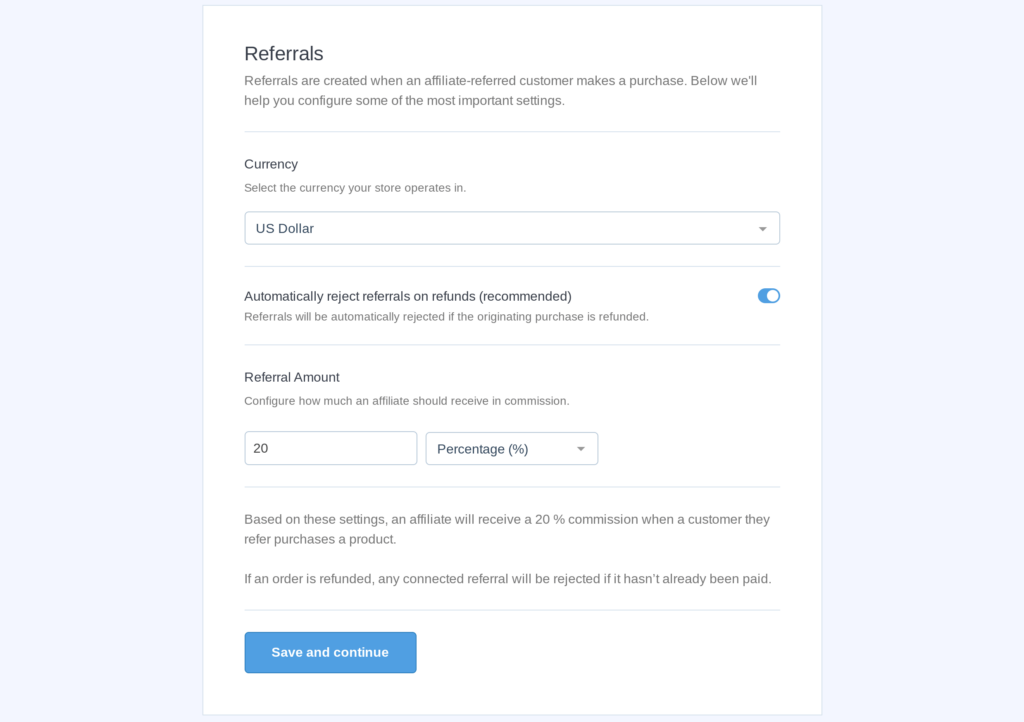
Click Save and Continue and then it’s time to choose your cookie settings.
Your cookie expiration dictates how long an affiliate has between someone clicking their affiliate link and completing a form to be eligible for a commission. For instance, if you set your cookie expiration at 30 days, a potential lead has to fill out your form within 30 days of clicking the affiliate’s link for the affiliate to be entitled to a payout.
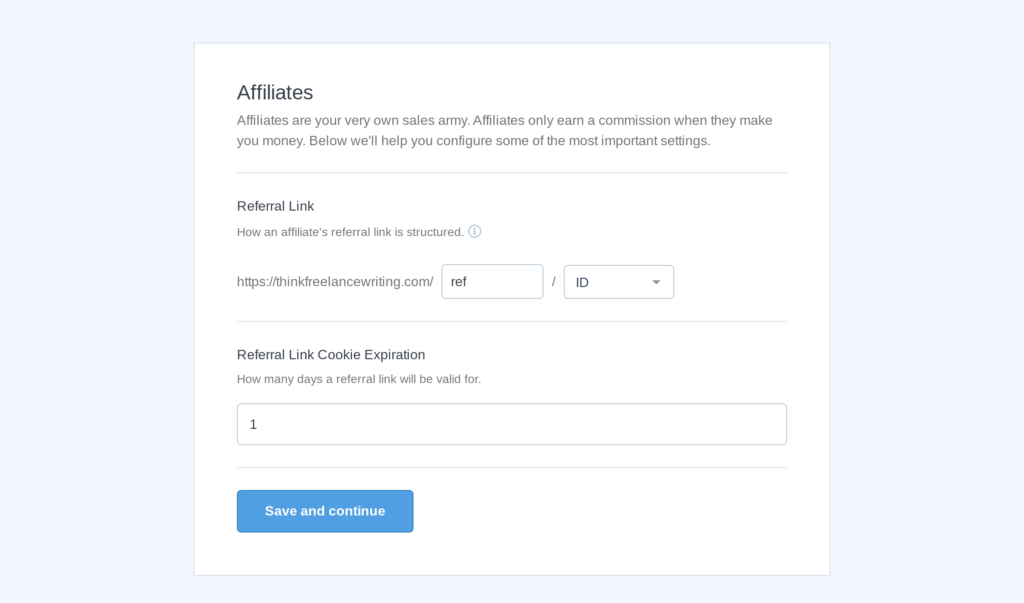
Again, don’t worry too much about this at the moment as you can always change it in your Settings.
When you’re happy with all your settings, click Save and Continue and your affiliate program will be automatically set up. Click Finish the Setup and Exit the Wizard and you can start enabling referral tracking for individual forms.
To track referrals on Ninja Forms, you simply need to create your form as usual.
Build your form exactly as you want it, but be sure to add at least a couple of form fields and a Submit button. Once you’re happy with your form, click on the Emails and Actions button and then the Add Referral button on the right.
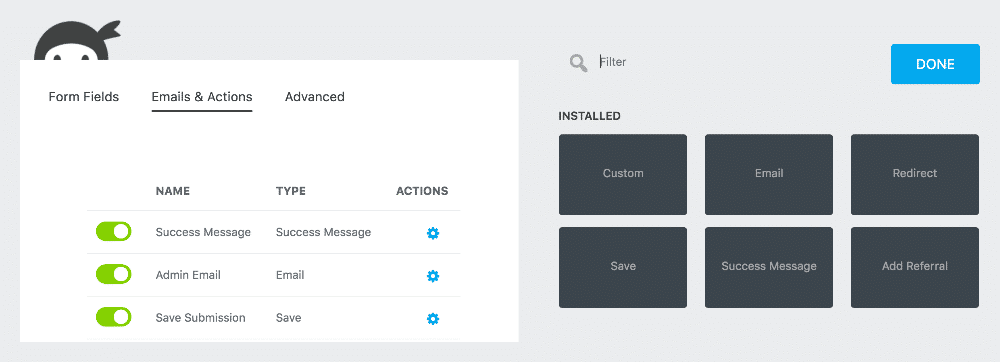
Referral tracking will now be enabled, and affiliates will earn your global referral rate on all form submissions.
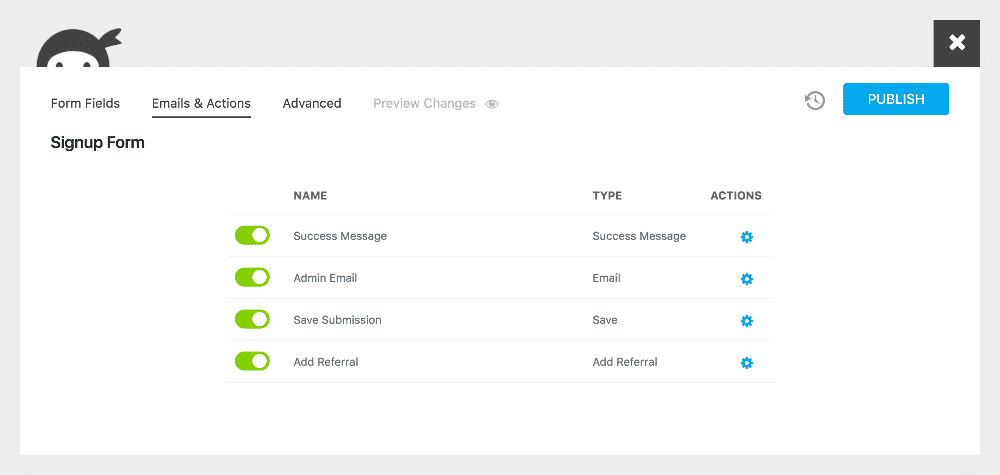
If you want to be more specific and set individual form rates or percentage rates, then check out this documentation.
You’re ready to track referrals on Ninja Forms, but first, you need affiliates.
AffiliateWP makes the affiliate signup process incredibly easy, by automatically generating your signup page. This is highly customizable, and you can edit it by going to Pages and searching for Affiliate Area.
The Affiliate Area page is just like any other page on your website and can be edited using WordPress blocks or your theme builder.
One key element you will want to ensure you optimize is your sign-up form. If you have the AffiliateWP Professional or Plus licenses, then you can use all your Ninja Forms features to make sure this form is ready to convert thanks to the Affiliate Forms for Ninja Forms addon.
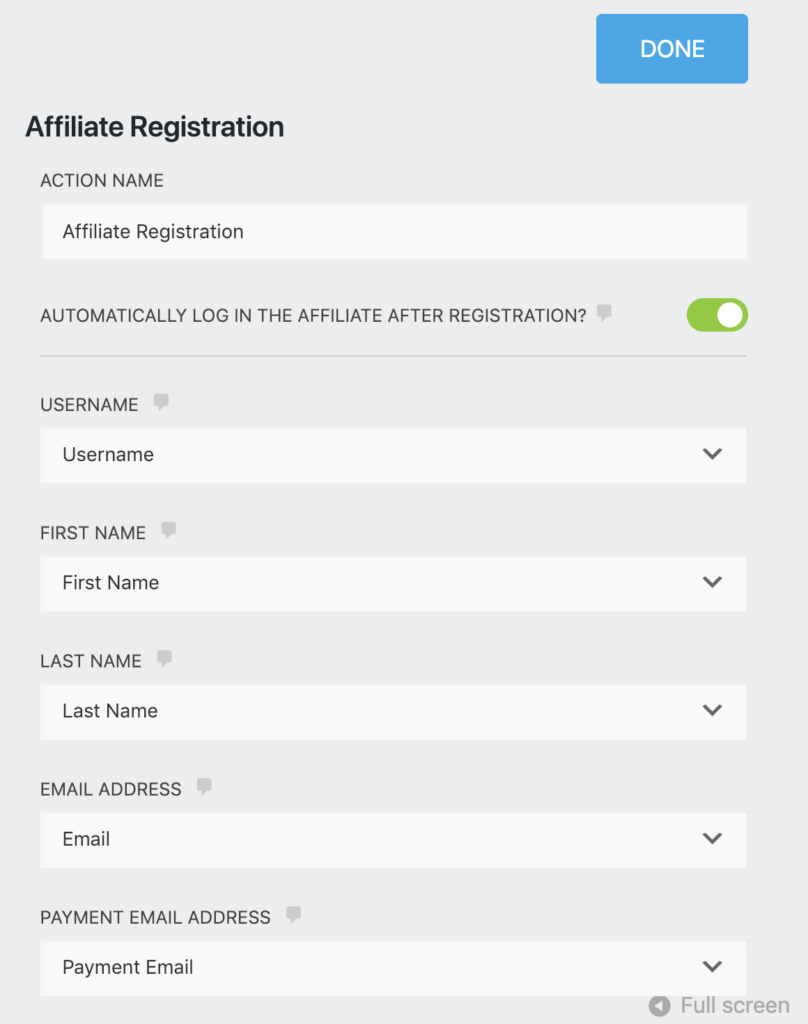
If not, then don’t worry, you can also use WordPress blocks to edit your form or our free integration with WPForms.
AffiliateWP allows you to automate large parts of your affiliate marketing program, but one step we recommend you do manually is affiliate approval.
When you take the time to verify affiliates you cut the risk of affiliate fraud and make sure you’re focusing your resources on the very best affiliate partners, and this can have big implications for your program.
To view affiliate applications (you’ll receive an email notification when affiliates sign up), go to the Affiliates page and click the Pending tab. You’ll now see all your pending applications and can see more details by clicking the affiliate’s name.
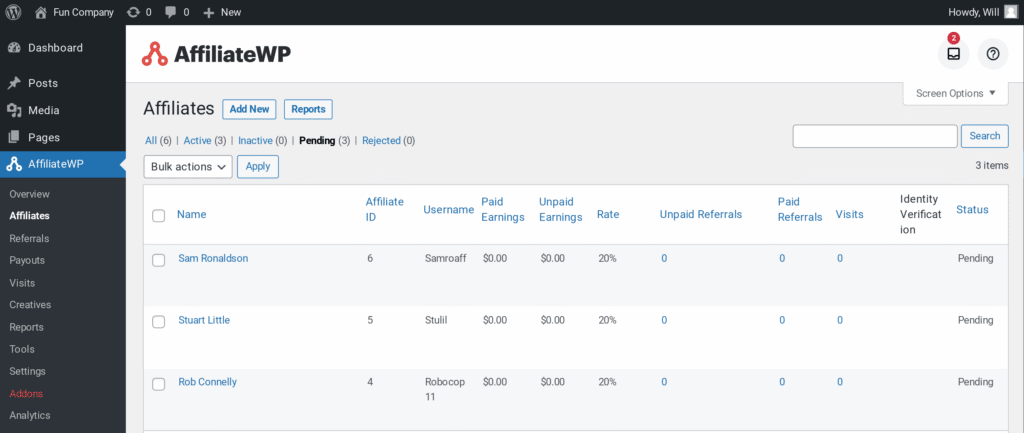
Now use the Accept or Reject buttons and the affiliate will automatically receive an email notification with your decision. Once approved, affiliates will be able to log in to their affiliate dashboard using the same Affiliate Area page they used to sign in.
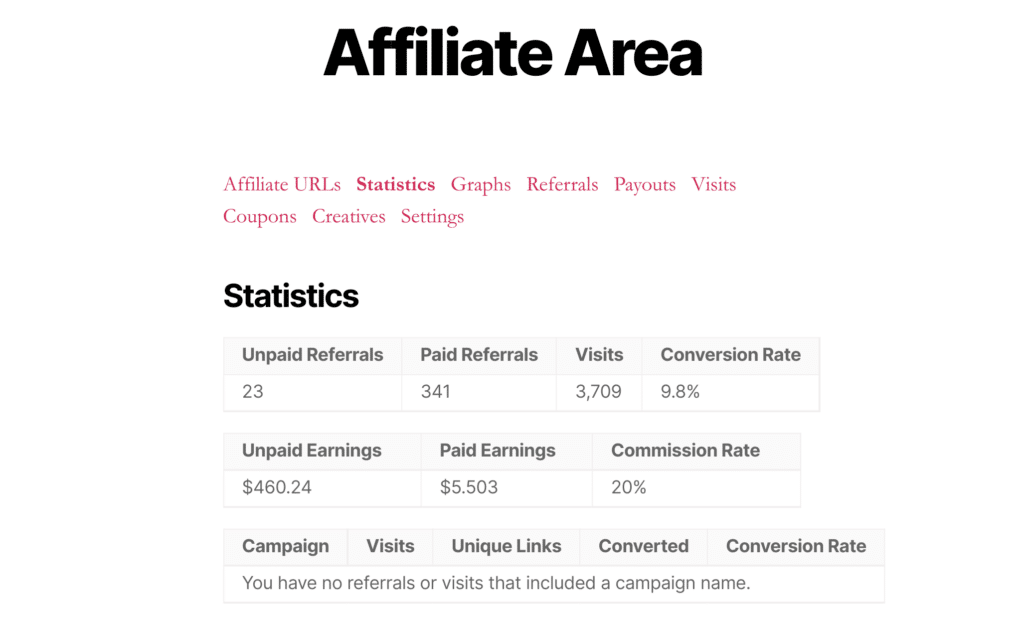
From the affiliate dashboard, affiliates can generate affiliate links using the Affiliate URL Generator, as well as see detailed affiliate analytics, and much more.
You’ll be able to keep track of all your referral tracking data from the Reports page. Here you’ll find detailed information about your affiliates, visits, referrals, campaigns, and payouts.
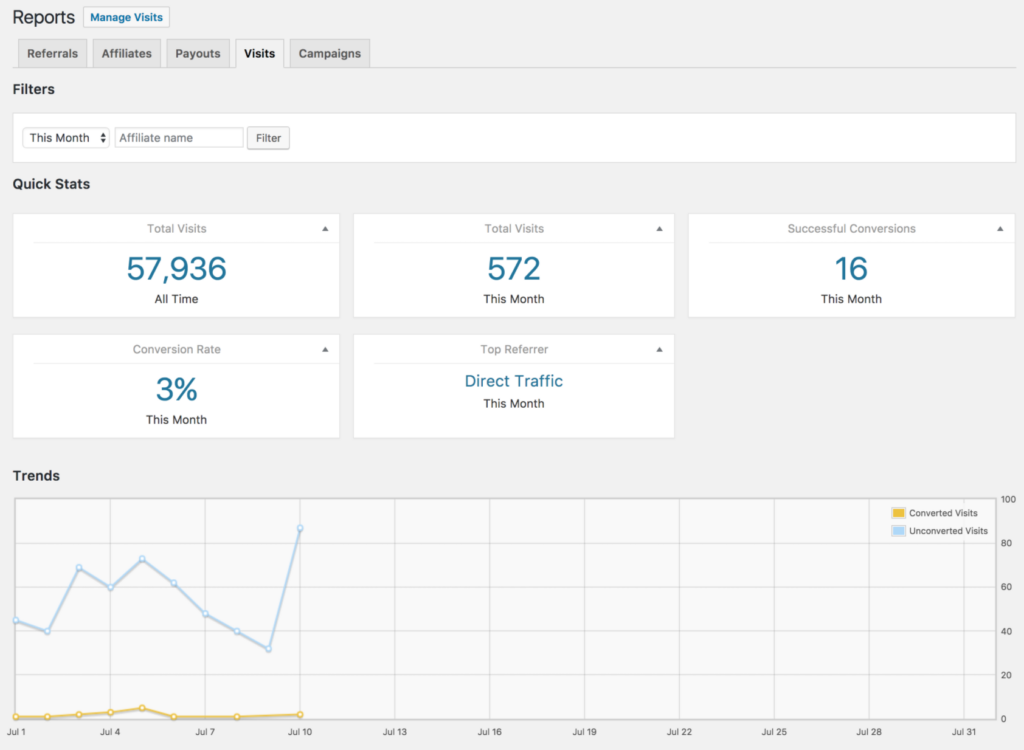
This data is a useful tool to help you spot successful affiliates and understand the marketing tactics that are going to grow your lead generation.
You can use your affiliate terms and conditions to set out how often you will pay affiliates. Many people choose to do this monthly, but you can also choose to do it weekly or even quarterly; it’s up to you.
The important thing is that you make your life simple, and that’s exactly what AffiliateWP’s Integrated Payouts Service ensures. It means you can pay affiliates in just a few clicks without ever leaving your WordPress admin.
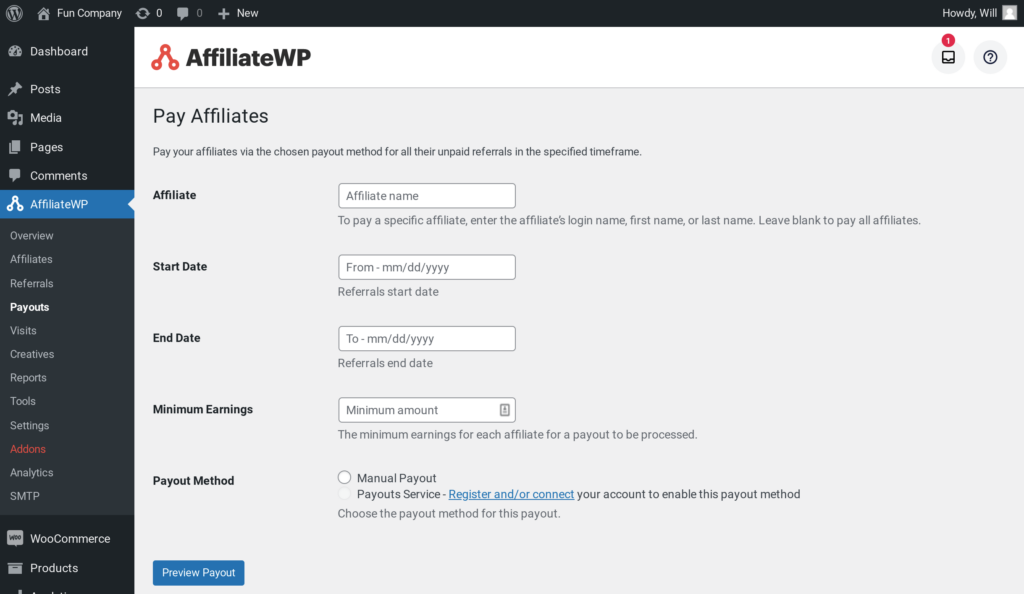
You can pay affiliates in a wide selection of currencies, and the payments go straight to their bank accounts. Speedy payments help keep your top affiliates happy, and AffiliateWP is perfectly set up for this, with 3 different ways to pay (integrated payouts service, PayPal payouts, Stripe mass payouts).
One thing you might have been wondering is how you ensure you’re paying affiliates for quality leads.
We’ve got an answer.
You can set up a lead approval process using the Force Pending Referrals free addon. All this means is that any referral will be created as Pending. You’ll then have time to qualify the lead before approving the referral so that the affiliate can qualify for their commission.
Once you’ve activated Force Pending Referrals from the Addon page, you’ll be able to see all pending referrals on the Referrals page. Click on the Pending tab at the top and you’ll be able to see the pending referrals and approve or reject them with a click.
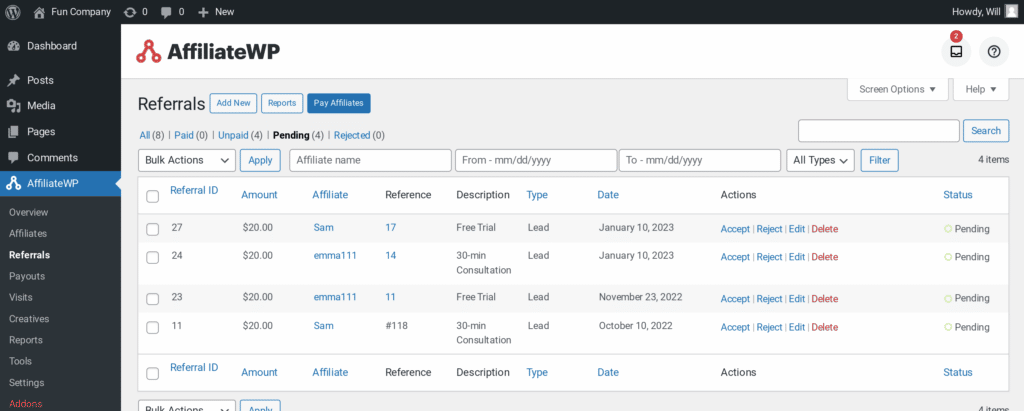
This helps ensure you’re paying out for legitimate leads and rewarding top affiliates appropriately.
As we’ve seen, it’s actually quite simple to set up referral tracking for Ninja Forms, and it can have huge benefits. Affiliate marketing is very low risk and can get your brand in front of large numbers of your target audience.
So, what else should you know?
Well, we’ve got some great resources you might want to check out:
Now there’s only one thing left to do.
Get AffiliateWP today and set up referral tracking for Ninja Forms!
Disclosure: Our content is reader-supported. This means if you click on some of our links, then we may earn a commission. We only recommend products that we believe will add value to our readers.
Launch your affiliate program today and unlock a new revenue channel to grow your business faster.
We use cookies to improve your experience on our site. By using our site, you consent to cookies.
Manage your cookie preferences below:
Essential cookies enable basic functions and are necessary for the proper function of the website.
Statistics cookies collect information anonymously. This information helps us understand how visitors use our website.
Marketing cookies are used to follow visitors to websites. The intention is to show ads that are relevant and engaging to the individual user.