Skip to content
AffiliateWP

AffiliateWP

Join 30,000+ Smart Business Owners who use AffiliateWP to Grow Their Revenue, FASTER!

Get AffiliateWP
See all Features
  • Features
    • Advanced Affiliate Tracking
    • 1-Click Payouts
    • Affiliate Growth Tools
    • Custom Affiliate Dashboard
    • Smart Commission Rules
    • Easy Setup
    • See all Features →
  • Integrations
    • WooCommerce
    • Easy Digital Downloads
    • PayPal
    • WPForms
    • MemberPress
    • GiveWP
    • See all Integrations →
  • Pricing
  • Help Center
    • Documentation
    • Support
  • Testimonials
  • Blog
  • Log In
  • Get AffiliateWP

How to Add Purchase Restrictions On WordPress Online Stores

Last updated on February 6, 2023 by William Palmer
FacebookTweetLinkedInEmail
Add purchase restrictions on WordPress

Want to add purchase restrictions on your WordPress store?

This is a super-useful feature that most online stores need access to, but how do you set it up?

Here’s your expert guide to adding purchase restrictions on WordPress.

Why Purchase Restrictions Are Useful for Online Stores

Picture this – you walk into a store and pick up a product with your own two hands. You know it’s there and you know it’s available to buy.

Now, think of how you feel when you’re shopping online and you finally decide to buy a product, only to put your credit card details in and find it’s out of stock. This sends people crazy because it’s a complete waste of their time!

It’s also a potential drawback of e-commerce, but surely, there’s something you can do about it?

Well, there is, and it’s called purchase restrictions.

Not only do purchase restrictions help when you’re selling a product that has limited stock, but it’s also a useful tool in other situations such as when you’re running a limited-time sale.

But, you want to keep your WordPress store clean and simple, right?

So, how can you add purchase restrictions without having to mess around with overly-complicated software, or worse still, the dreaded manual coding?

Let’s take a look at the easiest way to set up purchase restrictions on WordPress online stores.

How to Set Up Purchase Restrictions in WordPress

Setting up purchase restrictions in WordPress is actually incredibly easy, and you can do it while still offering a super clean user experience for your customers.

Here are the steps we’re going to look at:

  1. Install WP Simple Pay
  2. Create a Payment Form
  3. Customize Your Payment Form
  4. Set Your Purchase Restrictions
  5. Add Your Payment Form to a Page

These simple steps are going to help you set up purchase restrictions in just a couple of minutes!

Step 1: Install WP Simple Pay

WPSimplePay

WP Simple Pay is the number 1 Stripe payments plugin for WordPress. It allows you to effortlessly collect payments without having to install a cart system, which means it’s an incredibly easy way to make sales online.

As a Stripe Verified Partner, it offers extremely secure payment processing and it’s got a ton of advanced features to boost conversions:

  • 10+ payment methods
  • Buy now, pay later
  • Recurring payments
  • Advanced form builder
  • Collect custom data
  • Purchase restrictions
  • And more…

To get started, choose the plan that best fits your needs. Follow this guide to install the plugin, and then the setup wizard will take care of the rest.

With WP Simple Pay, you have a simple yet incredibly powerful tool to collect payments on WordPress, so it’s the perfect first step.

Check out WP Simple Pay’s pricing!

Step 2: Create a Payment Form

Now that you’ve set up WP Simple Pay it’s time to create your first payment form.

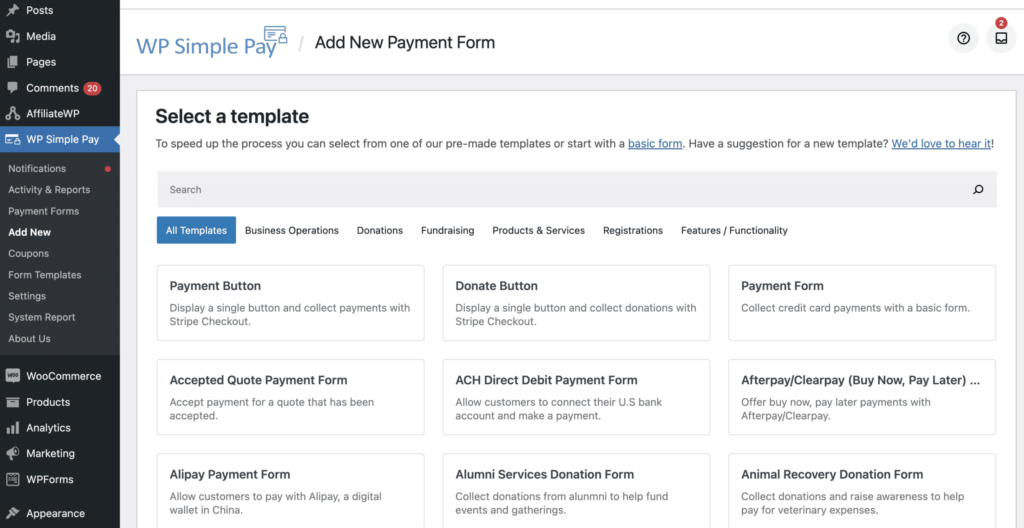
Click on the Add New button in the WP Simple Pay column to open the templates page. This will show you a whole host of templates you can use to get started.

Add new payment form

All of these templates are highly customizable, so you’ll be able to get them looking exactly how you want them, and they’re nice and easy to embed on your pages.

For now, let’s choose a simple Payment Form template.

Hover over the template name and then click Use Template. This will open up the form builder page where you can customize your payment form and add purchase restrictions.

Step 3: Customize Your Payment Form

You want your payment form to fit seamlessly with your site and offer the perfect user experience. To help you achieve this, WP Simple Pay gives you an advanced form builder where you can edit all the details of your form.

Let’s start with the basics.

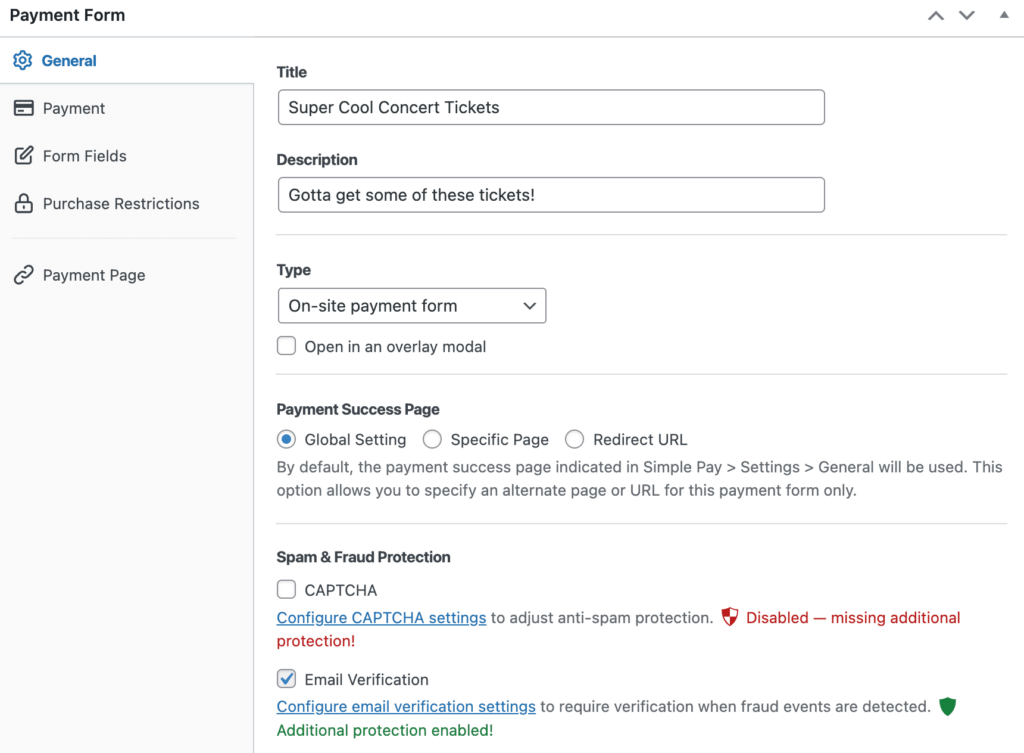
In the General tab, you’ll be able to edit your form title and description. Once you’ve completed this, you’ve got a couple more decisions to make.

Payment form general settings

The first is what type of form you want to create – is it an on-site payment form (most likely) or an off-site form? Next, we want to decide what page to send people to once they’ve completed their purchase. If you’ve set this in your global WP Simple Pay settings, then check Global Settings, or if you want to be more specific, choose Specific Page or Redirect URL.

Now – one of the most annoying things about any form is spam responses, so we want to set up some spam and fraud protection. Use the checkboxes to set up CAPTCHA and email verification and make sure your form is super secure.

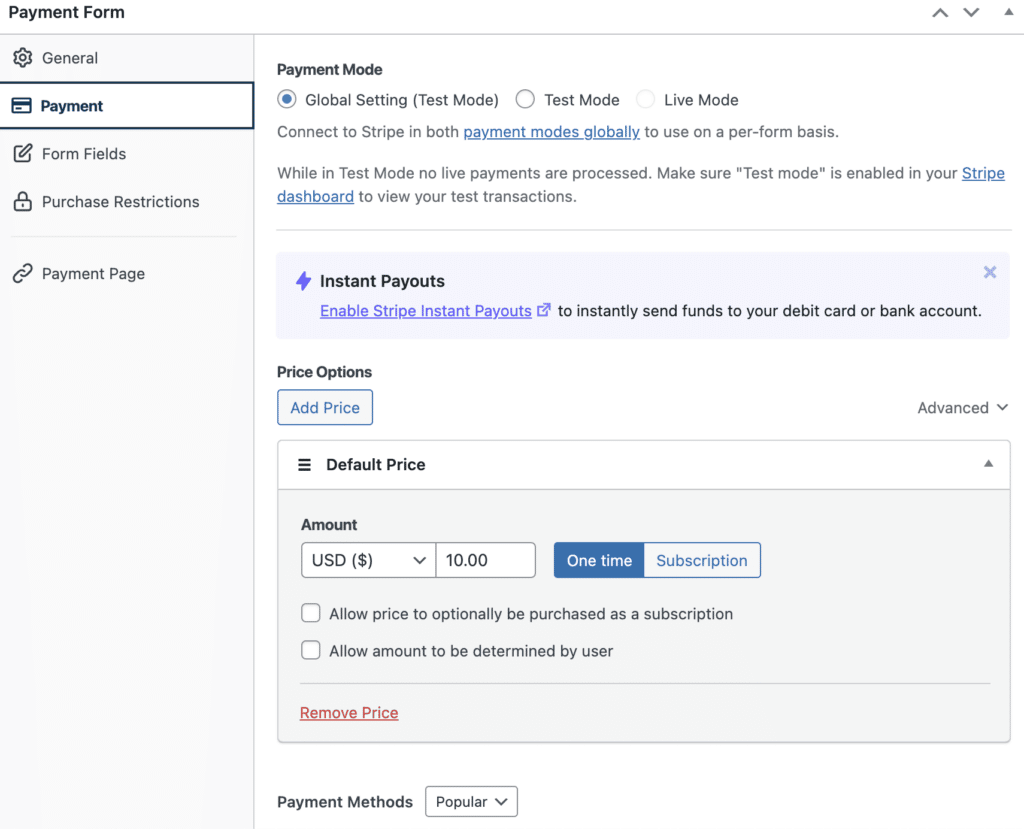
Once you’ve got the general requirements sorted it’s time to move on to the Payment tab which is where you decide on your pricing. Use the Default Price box to choose your currency, price, and whether it’s a one-time or subscription payment, and then choose your payment methods.

Payment form payment settings
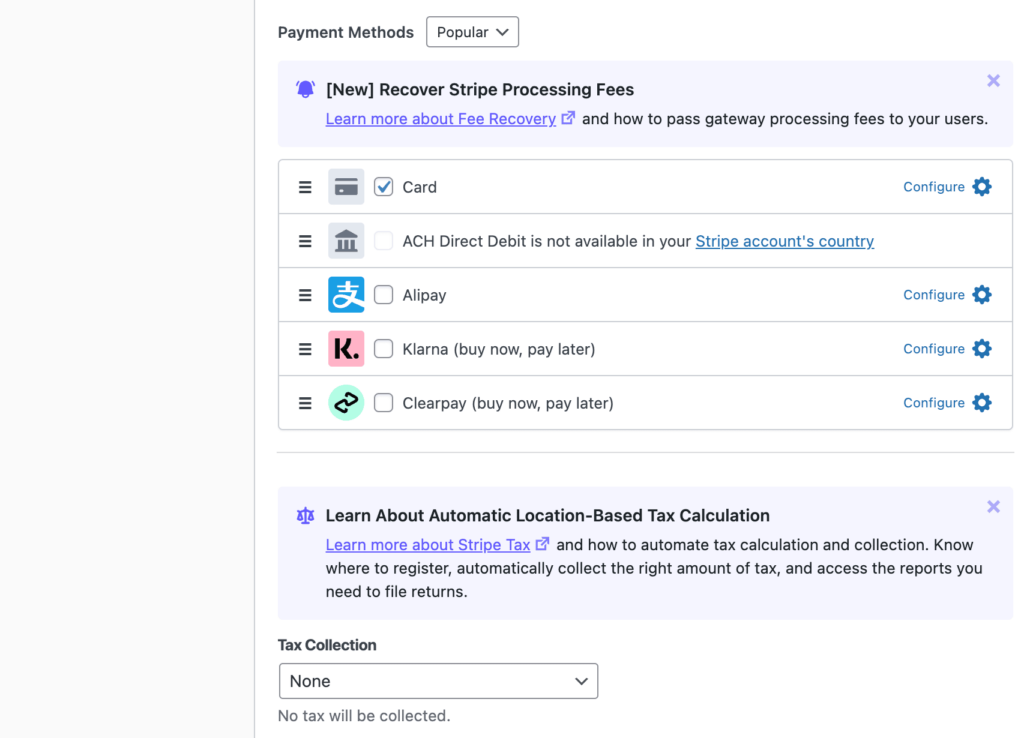
Payment options

You can add as many payment options as you like, and there are lots of methods to choose from:

  • Card
  • ACH Direct Debit
  • Alipay
  • Klarna
  • Clearpay

Lastly, you can set your tax collection preferences using the Tax Collection box. Use the dropdown and choose between no tax, collecting a global rate, or collecting a specific rate based on purchase location.

Now for the last step.

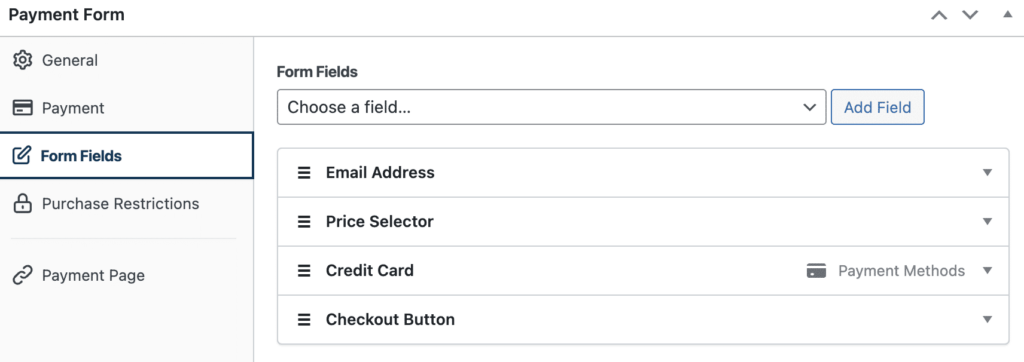
Click on the Form Fields tab and add fields to your form so you can collect all the data you need.

Add form fields

That’s it, your payment form is ready to go, but before we make it live, we want to add purchase restrictions.

Step 4: Set Your Purchase Restrictions

WP Simple Pay makes it incredibly easy to set purchase restrictions.

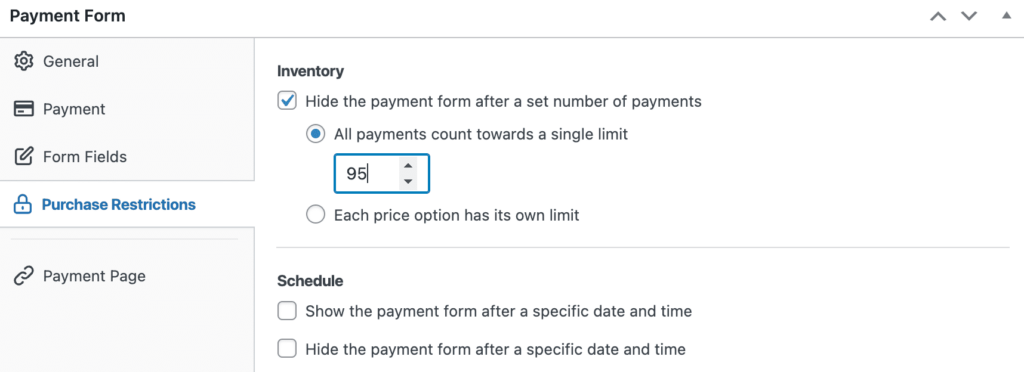
Just click on the Purchase Restrictions tab and choose what restrictions you want to set. You can choose to do this based on stock, or based on a scheduled time period.

Set purchase restrictions

For example, if you were selling concert tickets and you only had 95 tickets, then you would check the inventory box, and then All Payments Count Towards a Single Limit.

If you were running a flash sale on the other hand and you didn’t have any stock restrictions, you could use purchase restrictions to set a start time and end time for the payment form.

These purchase restrictions make it much easier to manage stock and run your sales.

Once you’re happy with your work, just click Publish and you’re ready to go.

Step 5: Add Your Payment Form to a Page

You can add your payment form (with purchase restrictions) to any WordPress page using WordPress blocks or shortcodes.

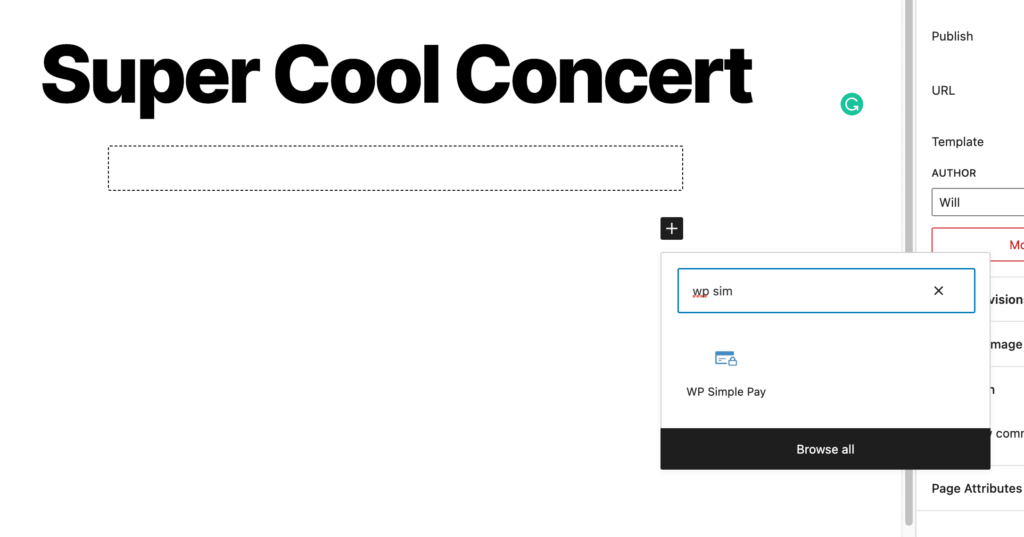
Just open up the page you want to add the form to and click the + button to add a new block. Search for WP Simple Pay and then click on the WP Simple Pay icon to open the payment form block. Then just select your form from the dropdown menu and it will be ready to go live.

Embed payment form

Alternatively, you can add your form to any WordPress page using shortcodes.

Go to your Payment Forms page and click Copy Shortcode next to the form you want to embed. Open up the WordPress page you want to add the form to and add a new Shortcode block. Paste the shortcode into the box, and it will embed on your page.

Payment form example

Use the Preview function to make sure your form is functioning as expected, and then click Update to push the page live.

Now Grow Your Sales with Affiliate Marketing

Ever wished you could have your own army of salespeople?

Well, with affiliate marketing, that wish can become a reality, and it’s a lot easier to set up than you might think.

Affiliate WP: best WordPress affiliate management plugin

WP Simple Pay integrates seamlessly with AffiliateWP to help you set up, manage, and grow an affiliate program. The best part is, it’s very low risk and it can almost run on autopilot.

If you want to get your products or services in front of a larger audience, then it’s the perfect next step.

Find out how easy it is to set up a WordPress affiliate program (hint: it’s going to take you less than 10 minutes).

Purchase Restrictions Are a Handy Tool

Most online businesses can benefit from using purchase restrictions as they help combat one of shoppers’ biggest complaints – the dreaded out-of-stock notification.

We’ve shown you how you can quickly set up purchase restrictions on WordPress, but what else do you need to know?

Here are some more handy resources.

  • How to Add a Buy Now, Pay Later Option to Your WordPress Website
  • 17 Best WordPress Plugins for Small Businesses (Compared)
  • How to Do a Giveaway on TikTok (Easy Setup, Big Results)
  • How to Ask Someone to Be a Brand Ambassador (Ultimate Guide)

Now there’s only one thing left to do.

Get WP Simple Pay and set up purchase restrictions today!

Add a Comment Cancel Reply

We're glad you have chosen to leave a comment. Please keep in mind that all comments are moderated according to our privacy policy, and all links are nofollow. Do NOT use keywords in the name field. Let's have a personal and meaningful conversation.

AffiliateWP

Get the #1 Most Powerful WordPress Affiliate Plugin Today

Join 30,000+ Smart Business Owners Who Use AffiliateWP to Grow Their Revenue, FASTER!

Get AffiliateWP Now
  • 5 Proven Ways to Stop Form Spam in WordPress
  • Affiliate Marketing vs Lead Generation, What’s the Difference?
  • 5 Best Affiliate Fraud Detection Software for WordPress
  • How to Enable Google Analytics Video Play Tracking in WordPress?
  • How to Set Up Referral Tracking On WPForms

Connect with us:

  • Facebook
  • Twitter

Start Getting More Sales Today with AffiliateWP

Launch your affiliate program today and unlock a new revenue channel to grow your business faster.

Get AffiliateWP Now

Company

  • About
  • Press
  • Testimonials
  • Blog
  • Contact
  • Affiliates
  • Careers
  • Twitter
  • Facebook

Powerful Affiliate Features

  • Easy Setup
  • Advanced Affiliate Tracking
  • Smart Fraud Detection
  • Powerful Affiliate Management
  • Detailed Affiliate Reports
  • 1-Click Payouts
  • Custom Affiliate Dashboard
  • Smart Commission Rules
  • Unlimited Creatives
  • Affiliate Growth Tools
  • Fully Internationalized
  • Fully Customizable

Helpful Links

  • Support
  • Documentation
  • Integrations
  • WordPress Hosting
  • Start a Blog
  • Make a Website
  • Start a Store

Use Cases Section

Ecommerce Affiliate Software for:

  • WooCommerce
  • PayPal
  • WP Simple Pay
  • Easy Digital Downloads

Membership Affiliate Software for:

  • MemberPress
  • Paid Memberships Pro
  • LifterLMS
  • Restrict Content Pro
  • MemberMouse

Form Referral Tracking Software for:

  • WPForms
  • Formidable Forms
  • Gravity Forms
  • Ninja Forms
  • Contact Form 7

Our Brands

Connect with us

  • Twitter
  • Facebook
  • YouTube

Awesome Products Start with an Awesome Team.

Over 20 million sites use our software. We believe in creating awesome user experiences. Whatever the market conditions or current trends, you will always find Awesome Motive leading the way to help our customers gain competitive business advantage and stay ahead of the curve.

  • WPForms
  • OptinMonster
  • MonsterInsights
  • WP Mail SMTP
  • RafflePress
  • SeedProd
  • TrustPulse
  • AIOSEO
  • Smash Balloon
  • Easy Digital Downloads
  • WP Simple Pay
  • PushEngage
  • SearchWP
  • WPBeginner

Copyright ©  Sandhills Development, LLC.

Terms of Service
Privacy Policy
FTC Disclosure
Sitemap
AffiliateWP Coupon
wpbeginner verified

Share this ArticleLike this article? Email it to a friend!

Email sent!