You can Integrate AffiliateWP with Zapier to automate and streamline your affiliate program. The Zapier addon connects numerous web services, enhancing management and operations. It automates affiliate creation, syncs updates with MailChimp, and more, to boost productivity. This addon supports Zapier Actions and Triggers, allowing you to automate notifications, manage affiliates, referrals, visits, creatives, and payouts with ease.
In this guide, we’ll show you how to install and setup the Zapier addon.
You will need a Pro license level to access the Zapier addon.
Installing the Zapier addon
Before we get started, be sure to install and activate AffiliateWP on your WordPress site.
Once you’ve got AffiliateWP installed and your license is verified, you’ll be able to quickly install and activate the Zapier addon.
How does the Zapier addon works?
This article explains the primary concepts and terms used regarding the Zapier addon.
This article is divided into the following sections:
- What is Zapier?
- What is a “trigger”?
- What is an “action”?
- How does Zapier connect with AffiliateWP?
- What information is sent to Zapier?
- What can I do with this addon?
What is Zapier?
Zapier is a service that facilitates communication and data sharing between different, unconnected applications. Available at zapier.com, it offers both free and paid plans. The service works like a translator between users speaking different languages—by connecting various apps (over 700) to enable data flow.
Ultimately, Zapier either receives data from one of these apps, or sends data to one of these apps. When Zapier receives data from one of these apps, such as the AffiliateWP Zapier app, Zapier calls that a trigger.
When Zapier sends data to one of these apps, Zapier calls that an action. Triggers cause actions to happen.
What is a “trigger”?
Triggers are incoming data that Zapier receives from an outside source. You can then use that data to do things somewhere else. When Zapier receives data from one of the Zapier apps, such as your website on which AffiliateWP is installed, Zapier calls that a trigger.
What is an “action”?
Actions are things Zapier can do on your behalf, to a variety of external services and websites (such as a WordPress site with AffiliateWP!). When Zapier sends data to something (perhaps creating an affiliate on your site, or updating a referral), Zapier calls that an action.
How does Zapier connect with AffiliateWP?
Zapier connects with your AffiliateWP installation securely using the REST API introduced in AffiliateWP 2.0.
What information can Zapier receive?
Pretty much anything that happens in AffiliateWP can be used as a trigger in Zapier.
Zapier receives only the data you’ve enabled in the AffiliateWP Zapier Pro addon. For more information on how to enable or disable data that Zapier can receive, see the Triggers section of the AffiliateWP Zapier Pro addon set up and configuration guide.
What can I do with this addon?
There are virtually infinite combinations of zaps that can be created. See the following for a few examples of what you can do. Most importantly, you can create zaps using any of Zapier’s listed apps – not just those we’ve used as examples!
- Set up and configuration guide (3 examples)
- Automatically add affiliates to MailChimp (blog post)
- AffiliateWP Zapier release post, containing multiple example zap ideas
Setup and Configuration
You’ll need a couple of things to get started with this addon:
- A free Zapier account.
- The Zapier addon has two parts: the plugin you install on your site and a Zapier app we’ve made in the Zapier app marketplace. While the AffiliateWP Zapier app is in Beta, you’ll need to use our invite code to add the AffiliateWP Zapier app to your Zapier account. Click here to accept an invite for the AffiliateWP Zapier app.
After installing and activating the Zapier addon, visit the AffiliateWP » Settings screen, and click on the Zapier tab. Enable the addon by checking the Enable Zapier checkbox:
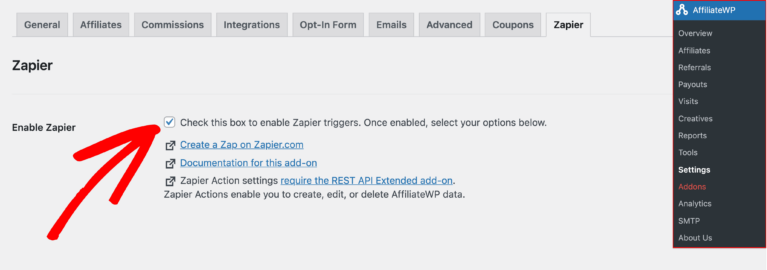
You will also need to install and activate the REST API Extended Pro addon to be able to use the API Keys for further functionality with the triggers and actions of Zapier.
Triggers or Actions?
Triggers are incoming data that Zapier receives from an outside source. You can then use that data to do things somewhere else. When Zapier receives data from something, such as your website on which AffiliateWP is installed, Zapier calls that a trigger.
Actions are things Zapier can do on your behalf, to a variety of external services and websites (such as a WordPress site with AffiliateWP!). When Zapier sends data to something (perhaps creating an affiliate on your site, or updating a referral), Zapier calls that an action.
Read more about how the Zapier addon works, what it can do, and more in our guide How does the Zapier addon work?
Below, examples are provided for both triggers and actions.
Triggers
Let’s start with a trigger to get things going. Follow the guide below to set up your first AffiliateWP Zapier trigger.
1. Select the checkboxes next to the triggers you’d like to enable for use within Zapier by navigating to AffiliateWP » Zapier . The options available are:
- Affiliates
- Referrals
- Creatives
- Visits
- Payouts

For each of the items above which you enable, you can create Zapier triggers for any of the following events:
- Any item is created (such as “New Affiliate”)
- Any item is updated (except Payouts, since they can’t be edited)
- Any item is deleted
For example, if you enable Affiliate triggers, you’ll be able to trigger a Zapier event on any of the following conditions:
- Whenever an affiliate account is created on the site, whether added by an administrator manually, or via an affiliate registration, Zapier is notified, which can then be used to trigger something else in Zapier.
- Whenever an affiliate’s account information is updated in any way on the site*.
- Whenever an affiliate is deleted on the site.
The same can be done for referrals, visits, creatives, and payouts! However, payouts cannot be edited, so the payout updated option is not available for payouts.
Except when re-calculating affiliate earnings due to a referral being altered, such as a referral rejection. This is done by AffiliateWP any time a referral is changed, so that affiliate information always stays accurate and up-to-date.
Connecting your WordPress site with your Zapier account
AffiliateWP will only authenticate with the API keys method defined in this setup guide below. Despite there being a Zapier App called WordPress on zapier.com, which allows for various generic functionalities on a WordPress site, it does not authenticate with AffiliateWP, nor does it provide any functionality for AffiliateWP.
First, let’s get the rest of the set up completed, then we’ll create an example zap!
After creating your account on Zapier.com using the AffiliateWP Zapier app invite, go to the Create A Zap editor. Click on Trigger to open the popup

Search for AffiliateWP, select the latest version, and add it as the first step.

Now, select the desired AffiliateWP event (or action if you happen to be creating an action). There are numerous options, but authentication is the same for both triggers and actions.
Available events are:
- New Affiliate
- Affiliate Deleted
- Affiliate Updated
- New Referral
- Referral Deleted
- Referral Updated
- New Visit
- Visit Deleted
- Visit Updated
- New Creative
- Creative Deleted
- Creative Updated
- New Payout
- Payout Deleted
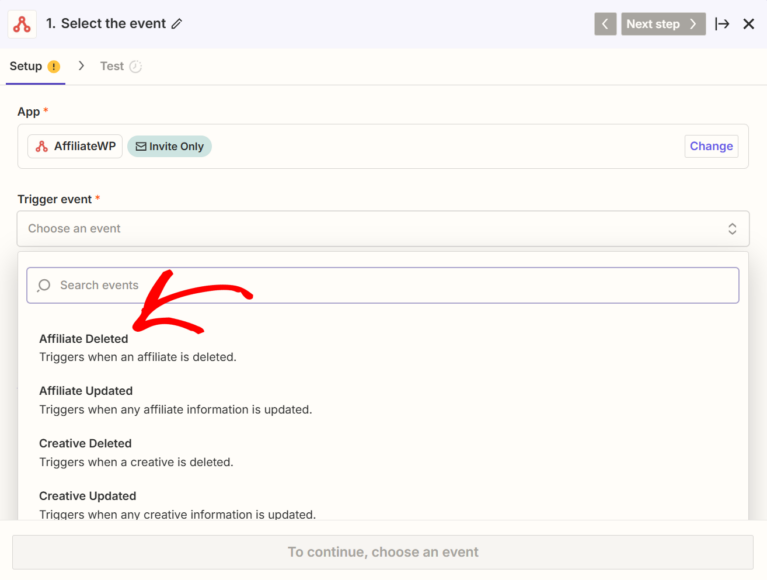
Once you’ve selected the desired event, click Connect AffiliateWP inside the account field.
Connecting Zapier to AffiliateWP
Clicking inside the Connect AffiliateWP will open a pop-up window from Zapier.

To get the information Zapier is requesting, we’ll need to head back to your site where AffiliateWP and the Zapier addon are installed. Keep this Zapier window open – we’ll get back to it in just a moment.
On your site, navigate to AffiliateWP » Tools, and click on the API Keys tab.
In the input field at the top, enter the username of an admin user on your site you’d like to use for authenticating with Zapier. Once the correct username pops up, click the Generate New API Keys button.
Note: The API key must be created for a user that has the necessary capabilities in order to connect successfully. Typically this means the user needs to have the Administrator role. The account does not need to be an affiliate. This is simply the account that will be used to communicate with Zapier.
You’ll receive something that looks like this, but the values in each key will be unique.

Copy the public key and head back to that Zapier pop-up window. Paste it in the field labeled Public Key.
Now do the same for the Token field.
Lastly, add your site URL. If you’re not sure of the site URL, this can be found on the main WordPress settings page, Settings » General » Site Address.
Once everything is filled out, click on the Yes, Continue button at the bottom of the pop-up window.

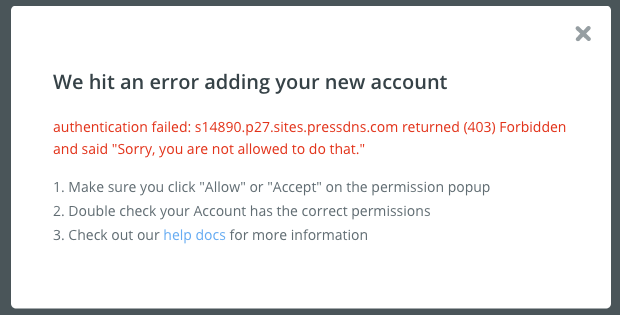
If you receive an error message such as (403) Forbidden “Sorry, you are not allowed to do that.” when trying to allow access to your site where Zapier addon is installed, please see our Troubleshooting page.
You should now see your site selected, similar to the screenshot below.

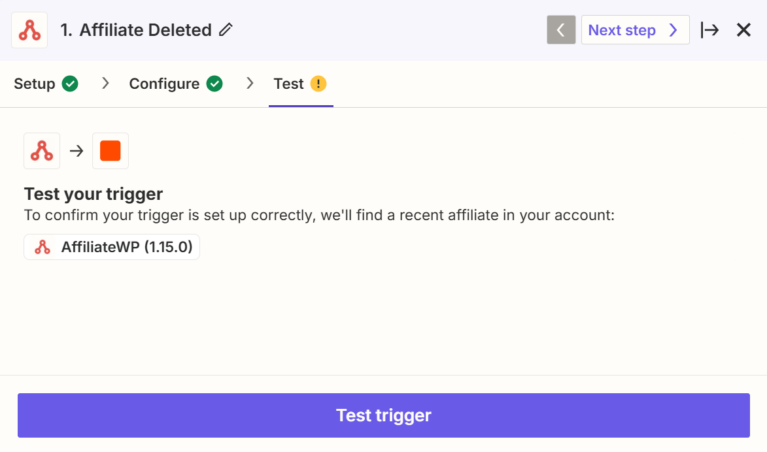
Click Continue. Now, let’s test to make sure things are working before we create the zap.
Click the Test Trigger button.
Now we’ll create the action, where we can choose what to do when Zapier receives AffiliateWP data from your site. Because of the virtually infinite combinations in which you can integrate apps on Zapier, you’ll possibly see things that look a little different from what you’re seeing within this guide. However, the same principle applies for all Zapier triggers: you’d now like to do something with the information AffiliateWP is providing to your Zapier account.
When successful, you’ll receive a message that an affiliate account was located with information on the affiliate account.

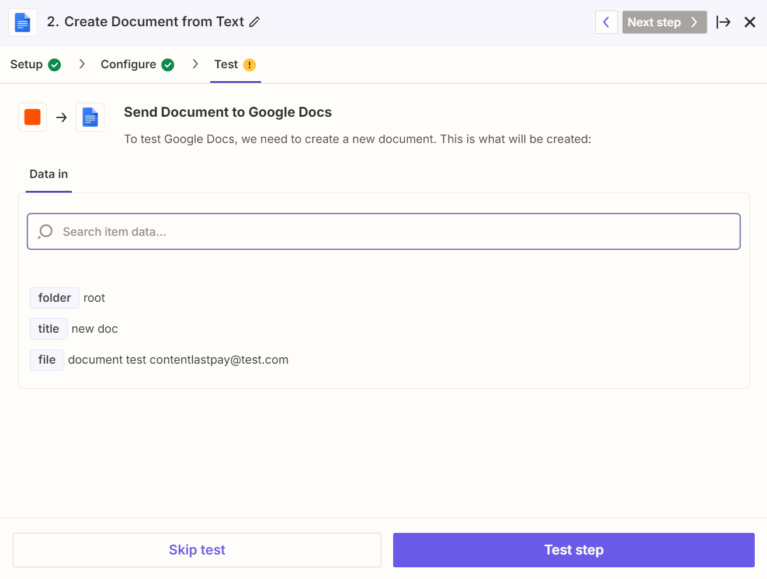
In this case, the action is to create a Google document. In this example, a new doc will be created when a new Affiliate is created from the site.

The AffiliateWP fields are available within a drop-down menu of trigger fields. Below is an example of how to create a new Google Doc that includes the Affiliate email, First, and Last name.
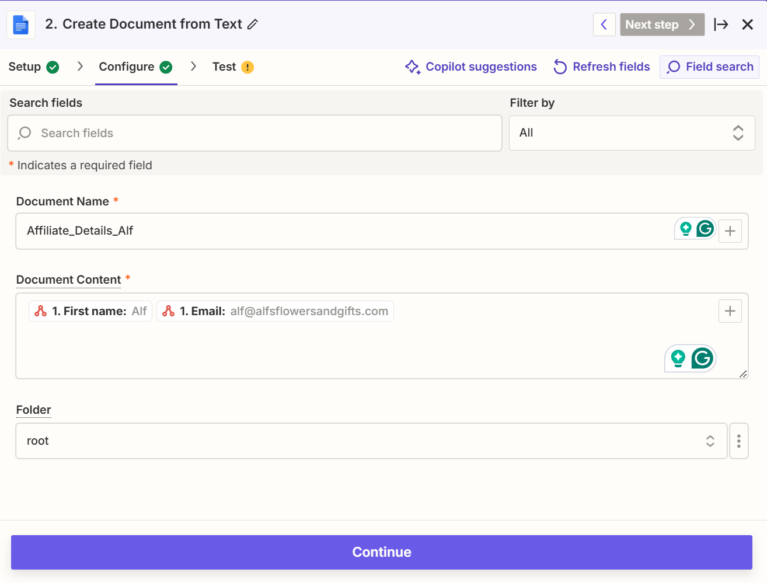
You’ll have the option to test this step as well.
Once the step has been completed (or if you prefer to skip the test), you’re given the option to name the zap, and turn it on. This zap will now trigger on any valid AffiliateWP event.
Actions
Zapier actions allow things in AffiliateWP to be created, updated, or deleted on your site; they’re the opposite of triggers. You can learn more about Zapier actions and how they work within the AffiliateWP Zapier addon by reading our guide How does the Zapier addon work?.
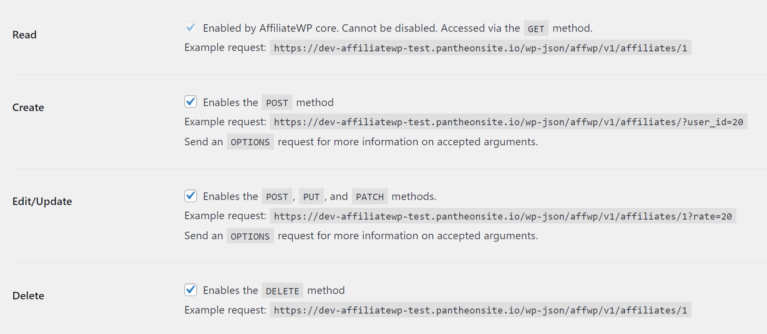
For actions to work, you’ll need to install one more addon on your site, AffiliateWP REST API Extended. For each action, make sure to enable the corresponding endpoint in the REST API tab, located in the AffiliateWP » Settings screen.
For example, if you’d like to be able to create affiliates, enable the Create endpoint under Affiliate Endpoints:
Actions, Example One: Creating an Affiliate
Now, let’s create an action in Zapier. For this example, you’ll need a free Google Drive account. We’ll be using Google Sheets to create a spreadsheet. When data is added to that spreadsheet, Zapier will pick it up, and create an affiliate on your site using that data.
Create a spreadsheet containing affiliate data you’d like to be entered into AffiliateWP. For this example, you can copy the one we’re using here at this link, or use it as a starter template to create your own.
Make sure to specify, at a minimum, the affiliate payment email, which is required to create an affiliate. The username of the WordPress user can be provided, with the username field. If no username field is provided, the username will be generated using the payment email.
Note: The data contained in the spreadsheet is fictional, and is provided for example usage. You’ll need to copy the spreadsheet to your own Google account so you can change the data.
Here’s what our example spreadsheet looks like:

Now that we’ve got that spreadsheet loaded up, let’s go to Zapier and log in, and create a Zap.
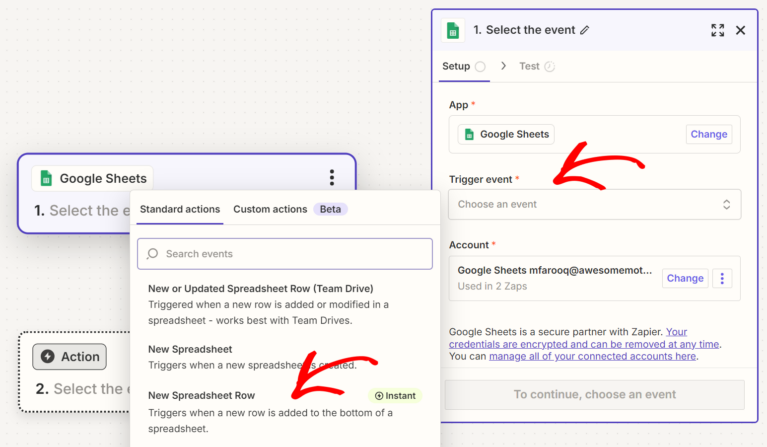
This time, the first step, the trigger, will be Google Sheets. Start typing it in the trigger input area:

Select New Spreadsheet Row inside the Trigger event.
If you haven’t connected yet, connect your Google account.
Now let’s tell Zapier which spreadsheet to use and then click Continue.
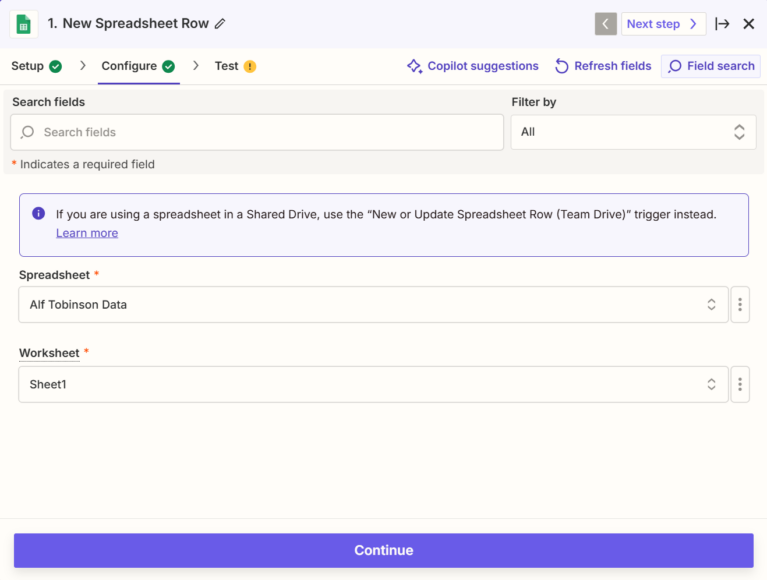
Just like the AffiliateWP trigger we set up in the Triggers section of this guide, Zapier will ask if you’d like to perform a test.

Perform the test and when successful, Zapier will show you that a spreadsheet row was found.
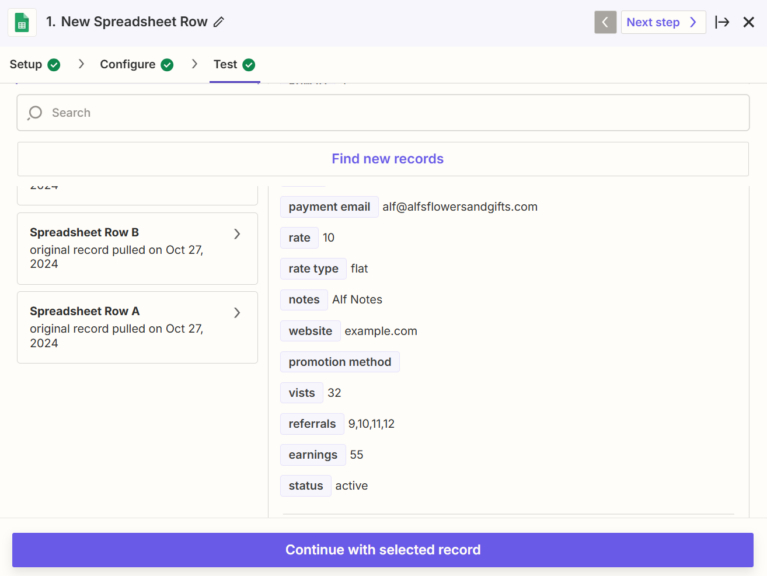
Click Continue and then we’ll add the action.
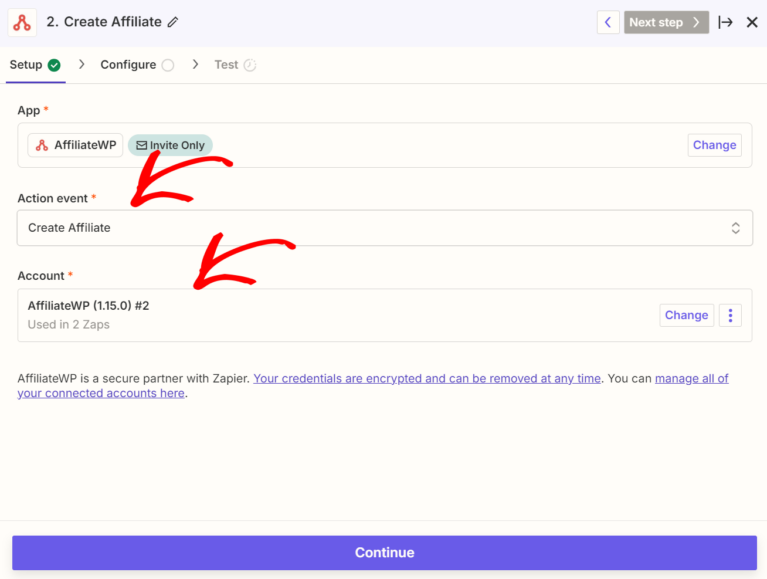
Just like Zapier triggers, there are many options here. For this example, we’re going to use Create Affiliate, because we want to create an affiliate on your site any time a spreadsheet row is created in the previously-selected Google Sheets spreadsheet.
Available actions are:
- Create Payout – Creates a payout in AffiliateWP.
- Update Visit – Updates a visit in AffiliateWP.
- Create Visit – Creates a visit in AffiliateWP.
- Create Affiliate – Creates an affiliate in AffiliateWP. This also creates the required WordPress user account. Payment email is required.
- Delete Creative – Deletes the specified creative in AffiliateWP.
- Create Referral From User ID – Creates a referral in AffiliateWP.
- Create Referral From Username – Creates a referral in AffiliateWP.
- Create Affiliate From User ID – Creates an affiliate from an existing WordPress User ID. An existing WordPress User ID must be specified.
- Delete Visit – Deletes the specified visit in AffiliateWP.
- Create Referral From Affiliate ID – Creates a referral in AffiliateWP.
- Create Creative – Creates a creative in AffiliateWP.
- Update Referral – Updates a referral with the specified data.
- Update Affiliate – Updates an affiliate account with the specified data.
- Delete Referral – Deletes a referral.
- Update Payout – Updates a payout with the specified data.
- Delete Payout – Deletes a payout.
- Delete Affiliate – Deletes an affiliate.
- Update Creative – Updates a creative in AffiliateWP.
Select the Create Affiliate trigger, click Continue, and connect your AffiliateWP account using the same method noted above.
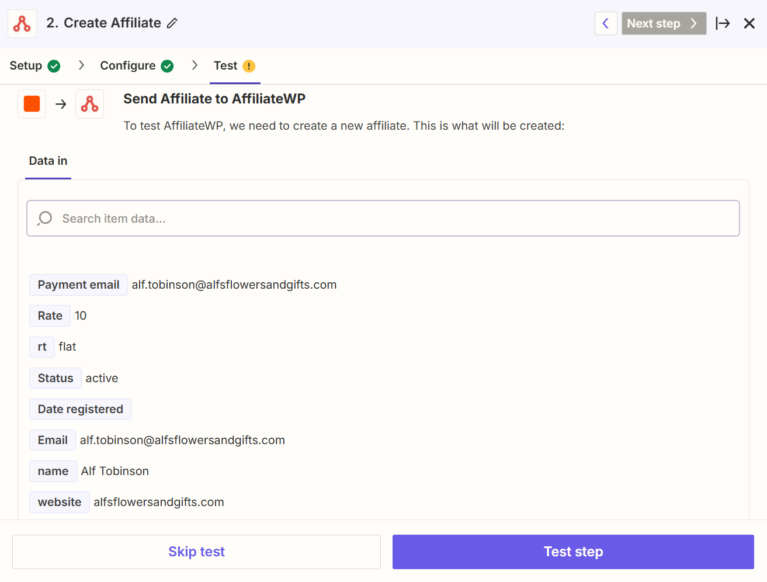
Now we’ll need to map fields from the Google spreadsheet to the matching AffiliateWP fields. Select each field you’d like to be sent to AffiliateWP, to be used when creating an affiliate.
Here, you can specify the username, if you like. If not, the payment email will be used to generate the username. Please note that the payment email field is required:
Note: The payment email field is required when creating Affiliates through Zapier.
Now Zapier will again ask if you’d like to test this step.
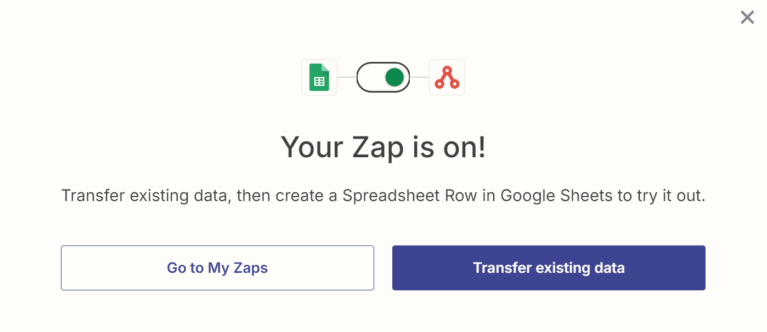
Test things out, if you like, then the zap is ready to Publish.
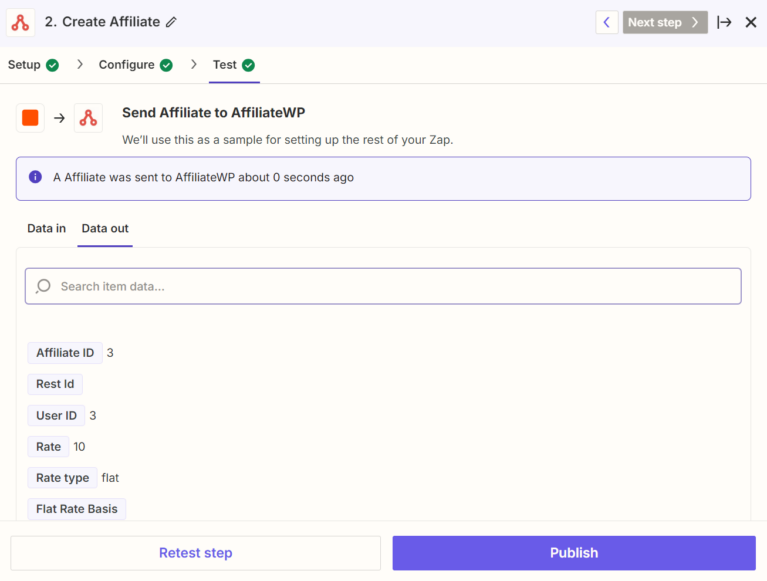
After clicking Publish Zap, you will see a confirmation stating that your Zap is “on”.
T
To test the zap at any time, you can create a new spreadsheet row in your Google spreadsheet. Zapier will detect it either every five minutes, or every fifteen minutes, depending on the type of account you have.
Actions, Example Two: Updating an Affiliate when a Subscriber is Updated in MailChimp
If you’ve followed the first actions example above, now affiliates can be created from any Zapier trigger. That’s great, but what if data for an affiliate changes? How will AffiliateWP have accurate information? By using another zap to update the affiliate, that’s what we review below.
In this example, we’ll create a MailChimp trigger, and then use a different AffiliateWP action – the Update Affiliate action.
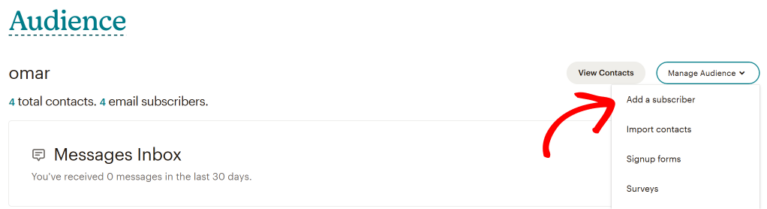
Create an account (or log in to an existing account) at mailchimp.com.
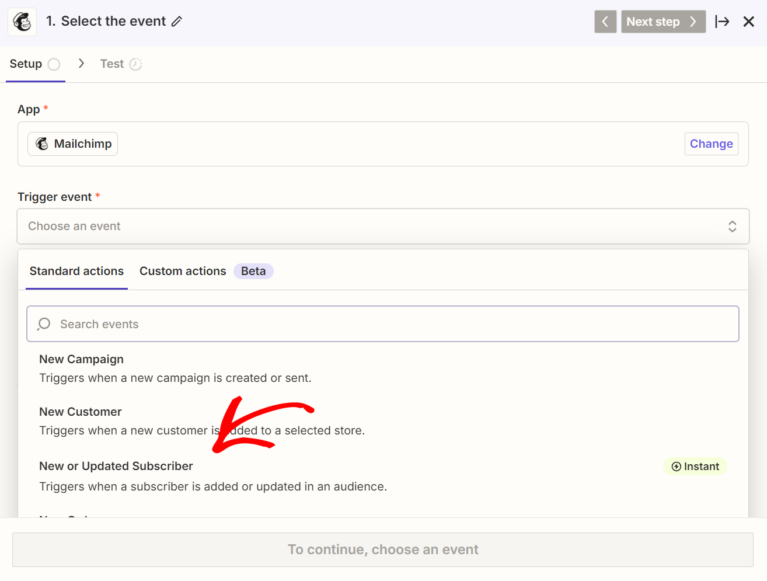
Select MailChimp as the trigger source, and select Updated Subscriber as the trigger:
Click Continue, then connect your Zapier account to your MailChimp account:

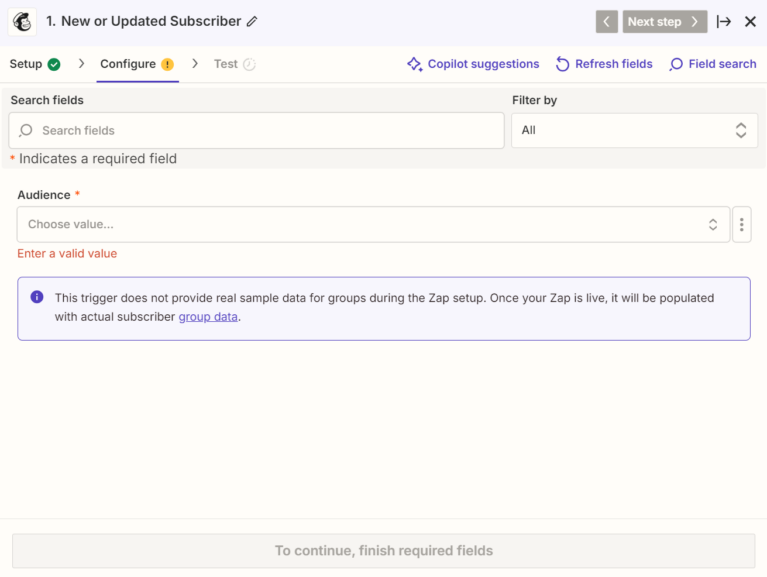
Click Continue, then select your desired list/audience:
An important note about custom fields
Before going further, let’s take a moment to explore what information is required by AffiliateWP for the Update Affiliate action, what fields are available in your MailChimp list already, and discover how to add some new custom fields within MailChimp.
By default, any subscribers imported into MailChimp will only have fields which are already defined in MailChimp imported. These are usually first name, last name, and email address.
AffiliateWP requires either the Affiliate ID or the associated WordPress user ID in order to update an affiliate. Make sure to define this field in MailChimp.
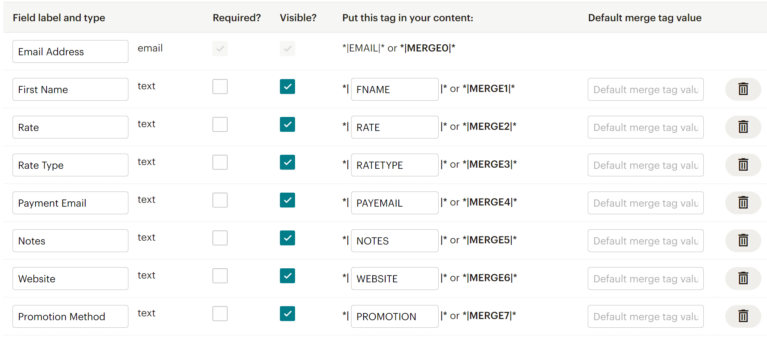
If, for example, you wished to import the affiliate rate, or status, or other information into MailChimp, you’ll get a notice indicating that the fields must be skipped, since there’s no MailChimp field in which to place it:
However, you can create as many custom fields as you like, by going to Settings » Audience fields and *MERGE* tags in the selected lists menu:
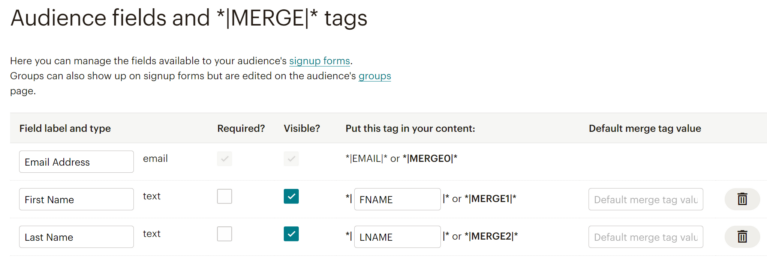
At a minimum, create the Affiliate ID field (or a field to provide the associated WordPress user ID of the affiliate):
With the exception of the Affiliate ID (or associated WordPress user ID), which is a required field for the Update Affiliate action (noted above), you don’t need to create any additional custom fields in MailChimp in order to use it with AffiliateWP, but it sure makes it a lot more powerful.
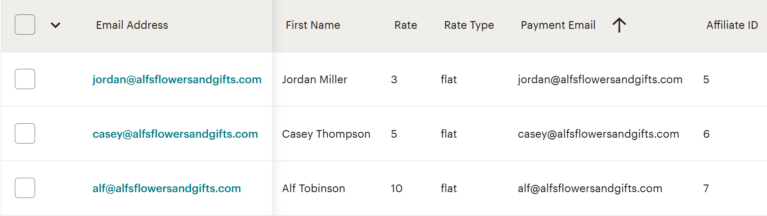
We use this very zap here at AffiliateWP every day, which helps us keep affiliate information updated in multiple places, automatically. Here’s an example of fields you may choose to include – which are all listed when creating a zap in Zapier:
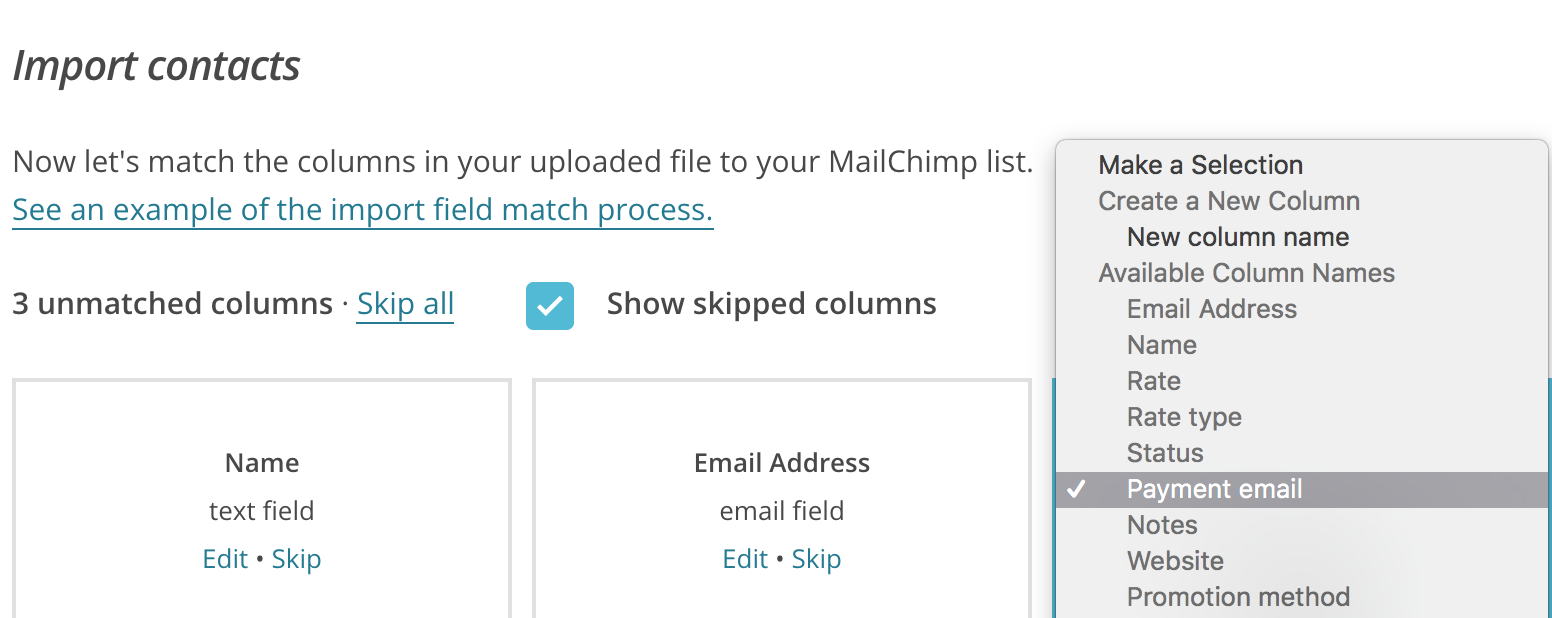
When importing subscribers, the newly created fields will now be available to map. You can also create new field columns here as well, if you like:
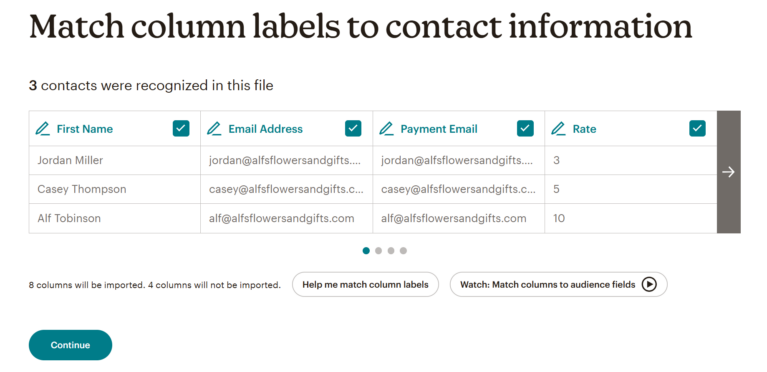
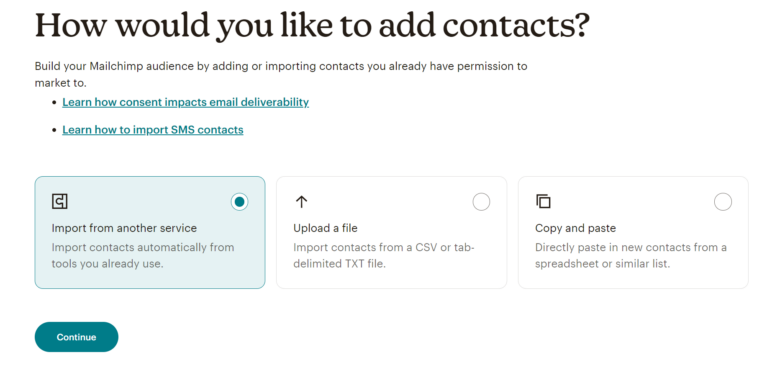
Once you have the list how you’d like it, if it’s a new list, you’ll need to import subscribers.
Import a single subscriber:
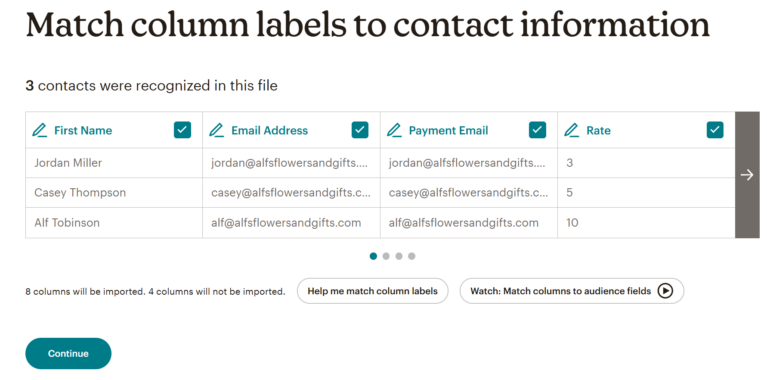
Import multiple subscribers:
You’ll get something like the screenshot below once you’re done. Click Finish when you’re ready to import the list.
Now let’s connect the MailChimp data to AffiliateWP. Zapier will again ask if you’d like to test your step before continuing.
Notice that for any custom MailChimp fields you’ve created, they’ll be prepended with merges__, which is followed by your custom field name.
Make sure that the Affiliate ID (or associated WordPress user ID for the affiliate) is being seen by Zapier

Make sure that the Affiliate ID (or associated WordPress user ID for the affiliate) is being seen by Zapier
Click Continue, then select AffiliateWP as the Action App:
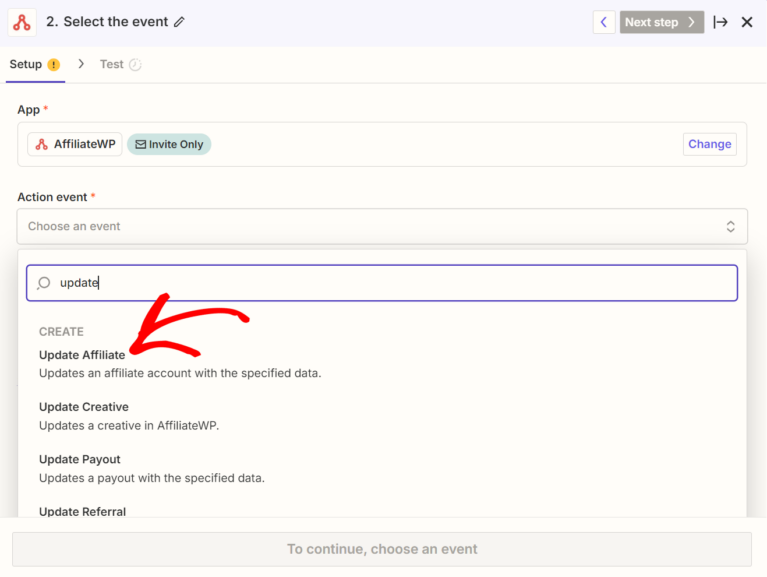
Choose Update Affiliate as the action, and connect your AffiliateWP account as noted above.
Map the Affiliate ID field you set up in MailChimp to the corresponding AffiliateWP required field, and click Continue.
Zapier will ask if you’d like to test this step as well. Test if you like, then create the zap! Like the other examples, this can be triggered either every five minutes, or every fifteen minutes, depending on your Zapier.com account plan.
T
Troubleshooting Zapier Connection Errors
If you’re receiving an error like this when attempting to connect your site to Zapier, see below for tips on how to solve it:
First, check that the Zapier addon is installed and activated. You will receive this error if, for example, the plugin is installed but not activated. The name of the plugin will show as AffiliateWP – Zapier – Automated Tasks.
Next, verify that your Public Key and Token values were entered correctly. These can be found in AffiliateWP » Tools, and click on the API Keys tab.
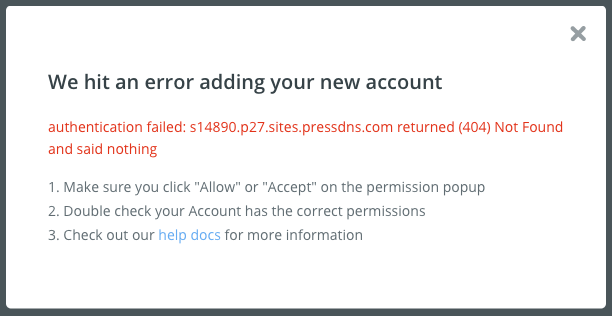
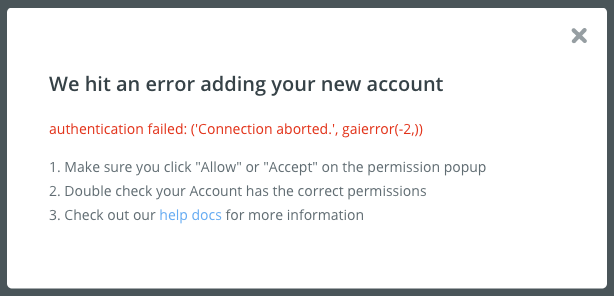
Also check that your Site URL was entered correctly. If not, you might see error messages such as these:
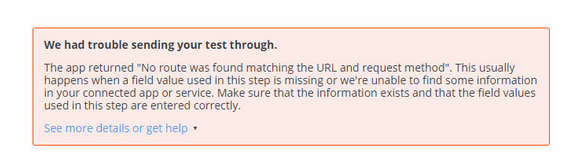
You may run into the following error which means you need to install and activate the REST API Extended Pro addon:
Other Tips to Investigate
- An IP is being blocked possibly by a conflict from another plugin.
- Your host is blocking the IP Zapier wants to use.
- Or, your host might be disabling remote authentication. To find out, can you ask your host if remote HTTP authentication is disabled in any way on your site, such as
$_SERVER['PHP_AUTH']? - Zapier has a troubleshooting document that can assist from their side of things: https://zapier.com/help/troubleshoot/behavior/cant-access-or-use-zapier-with-other-apps
Note: For GoDaddy hosting accounts: Enter the following rules at the top of your .htaccess file, after the first instance of RewriteEngine On . If you need assistance in how to edit this file, please contact GoDaddy support.
RewriteCond %{HTTP:Authorization} ^(.)
RewriteRule ^(.) - [E=HTTP_AUTHORIZATION:%1]
If you are not able to resolve the error after trying the above steps, please get in touch with our support team for additional help!
Frequently Asked Questions
How does the Zapier addon work?
The addon allows you to connect AffiliateWP with over 700 apps via Zapier, using triggers (data sent from AffiliateWP) and actions (tasks performed by Zapier).
What are triggers and actions in the context of AffiliateWP and Zapier?
Triggers send data from AffiliateWP to Zapier when specific events occur (e.g., new affiliate registered). Actions perform tasks in other apps based on the data received from AffiliateWP.
Can I use Zapier to update AffiliateWP data?
Yes, actions can be set up to create, update, or delete affiliates, referrals, payouts, etc., in AffiliateWP.
What are some common issues when connecting to Zapier and how can I troubleshoot them?
Common issues include the addon installed but not activated, incorrect API keys or site URL. Checking these settings and ensuring that the REST API Extended Pro addon is installed are good first steps in troubleshooting.
That’s it! To conclude, the Zapier addon transforms the way you manage your affiliate program by automating workflows between AffiliateWP and over 700 other applications. This integration not only simplifies the process of managing affiliates, referrals, visits, creatives, and payouts, but also enhances the efficiency of your affiliate program.