Are you looking for a way to customize your affiliate dashboard by adding extra content and organizing the layout? The Affiliate Area Tabs addon for AffiliateWP allows you to add custom tabs to the Affiliate Area. This feature makes it simple to manage affiliate-related information while enhancing the user experience.
In this guide, we’ll walk you through the steps to install, configure, and manage the Affiliate Area Tabs addon.
The Affiliate Area Tabs addon is available with all the license levels of AffiliateWP.
Installing the Affiliate Area Tabs addon
Before we get started, be sure to install and activate AffiliateWP on your WordPress site.
Once you’ve got AffiliateWP installed and your license is verified, you’ll be able to quickly install and activate the Affiliate Area Tabs Addon.
Configuring Affiliate Area Tabs
Once you have installed the Affiliate Area Tabs addon, you can manage and customize the affiliate tabs by adding new ones, hiding default tabs, reordering them, or deleting them as needed. To get started, navigate to AffiliateWP » Settings and click on the Affiliate Area Tabs tab.
Adding a Custom Tab
To personalize the Affiliate Area further, you can add custom tabs that link to specific WordPress pages. Begin by clicking the Add New Tab button.

Enter the Tab Title (the name that will appear in the affiliate area) and select a page from your existing WordPress pages in the Tab Content field. Make sure you’ve already created the page in WordPress before assigning it to the tab. Only affiliates will be able to see the content on this page, while non-affiliates will be redirected to the affiliate login page.
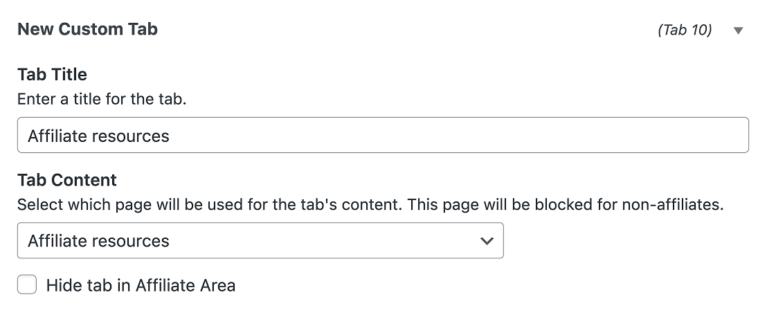
Repeat the process to add more tabs, then click Save Changes to finalize your setup.
Reordering Tabs
To rearrange the order of your tabs, use the drag-and-drop feature. Simply click on the arrow icon next to a tab and move it to the desired position. When you’re satisfied with the order, click Save Changes.

Deleting a Custom Tab
To delete a tab, click on the tab to expand its settings, then select Delete tab. Confirm the deletion in the pop-up window. Once deleted, the tab will no longer appear in the Affiliate Area. Don’t forget to save your changes.

If you’re using WooCommerce, avoid adding the My Account page as a custom tab. Doing so will cause all traffic to be redirected to the affiliate login page.
Hiding a Default Tab
If you want to hide any of AffiliateWP’s default tabs, expand the tab by clicking on it, then check the box labeled Hide tab in Affiliate Area and click the save changes button.

Viewing Custom Tabs in the Affiliate Area
Once you’ve added or modified the tabs, affiliates will be able to see them in the Affiliate Area. This page is defined as the Affiliate Area in AffiliateWP » Settings » General. Ensure you’re logged in as an affiliate or have added yourself as an affiliate to see the tabs as they appear to affiliates.

Frequently Asked Questions
Why aren’t my new tabs showing up in the Affiliate Area?
If you’ve added custom tabs and they aren’t showing, make sure you’re logged in as an affiliate or have assigned affiliate status to your user account. Only affiliates can view these tabs.
How do I reorder the default tabs?
Default tabs can be reordered just like custom tabs. Simply drag and drop them into the desired position using the arrow icon next to each tab, then click Save Changes.
Can I use the Affiliate Area Tabs addon with the Affiliate Portal addon?
No, if the Affiliate Portal addon is active, the Affiliate Area Tabs content won’t be visible. You’ll need to use the custom menu links feature in Affiliate Portal to add tabs.
My tabs aren’t being displayed in the correct language. What’s happening?
If you’ve changed your site language after setting up Affiliate Area Tabs, the default tabs from AffiliateWP may still appear in the old language. To fix this, update to the latest version of Affiliate Area Tabs and re-save the settings screen to force a re-translation of the tab titles (provided a translation file exists for your new language).
That’s it! With the Affiliate Area Tabs addon, you can create a more dynamic, organized, and customized Affiliate Area for your users. By adding, hiding, or deleting tabs, you’re able to present valuable content that’s easy for your affiliates to navigate.