Skip to content
AffiliateWP

AffiliateWP

Join 30,000+ Smart Business Owners who use AffiliateWP to Grow Their Revenue, FASTER!

Get AffiliateWP
See all Features
  • Features
    • Advanced Affiliate Tracking
    • 1-Click Payouts
    • Affiliate Growth Tools
    • Custom Affiliate Dashboard
    • Smart Commission Rules
    • Easy Setup
    • See all Features →
  • Integrations
    • WooCommerce
    • Easy Digital Downloads
    • PayPal
    • WPForms
    • MemberPress
    • GiveWP
    • See all Integrations →
  • Pricing
  • Help Center
    • Documentation
    • Support
  • Testimonials
  • Blog
  • Log In
  • Get AffiliateWP

Automatically add affiliates to MailChimp with Zapier

Last updated on October 2, 2020 by Lisa Gibson
FacebookTweetLinkedInEmail

Zapier can help you automate hundreds of web-based processes for your website. In this post we’ll show you how to set up Zapier to automatically add your affiliates to a mailing list in MailChimp, so you can start communicating with them more effectively.

Zapier is an extraordinary tool that takes the hassle out of managing your web-based processes. Developed and supported by a team who believe computers should do more work, Zapier helps you streamline your business by automating processes for more than 750 web applications.

Trust us when we say Zapier is supremely powerful. We even use it ourselves! It helps us make our affiliate program more efficient, and now you can use it alongside AffiliateWP too.

As we know, communicating with your affiliates is imperative to running a successful affiliate marketing program. It can help them promote your business and products more effectively. One of the easiest ways to communicate with your affiliates is via email, but first, you need to organize your affiliates into a separate mailing list so you can send them affiliate-specific emails. AffiliateWP’s pro add-on for Zapier makes it extremely easy to do this.

How Zapier works

Zapier works by connecting two or more web apps to perform specific processes. An integration between two apps is called a “Zap“. A Zap consists of a Trigger and one or more Actions or Searches.

When the Trigger takes place in one app, Zapier will automatically perform the Actions or Searches in another app, as defined by the user.

Below are some quick definitions of a Trigger, an Action and a Search:

  • A Trigger is a process performed by the first app. In AffiliateWP, for example, this might be a New Visit, a New Affiliate, or a New Referral.
  • An Action is a process that occurs in the second app after a specific trigger fires. For example, for a New Visit trigger, you might set up an Action to create a new row in a Google Sheets spreadsheet with the visit data. For a New Affiliate trigger, you might set up an Action to post a message in Slack. For a New Referral trigger, you might set up an Action to email your team of managers via Gmail.
  • A Search is also a process that occurs in the second app after a specific trigger fires. For example, for a New Affiliate trigger, you might set up a search to find if that affiliate is an existing subscriber in your primary MailChimp mailing list.

Creating a Zap to import affiliate data from AffiliateWP into MailChimp

Let’s look at how you can use Zapier to automatically add new affiliates to a mailing list in MailChimp once they have registered and been approved, or are manually added in AffiliateWP.

To set this up you’ll need:

  • An AffiliateWP Professional license (or historical Ultimate license)
  • The Zapier for AffiliateWP pro add-on (ensure you have installed and activated the add-on)
  • A Zapier account
  • A MailChimp account (or other email marketing service account).

If you already have a Professional or Ultimate AffiliateWP license, you can download the Zapier for AffiliateWP pro add-on from your Account page.

Let’s get started!

Step 1: Create a test affiliate account

Setting up a test affiliate account will allow you to test Zapier is working correctly without sending a test email to a live affiliate account.

  1. To create a new test affiliate, go to Users → Add New in the WordPress admin, and populate the fields under Add New User.
  2. Tick the Skip Confirmation Email option checkbox, and two new options will appear; Add as Affiliate and Disable Affiliate Email.
  3. Tick the checkboxes next to each of these options to create an active affiliate test account and disable the Affiliate Application Accepted email.
  4. Click the Add New User button to create this user.

Create a test affiliate account

Ensure your test affiliate’s status is active by visiting Affiliates → Affiliates in your WordPress admin. If the affiliate’s status is active, you can move on to the next step. If the affiliate’s status is pending, hover over their name and click Accept to set their status to active.

Step 2: Zapier login and beta access to AffiliateWP app

  1. Log in to Zapier.
  2. While this Zapier app is in Beta, you’ll need to use our invite code to add the AffiliateWP Zapier app to your Zapier account. Click here to accept an invite for the AffiliateWP Zapier app.
  3. Click the Accept Invite & Go To Dashboard button. You’ll now have access to the AffiliateWP app.
  4. In your Zapier dashboard, click the MAKE A ZAP! button.

Make A Zap

Step 3: Name your Zap

Give your Zap a name in the top left-hand corner of the Zap editor screen. We recommend naming it something that clearly explains the action it performs. For example, “Add Affiliate from AffiliateWP to MailChimp List”.

Name your Zap

Step 4: Select AffiliateWP as your Trigger app

Use the search bar to find AffiliateWP, and click on the search result for AffiliateWP. AffiliateWP will be your Trigger app.

Choose your Trigger App

Step 5: Select a Trigger

Now, you can choose your Trigger process. As you will see there are multiple Triggers you can use within AffiliateWP. Select the New Affiliate Trigger. Click Save + Continue.

Select a Trigger

Step 6: Connect AffiliateWP to Zapier

In this step, you’ll connect AffiliateWP to Zapier. Click the Connect a New Account button. A popup window will open and prompt you for three things: your Public Key, your Token Key, and your Site URL.

Connect AffiliateWP to Zapier

You can find your Public Key and your Token Key by logging into your WordPress admin, and going to the Affiliates → Tools → API Keys tab.

API tab in AffiliateWP Tools

If you haven’t yet generated any API Keys, simply start typing your WordPress username into the Enter username field, select your username, and click the Generate New API Keys button.

AffiliateWP will then generate three different keys. You will only need the Public Key and the Token Key for Zapier.

AffiliateWP API Keys

In the Zapier popup window, copy and paste your Public Key from AffiliateWP into the Public Key field. Then, copy and paste your Token Key from AffiliateWP into the Token Key field. Finally, type in your exact site url (with your exact domain protocol, e.g. https:// or http://) into the Site URL field. Click the Yes, continue button in the popup to save this data, and then click Save + Continue in the main Edit Zap dashboard.

Enter AffiliateWP's API keys into Zapier

Step 7: Test AffiliateWP’s connection to Zapier

You can now test that Zapier is correctly fetching data from AffiliateWP. Click the Fetch & Continue button. Zapier will fetch the details of the latest affiliate who was accepted (the test affiliate you set up in Step 1).

Test AffiliateWP is connected

If an affiliate was successfully found, you’ll see the green “Test successful!” bar, and you’ll also be able to see their affiliate account details by clicking the view your affiliate link underneath the green “Test successful!” bar. If everything looks good, click the Continue button.

AffiliateWP test successful

Step 8: Choose your Action app

You’re ready to set up your Action app. For this example we are searching for MailChimp. Search for MailChimp, or if it appears in the Popular Apps section, click on the MailChimp logo to select it as your Action app.

Choose your Action app - MailChimp

Step 9: Choose your Action

To add a new affiliate/subscriber to a mailing list, select the Add/Update Subscriber action.

Select the MailChimp Action

Step 10: Connect Zapier to MailChimp

Click the Connect a New Account button. You’ll see another popup and be prompted to login to MailChimp with your username and password. This will connect Zapier to MailChimp. Enter your details and click Log In.

Connect Zapier to MailChimp

You can then test that the connection between Zapier and MailChimp has been established correctly by clicking the Test button back on the Select MailChimp Account page. If the test is successful, you’ll see a “Success!” message. Click Save & Continue.

MailChimp Test Successful

Step 11: Set up the Action Template for MailChimp

You can now set up your the Action Template for the Add/Update Subscriber action in MailChimp. This will template the processes to run in MailChimp for all future approved/added affiliates.

  • Under List, choose an existing mailing list to use for affiliates, or create a new list
  • Under Subscriber email, select the Email field
  • Under Double Opt-In, you can choose whether or not to enable a confirmation email to the affiliate
  • Under Update Existing, you can choose whether to update an existing affiliate’s email address if they have changed
  • Under Replace Groups, you can choose whether to update/overwrite an affiliate’s existing groups
  • Under Group, you can choose to add your affiliates to a group (if you have a general mailing list with all subscribers, we recommend using a group to separate your affiliates)
  • Under First Name, select the First Name field
  • Under Last Name, select the Last Name field. Selecting these name fields will allow you to use merge tags in your emails to address your affiliates by name.

When you’ve finished, click the Continue button.

Setup the MailChimp Action Template

Step 12: Test the MailChimp Action

At this point you can choose to test the action or skip the test and continue. We recommend testing the action so you can see it is working correctly with your test affiliate data. Check the options you have set up, and click Create & Continue to test that the Zap correctly imports the affiliate’s data into MailChimp.

Test MailChimp Action in Zapier

If the affiliate’s data was successfully imported into MailChimp, you’ll see the green “Test successful!” bar, and you’ll also be able to see the affiliate’s MailChimp subscriber data by clicking the view your affiliate link. If everything looks good, click the Finish button.

MailChimp Action successful

Your new Zap will be shown as off:

Zap off

So hit that toggle and turn it on!

Turn Zap on

When a live Zap occurs, the affiliate will be added to MailChimp anywhere between 5 to 15 minutes after they have been accepted (depending on your Zapier plan). This short time delay is not an issue at all, but if you’d like to guarantee that your Zaps are processed every 5 minutes, you can upgrade to a premium Zapier plan.

Aaaand that’s it! You’re done! Super easy, right?

Making the most of your ‘Affiliates’ mailing list

When your Zapier integration is set up and your affiliates are being automatically added to a mailing list, you’ll be able to communicate with your affiliates more effectively. Here are some ideas on how you can use MailChimp to communicate with your affiliates:

  • Create an automation to send your affiliates a custom “Welcome!” email once they are added to an affiliate-only mailing list
  • Create an automation with a series of follow-up emails spread over a period of time, educating your affiliates about your business
  • Create affiliate-only campaigns to notify your affiliates about upcoming sales or promotions, or to let them know about updates and changes to your affiliate program
  • Add your affiliates to existing RSS feeds or campaigns so they can stay up to date with your website and company news, learn about new products, view showcases on existing products, and more.

Whilst this particular post focuses on setting up MailChimp, the process will be similar for other email marketing platforms. Not using MailChimp? Browse the hundreds of web applications and various email marketing services that integrate with Zapier to find your favorite apps: Zapier-supported applications.

Happy Zapping!⚡️

Updated: October 2nd, 2020

Add a Comment Cancel Reply

We're glad you have chosen to leave a comment. Please keep in mind that all comments are moderated according to our privacy policy, and all links are nofollow. Do NOT use keywords in the name field. Let's have a personal and meaningful conversation.

2 comments on “Automatically add affiliates to MailChimp with Zapier”

  1. Rolemodelx Impact says:
    January 10, 2017 at 11:20 am

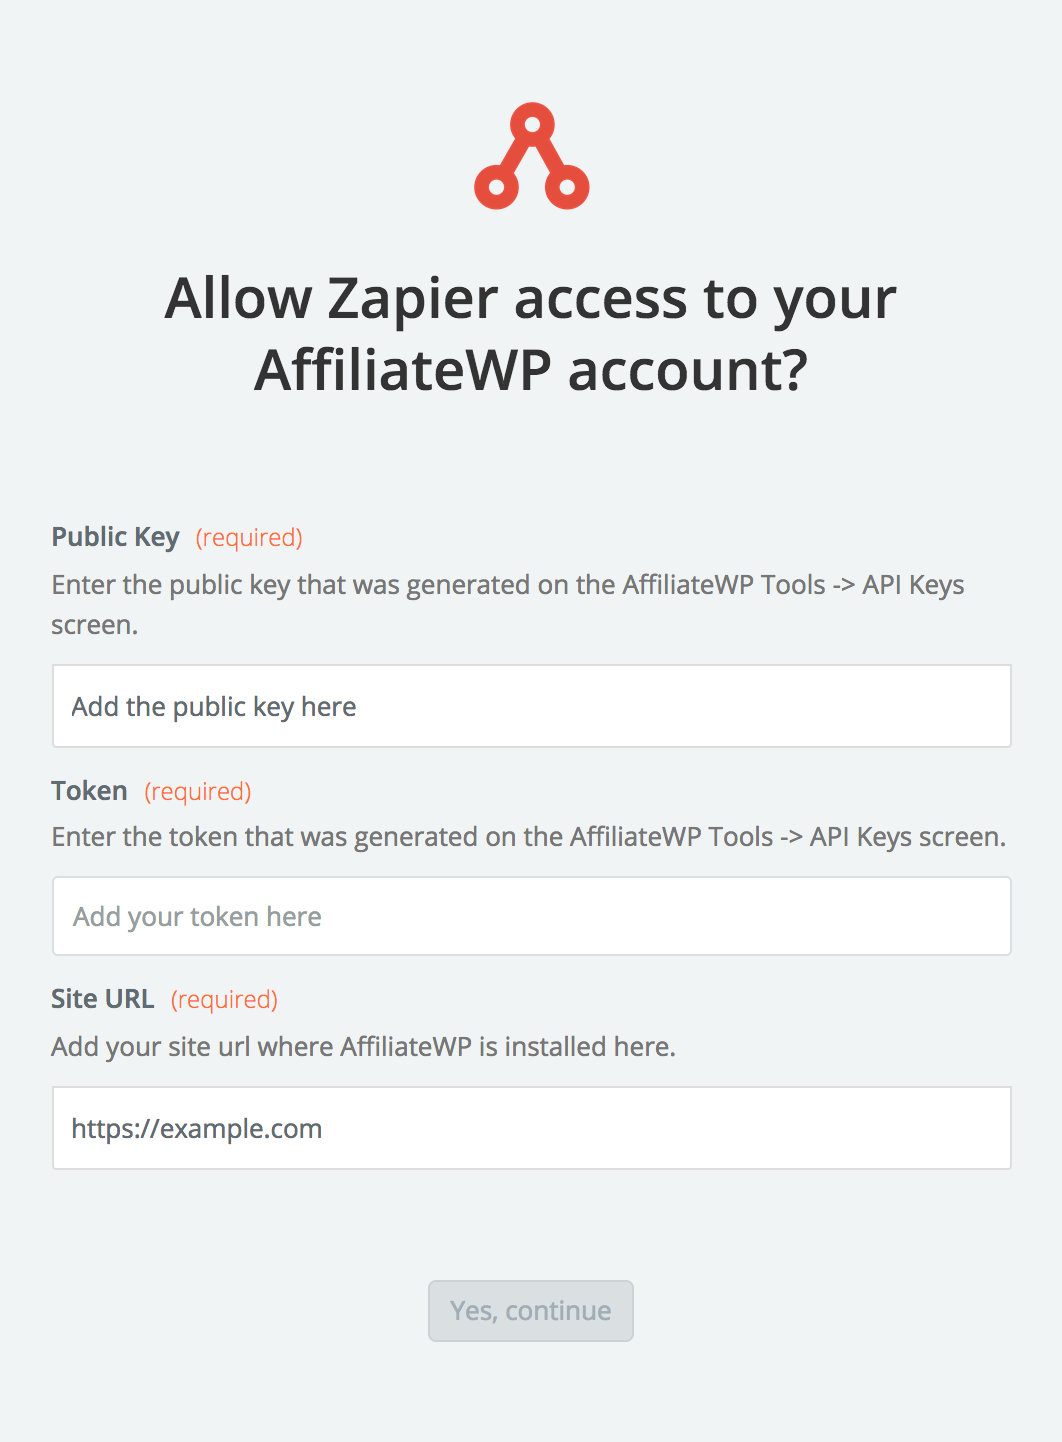
    I could not find AffiliateWP on Zapier

    Reply
    1. Pippin Williamson says:
      January 10, 2017 at 1:02 pm

      See our documentation here: http://docs.affiliatewp.com/article/1478-zapier-setup-and-configuration

      You need to click the invite link on that page in order to access it.

      Reply
AffiliateWP

Get the #1 Most Powerful WordPress Affiliate Plugin Today

Join 30,000+ Smart Business Owners Who Use AffiliateWP to Grow Their Revenue, FASTER!

Get AffiliateWP Now
  • 5 Proven Ways to Stop Form Spam in WordPress
  • Affiliate Marketing vs Lead Generation, What’s the Difference?
  • 5 Best Affiliate Fraud Detection Software for WordPress
  • How to Enable Google Analytics Video Play Tracking in WordPress?
  • How to Set Up Referral Tracking On WPForms

Connect with us:

  • Facebook
  • Twitter

Start Getting More Sales Today with AffiliateWP

Launch your affiliate program today and unlock a new revenue channel to grow your business faster.

Get AffiliateWP Now

Company

  • About
  • Press
  • Testimonials
  • Blog
  • Contact
  • Affiliates
  • Careers
  • Twitter
  • Facebook

Powerful Affiliate Features

  • Easy Setup
  • Advanced Affiliate Tracking
  • Smart Fraud Detection
  • Powerful Affiliate Management
  • Detailed Affiliate Reports
  • 1-Click Payouts
  • Custom Affiliate Dashboard
  • Smart Commission Rules
  • Unlimited Creatives
  • Affiliate Growth Tools
  • Fully Internationalized
  • Fully Customizable

Helpful Links

  • Support
  • Documentation
  • Integrations
  • WordPress Hosting
  • Start a Blog
  • Make a Website
  • Start a Store

Use Cases Section

Ecommerce Affiliate Software for:

  • WooCommerce
  • PayPal
  • WP Simple Pay
  • Easy Digital Downloads

Membership Affiliate Software for:

  • MemberPress
  • Paid Memberships Pro
  • LifterLMS
  • Restrict Content Pro
  • MemberMouse

Form Referral Tracking Software for:

  • WPForms
  • Formidable Forms
  • Gravity Forms
  • Ninja Forms
  • Contact Form 7

Our Brands

Connect with us

  • Twitter
  • Facebook
  • YouTube

Awesome Products Start with an Awesome Team.

Over 20 million sites use our software. We believe in creating awesome user experiences. Whatever the market conditions or current trends, you will always find Awesome Motive leading the way to help our customers gain competitive business advantage and stay ahead of the curve.

  • WPForms
  • OptinMonster
  • MonsterInsights
  • WP Mail SMTP
  • RafflePress
  • SeedProd
  • TrustPulse
  • AIOSEO
  • Smash Balloon
  • Easy Digital Downloads
  • WP Simple Pay
  • PushEngage
  • SearchWP
  • WPBeginner

Copyright ©  Sandhills Development, LLC.

Terms of Service
Privacy Policy
FTC Disclosure
Sitemap
AffiliateWP Coupon
wpbeginner verified

Share this ArticleLike this article? Email it to a friend!

Email sent!