Would you like to give your affiliates the ability to personalize their referral URLs? The Custom Affiliate Slugs addon allows affiliates to create their own unique “slug,” which is the part of the referral URL that would typically display the affiliate’s username or ID. By allowing custom slugs, affiliates can make their referral links more memorable and easier to share, providing a personalized touch to their marketing efforts.
In this guide, we’ll walk you through how to install and set up the Custom Affiliate Slugs addon for AffiliateWP, so your affiliates can start customizing their URLs.
In This Article
- Installing the Custom Affiliate Slugs Addon
- Setting up Custom Affiliate Slugs
- Setting the Default Referral Format
- Per-Affiliate custom slugs
- Changing an existing affiliate's slug as an admin
- Adding a custom slug while adding a new affiliate
- Exporting a .CSV file of affiliates and their custom slugs
- Adding a custom slug as an affiliate
- Frequently Asked Questions
You will need a Pro license to access the Custom Affiliate Slugs addon.
Installing the Custom Affiliate Slugs Addon
Before we get started, be sure to install and activate AffiliateWP on your WordPress site.
Once you’ve got AffiliateWP installed and your license is verified you’ll be able to quickly install and activate the Custom Affiliate Slugs addon.
Setting up Custom Affiliate Slugs
To configure the Custom Affiliate Slugs settings navigate to AffiliateWP » Settings and then click on the Custom Affiliate Slugs tab.
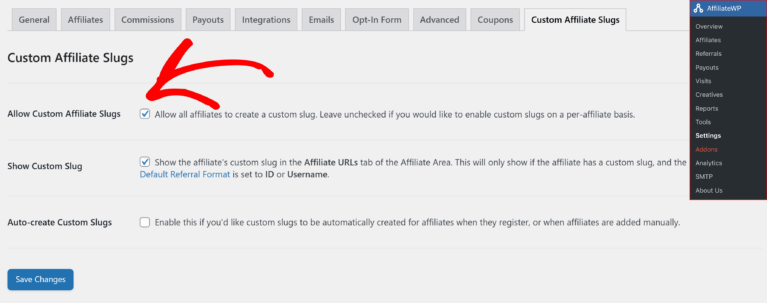
Allow Custom Affiliate Slugs
Enable this option if you’d like all affiliates to be able to add a custom slug. Leave this option unchecked if you only want to enable custom slugs on a per-affiliate level (see below).
Show Custom Slug
If your Default Referral Format in AffiliateWP » Settings » Affiliates is set to ID or Username you can enable this option and the affiliate’s custom slug (if they have one) will be shown on the Affiliate URLs tab of the Affiliate Area, (however the URL generator will continue to work only for the ID or Username). If you set the Default Referral Format to Custom Affiliate Slug, the affiliate ID or Username will not be shown, the affiliate’s custom slug will be shown in place of their ID and username, plus they will be able to use the URL generator to generate a referral URL with their slug in it.
Auto-create Custom Slugs
Enable this option if you’d like custom slugs to be automatically generated for your affiliates when:
- An affiliate registers via the affiliate registration form
- The Auto Register New Users option is enabled from AffiliateWP » Settings » Affiliates and a user is automatically registered as an affiliate
- An affiliate is added manually via the AffiliateWP » Affiliates » Add New screen
When this option is enabled an Auto-create Slug Settings section will appear with the following options:

Slug Preview
This will show the admin an example of what an automatically generated slug could look like. This preview will dynamically update as you alter the slug type and slug length as mentioned below.
Slug Type
Choose between an alphanumeric (letters and numbers) or alphabetic slug (letters only).
Custom slugs can be all lowercase, all uppercase, or sentence case (a mix of both lowercase and uppercase) letters.
Slug Length
Set the length of a newly generated slug (the maximum length is 60 characters as per WordPress’ default username standards).
Setting the Default Referral Format
If you’ve been using AffiliateWP for some time, we’ve added settings to make Custom Affiliate Slugs more seamless without disrupting your affiliates’ experience.
If your default referral format is set to ID or Username, this is what affiliates will be used to seeing in the Affiliate URLs tab of the Affiliate Area. By enabling the Show Custom Slug option in AffiliateWP » Settings » Custom Affiliate Slugs, the affiliate will still see their ID or username as normal, however, they will also now see their custom slug, and a custom slug URL they can use above their ID or username. If they use the URL Generator, this will continue to generate a URL for the affiliate using their ID or username (depending on which default referral format you have set).
When you install and activate Custom Affiliate Slugs, a new Custom Affiliate Slug option will also appear in the Default Referral Format dropdown in the AffiliateWP » Settings » Affiliates tab. This allows you to show an affiliate their referral URL with their custom slug, rather than the ID or username. The affiliate will also be able to generate a referral URL using the generator with their custom slug (their ID or username will not be visible).

- Go to AffiliateWP » Settings » Affiliates tab of the settings
- Scroll down to the Default Referral Format dropdown menu and select Custom Affiliate Slug
- Click the Save Changes button at the bottom of the page
Once this option is enabled, the URL shown in the Affiliate URLs tab of the Affiliate Area will include the affiliate’s custom slug. If an affiliate does not have a custom slug, or they remove it themselves, it will fallback to showing their username as the default referral format.
Per-Affiliate custom slugs
As an admin, you can allow specific affiliates to create custom slugs on a per-affiliate basis. To do this, navigate to AffiliateWP » Affiliates, select the affiliate from the list, and enable the Allow Custom Slug checkbox. Click Update Affiliate to save your changes.

In order to allow custom slugs on a per-affiliate basis, Allow Custom Affiliate Slugs must be disabled in AffiliateWP » Settings » Custom Affiliate Slugs.
Changing an existing affiliate’s slug as an admin
If you need to modify an affiliate’s custom slug, go to the AffiliateWP » Affiliates screen and click on the affiliate’s name. In the Custom Slug field, you can either enter a new slug or remove the current one. Once the changes are made, a confirmation checkbox will appear after the slug validation passes. Click Update Affiliate to save the new custom slug.

Adding a custom slug while adding a new affiliate
When adding a new affiliate, you can specify a custom slug directly from the Add New Affiliate screen. Go to AffiliateWP » Affiliates and click the Add New button. After selecting the user and filling in the necessary details, enter the custom slug in the Custom Slug field.

If no slug is entered, and you have enabled the Auto-create Custom Slugs option, a slug will automatically be generated.
Exporting a .CSV file of affiliates and their custom slugs
As an admin, you can export a .CSV file that includes a list of all affiliates and their corresponding custom slugs. To do this, go to AffiliateWP » Tools and click on the Export/Import tab. Under Export Affiliates, choose the affiliate status you want to export, then click Export. A prompt will appear to download the .CSV file, which will contain a new column titled Custom Slug.
If the Allow Custom Affiliate Slugs option is enabled or a per-affiliate custom slug is enabled, affiliates can change their slug at any time.
Adding a custom slug as an affiliate
Affiliates can create their own custom slug directly from the Affiliate Area by navigating to the Settings tab. In the Custom Affiliate Slug input field, affiliates can enter their desired slug, confirm it by entering it again in the confirmation field, and click Save Profile Settings. Once saved, their personalized slug will be available for use in referral URLs.

Frequently Asked Questions
How do I enable custom affiliate slugs for all affiliates?
Navigate to AffiliateWP » Settings » Custom Affiliate Slugs and check the box labeled Allow Custom Affiliate Slugs. This will allow all affiliates to create custom slugs.
What should I do if I receive an error when setting a custom slug?
If you receive an error stating This slug cannot be used. it means the slug is already in use by another WordPress username. Choose a different slug that is unique.
How can an affiliate create their own custom slug?
Affiliates can create their custom slug by going to the Affiliate Area’s Settings tab, entering a slug in the Custom Affiliate Slug field, and clicking the Save Profile Settings button.
Why can’t I enable custom slugs for an individual affiliate?
Make sure that the Allow Custom Affiliate Slugs option is disabled in AffiliateWP » Settings » Custom Affiliate Slugs. Custom slugs can only be enabled on a per-affiliate basis if this global setting is disabled.
Why am I seeing the error “Your slug cannot contain all numbers” when setting a custom slug?
Custom slugs cannot be composed entirely of numbers. Ensure that the slug includes alphabetic characters to comply with the system requirements.
That’s it! By allowing your affiliates to create personalized referral URLs, you not only enhance their experience but also provide a unique branding opportunity. Custom Affiliate Slugs can make referral links more memorable and professional, potentially increasing affiliate engagement and conversions.