Do you want to create a custom affiliate registration form for your program? The Affiliate Forms for Ninja Forms addon lets you seamlessly connect Ninja Forms with AffiliateWP to create personalized registration forms.
This guide will take you through the process of setting up the addon, creating your form, and ensuring everything works smoothly for your affiliates.
To use the Affiliate Forms For Ninja Forms addon, you will need a Plus or Pro license.
Installing the Affiliate Forms for Ninja Forms Addon
Before we get started, be sure to install and activate AffiliateWP on your WordPress site.
Once you’ve got AffiliateWP installed and your license is verified, you’ll be able to quickly install and activate the Affiliate Forms for Ninja Forms addon.
The Affiliate Forms for Ninja Forms addon requires the Ninja Forms plugin which must also be installed and active.
Creating an Affiliate Registration Form
Let’s start by building your registration form. Go to Forms » Add New in your WordPress dashboard. This is where you’ll design the form that new affiliates will use to register for your program.
At a minimum, your form needs fields for Email Address and Affiliate Username, which are required for affiliate registration. We also recommend including fields like First Name, Last Name, and Password to make the registration process smoother.
To ensure the form connects correctly with AffiliateWP, go to the Form Fields » AffiliateWP section. This is where you’ll find fields like Username, Payment Email, Promotion Method, and Website URL. These fields are essential for capturing affiliate-specific data.
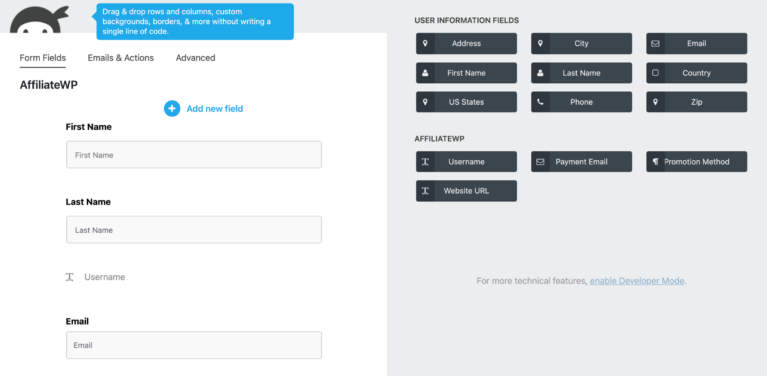
For user-related information like First Name, Last Name, and Email Address, go to the User Information Fields section in the Ninja Forms field list. Use these pre-defined fields rather than creating custom text fields, as they are designed to integrate seamlessly with AffiliateWP.
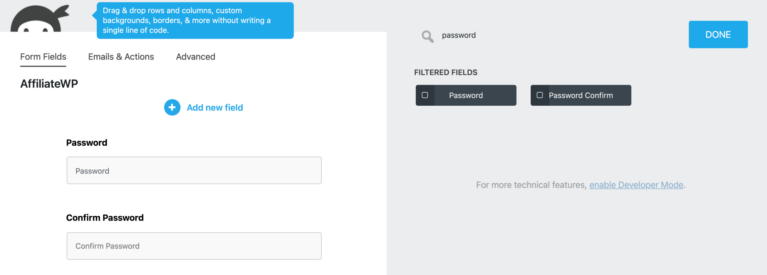
If you’d like to include a password field, use the search bar at the top of the field list to locate Password and Password Confirm. Adding these fields allows affiliates to set their password during registration.
Once all your fields are in place, click Done and Publish to save your progress.
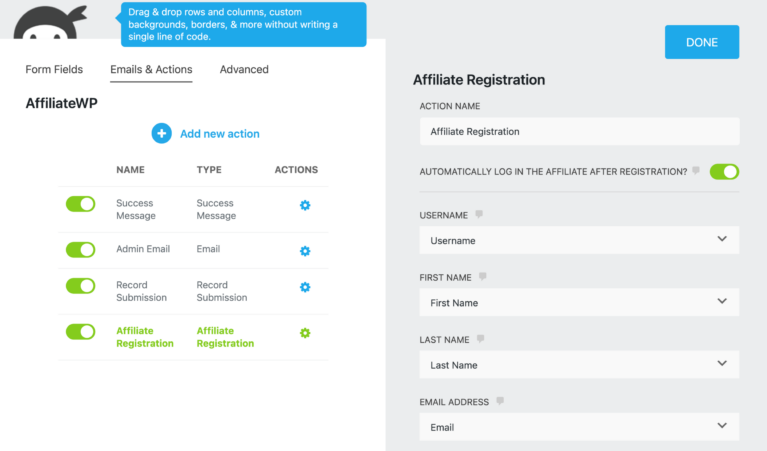
After publishing the form, go to the Emails & Actions tab in the form editor. Add an Affiliate Registration action and map each form field to its corresponding AffiliateWP field. For example, map the Email field to the AffiliateWP email field, and the Username field to the AffiliateWP username field. If you’d like affiliates to log in automatically after registration, enable this option in the action settings. Save and publish the form again.
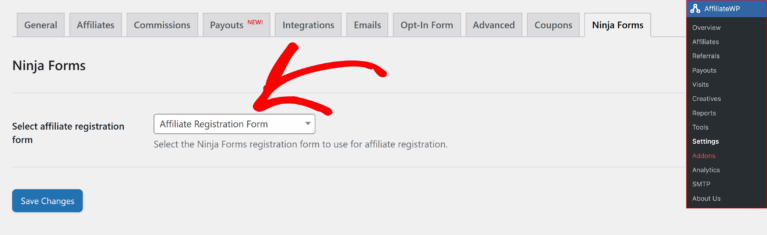
Finally, navigate to AffiliateWP » Settings » Ninja Forms in your WordPress dashboard. Select the form you just created from the dropdown menu and save your changes. This step links your Ninja Form to AffiliateWP, ensuring the form functions as your affiliate registration form.
Displaying the Affiliate Registration Form
Once your affiliate registration form is ready, you can display it on your site using any of the following methods. You can display the form using [affiliate_registration] shortcode, or use the shortcode provided by Ninja Forms to display the form wherever needed on your site.
Adding Affiliates to a Mailing List
By leveraging Ninja Forms addons, you can add affiliates to a mailing list during the registration process. This feature supports popular mailing list services like MailChimp, Campaign Monitor, and AWeber. Configure your mailing list addons alongside the affiliate registration form to ensure affiliates are automatically subscribed upon signing up.
Setting Up a Redirect Action for Affiliate Registrations
Once an affiliate completes the registration form, you can redirect them to a specific page, such as the affiliate area or a custom welcome page. To set this up, go to the Emails & Actions tab in the Ninja Forms editor. Click Add New Action and select Redirect from the Core Actions section.
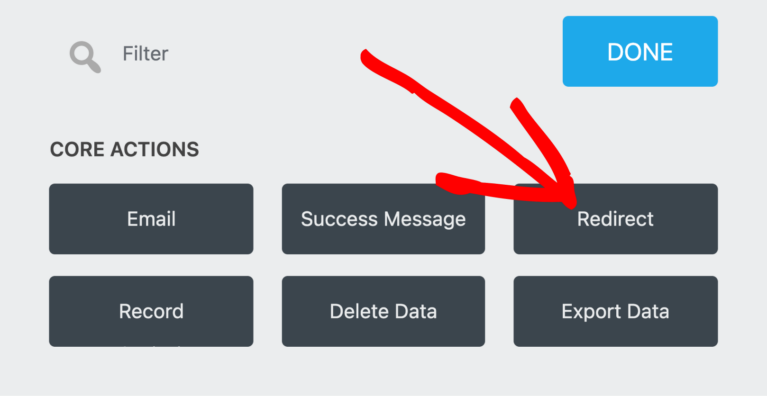
In the URL field, enter the link to the page where you want affiliates to be directed after registration.
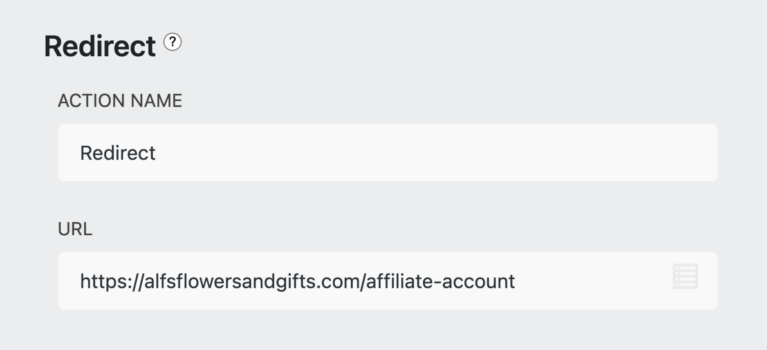
Once the redirect action is configured, save the form to ensure the changes take effect. This small step helps provide a seamless experience for new affiliates by guiding them to the right destination immediately after registration.
Frequently Asked Questions
How do I designate a Ninja Form for affiliate registrations?
After creating your form in Ninja Forms, go to AffiliateWP » Settings » Ninja Forms and select the form you’d like to use for affiliate registrations. Save your changes to enable the form for AffiliateWP.
Can I use multiple Ninja Forms for affiliate registrations?
No, only one form can be designated as the affiliate registration form at a time. You can, however, modify this form or replace it with another form as needed.
Do I need additional plugins to set up mailing list integrations?
Yes, you’ll need mailing list addons for Ninja Forms, such as MailChimp or Campaign Monitor. These addons allow you to automatically add affiliates to a mailing list during registration.
How can I test if the form is working correctly?
Submit a test registration using your form and verify the results in AffiliateWP » Affiliates. Ensure the affiliate account is created and the fields are mapped correctly.
Can I redirect affiliates to a custom page after registration?
Yes, you can set up a custom redirect action in the form’s Emails & Actions tab. Enter the URL of your custom page or use the merge tag for the affiliate area.
That’s it! The Affiliate Forms for Ninja Forms addon provides a flexible and user-friendly solution for creating custom affiliate registration forms. By integrating Ninja Forms with AffiliateWP, you can streamline affiliate signups, manage mailing list subscriptions, and use additional Ninja Forms features to enhance your program. This integration ensures a smooth onboarding experience for affiliates while giving you the tools to grow and manage your affiliate program effectively.