Are you using AffiliateWP but have another WordPress-based site you would like affiliates to promote? If so, the External Referral Links addon is perfect for you. This addon allows affiliates to promote external websites while still earning commissions on your main site where AffiliateWP is installed.
In this article, we’ll guide you through installing and setting up the External Referral Links addon for AffiliateWP.
Installing the External Referral Links Addon
Before we get started, be sure to install and activate AffiliateWP on your WordPress site.
Once you’ve got AffiliateWP installed and your license is verified, you’ll be able to quickly install and activate the External Referral Links addon.
How External Referral Links addon Work
To explain how this works, imagine you have two websites:
- alfsflowersandgifts.com: This is your primary site where AffiliateWP is installed, and it’s where all transactions take place.
- examplepromo.com: This is an external marketing site used to promote products or services sold on alfsflowersandgifts.com.
Affiliates will promote examplepromo.com using referral links, such as http://examplepromo.com/?ref=123 or http://examplepromo.com/?ref=john. When a customer clicks on the affiliate’s referral link, they arrive on examplepromo.com, and the affiliate’s ID or username is stored as a cookie in the customer’s browser.
Once the customer clicks on a call-to-action link or button that takes them to alfsflowersandgifts.com, the affiliate’s ID is passed along, and if the customer makes a purchase, AffiliateWP will track the referral and credit the affiliate for the sale.
Visit entries: A visit entry will not be recorded on the external site (examplepromo.com). The visit will only be recorded once the customer reaches alfsflowersandgifts.com, where AffiliateWP is installed.
Non-pretty affiliate links only: The addon works exclusively with non-pretty affiliate links, such as /?ref=123 or /?ref=john.
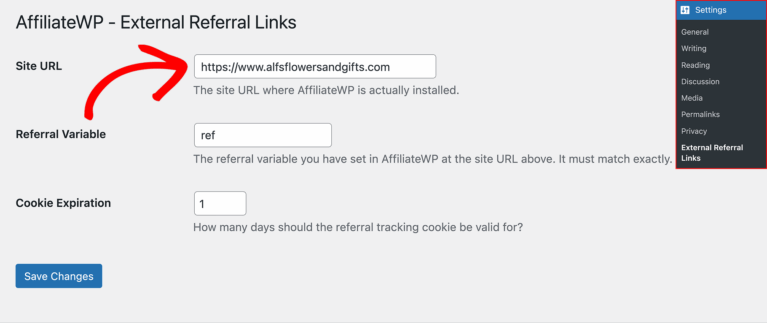
Configuring the External Referral Links Settings
After activating the addon, navigate to Settings » External Referral Links on your external site to configure the settings. Ensure the Site URL matches the exact URL where AffiliateWP is installed (in this case, alfsflowersandgifts.com). Also, ensure the protocol (HTTP or HTTPS) is the same on both sites to avoid tracking issues.
You can also set the Cookie Expiry duration, which controls how long the referral information stays in the customer’s browser after they visit the external site. Once configured, click Save Changes to enable referral tracking between the two sites.
Frequently Asked Questions
Can I use pretty affiliate links with the External Referral Links addon?
No, only non-pretty affiliate links (e.g., /?ref=123 or /?ref=john) are supported.
Do I need AffiliateWP installed on both sites?
No, AffiliateWP only needs to be installed on your primary site. The External Referral Links addon should be installed on the external site.
Will visit entries be tracked when customers land on the external site?
No, visit entries are only tracked when the customer arrives on the primary site, where AffiliateWP is installed.
Does the Credit Last Referrer setting apply to External Referral Links?
No, the Credit Last Referrer setting is only functional on the site where AffiliateWP is installed. It does not apply to the External Referral Links addon.
Can I set the external site as the default affiliate link?
Yes, you can set the external site as the default affiliate link shown in the affiliate dashboard. To do this, go to AffiliateWP » Settings » Advanced on your primary site and configure the Default Affiliate URL.
That’s it! With the External Referral Links addon, you can seamlessly connect multiple websites and ensure your affiliates are properly credited for referrals, even when promoting an external marketing site. By setting up this addon, your affiliates can confidently promote your products and services on different platforms while you keep referral tracking centralized on your primary site.