Looking for a fast, secure, and seamless way to payout your affiliates directly to their bank accounts? Stripe Payouts in AffiliateWP makes that possible. With a one-time setup, you can send affiliate earnings directly through Stripe, without ever needing spreadsheets or manual processing.
In this guide, we’ll walk you through how Stripe Payouts works, how to set it up, and how to send payouts.
Overview of Stripe Payouts
Stripe Payouts is a built-in integration in AffiliateWP that allows you to pay your affiliates using Stripe.
You’ll connect your Stripe account in AffiliateWP, which is installed on your site, and your affiliates will connect via your Stripe account from their Affiliate Area. Once both are connected, you can initiate payouts with a single click.
When you send a payout, funds move from your Stripe account to your affiliate’s connected Stripe account, and Stripe then deposits those funds into the affiliate’s bank account.
New to Stripe? Learn how to create your Stripe account here.
Setting Up Stripe Payouts
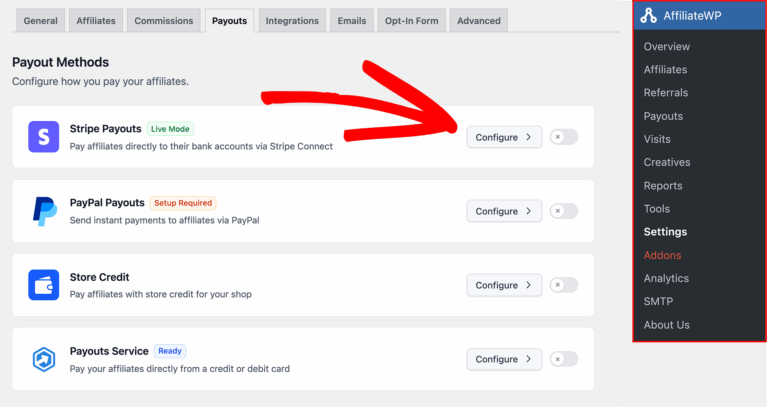
To get started, navigate to AffiliateWP » Settings » Payouts, then click on Stripe Payouts from the list of available payout methods. You can either click the Configure button or click anywhere on the Stripe Payouts row to expand the settings panel.
When opened, the Stripe Payouts panel displays three main sections: Live Credentials, Sandbox Mode, and Webhook Configuration.
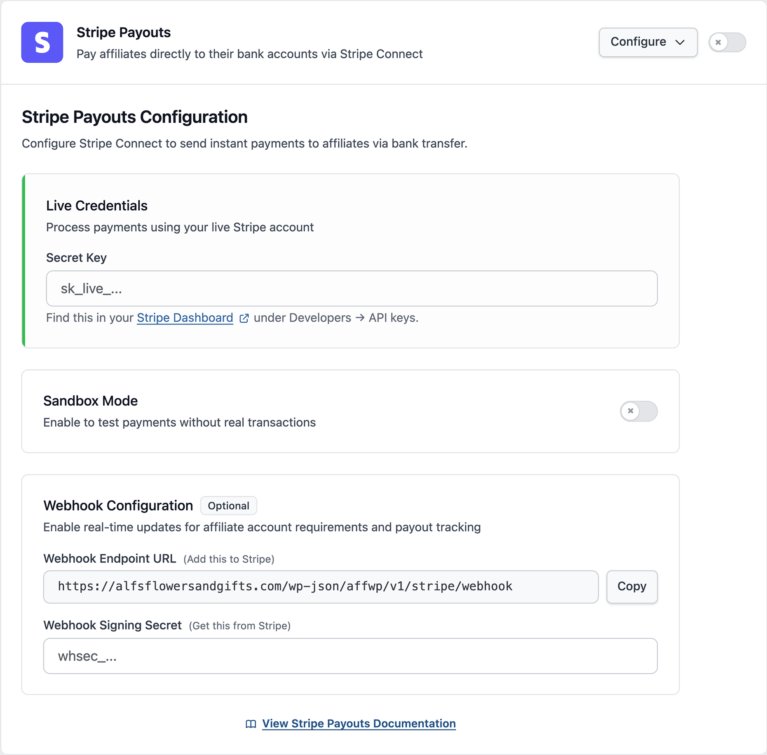
- Live Credentials is where you connect your live Stripe account to send real payouts.
- Sandbox Mode A test environment where you can simulate payouts without real transactions.
- Webhook Configuration — Optional settings to allow AffiliateWP to receive real-time updates from Stripe about account status and transfers.
Let’s walk through each section.
Live Credentials
To process real payouts, you’ll need to connect your live Stripe account by entering your Live Secret Key. If the connection is successful, a green checkmark will appear. If the connection is successful, a green checkmark will appear next to your credentials.
Not sure where to find your keys? Log in to your Stripe Dashboard and go to Developers » API Keys.
After entering your key, toggle to on and click Save Changes. Once enabled, Stripe will be available as a payout method.
Sandbox Mode (Test Environment)
Sandbox Mode lets you simulate payouts without processing real transactions. This is especially helpful for testing your Stripe Payouts configuration and ensuring that everything works as expected before going live.
To enable Sandbox Mode:
- Enable Sandbox Mode by toggling it on.
- Enter your Test Secret Key found in your Stripe Test Dashboard under Developers » API Keys.
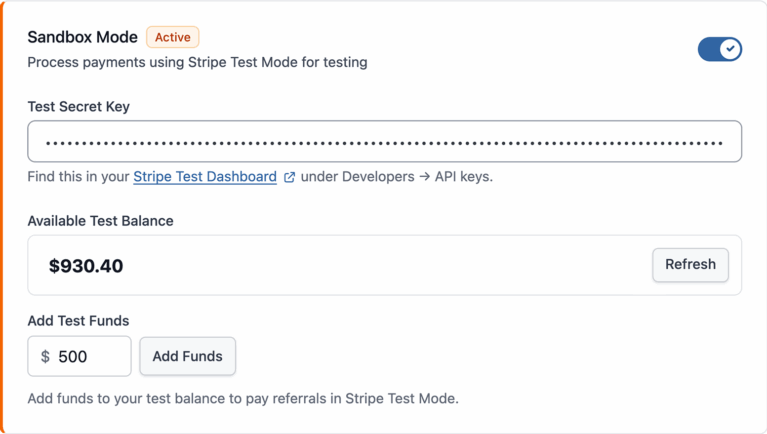
The panel also shows:
- Available Test Balance: Displays the current sandbox funds available in your Stripe test account.
- Add Test Funds: Enter an amount (e.g., $500) and click Add Funds to simulate having a balance. These test funds allow you to initiate payout actions without real money.
Test funds do not involve real money. They’re only used in Stripe’s test environment for simulating payouts.
Webhook Configuration (recommended)
Webhooks keep AffiliateWP in sync with Stripe by providing real-time updates when an affiliate’s account changes status or when a payout is sent.

This section includes:
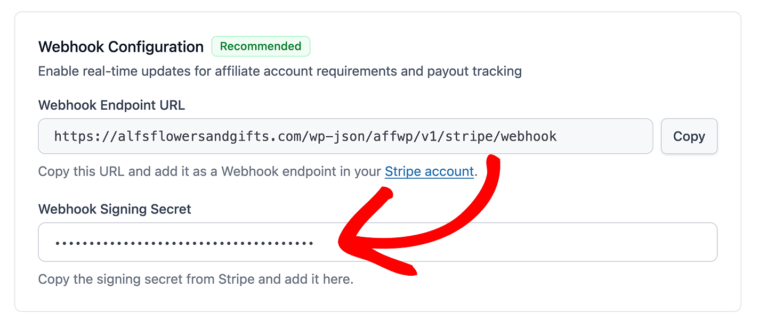
- A Webhook Endpoint URL that you can copy into Stripe
- A field to paste the Webhook Signing Secret from Stripe
These steps are optional but highly recommended for better reliability and debugging.
Setting Up Webhook Events
To make sure Stripe can send real-time updates back to AffiliateWP, we recommend configuring the following events when setting up your webhook:
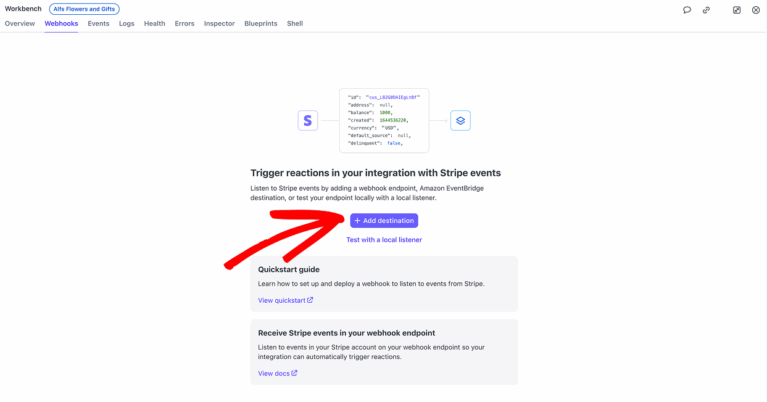
Start by logging in to your Stripe Dashboard. In the bottom-left corner of the dashboard, click on Developers. Then, from the side menu, select Webhooks.
On the Webhooks page, click the Add Destination button to begin setting up a new webhook.
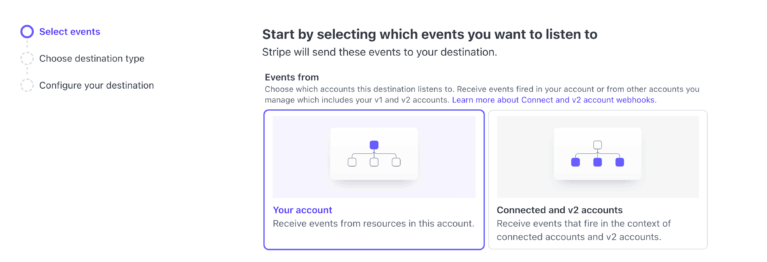
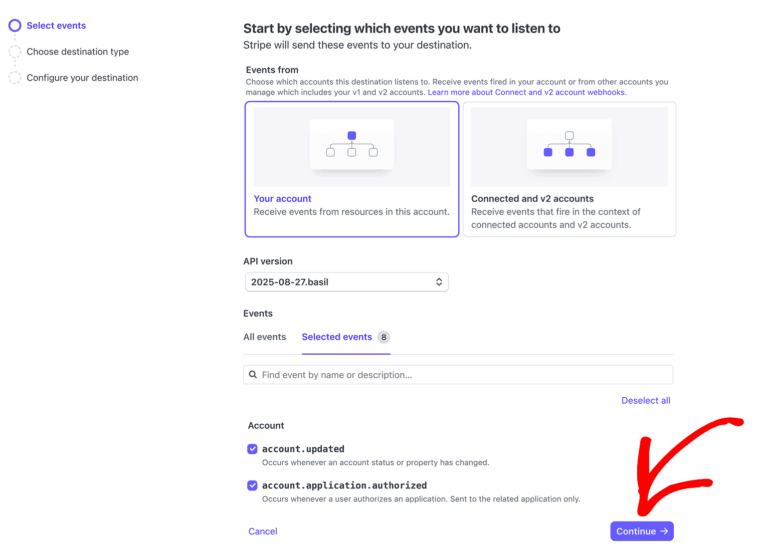
On the Select events page, Stripe will ask you to choose which account should trigger events. Under the Events from section, ensure that Your account is selected. This is pre-selected by default and ensures that events triggered from your Stripe account are sent to AffiliateWP.
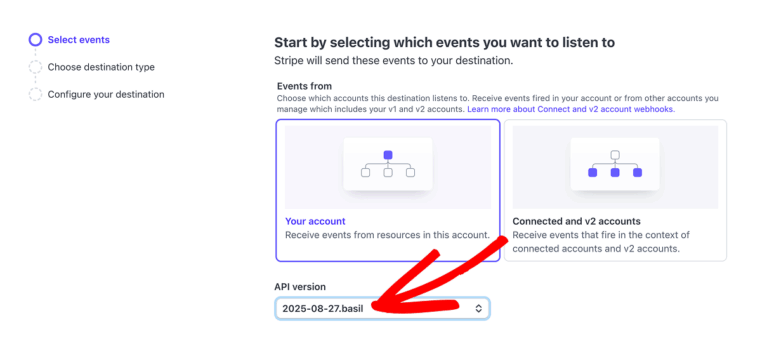
Just below that, you’ll see the API version field. From the dropdown, select the latest available version to ensure compatibility with the most recent Stripe features and improvements.
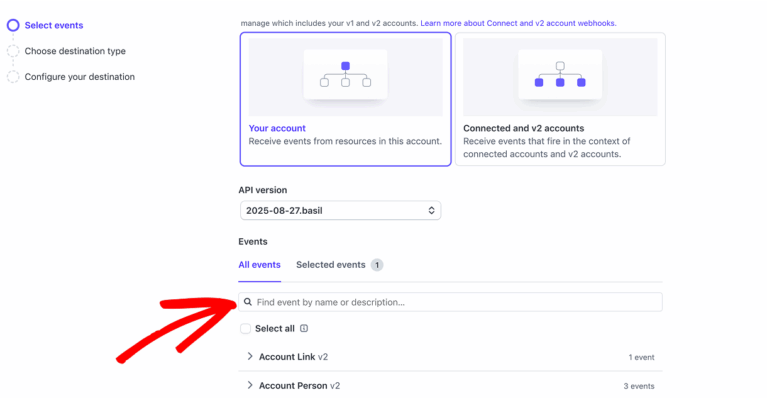
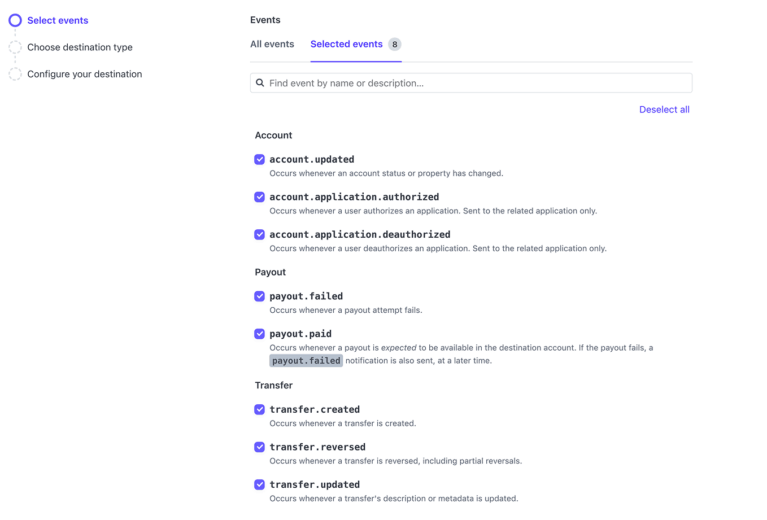
Next, under the All events tab, use the Find event by name or description field to search for specific event names.
Then, select the following events to ensure AffiliateWP receives the necessary updates from Stripe:
payout.paid– Notifies when a payout is successfully deposited into the affiliate’s bank accountpayout.failed– Notifies when a payout fails to reach the affiliate’s banktransfer.created– Notifies when a transfer is initiated to the affiliate’s Stripe accounttransfer.reversed– Notifies when a previously sent transfer is reversedtransfer.updated– Notifies when the transfer status or metadata is updatedaccount.updated– Tracks changes in the affiliate’s account (e.g., status or verification info)account.application.authorized– Confirms when an affiliate connects their Stripe accountaccount.application.deauthorized– Triggers if the affiliate disconnects from your Stripe account
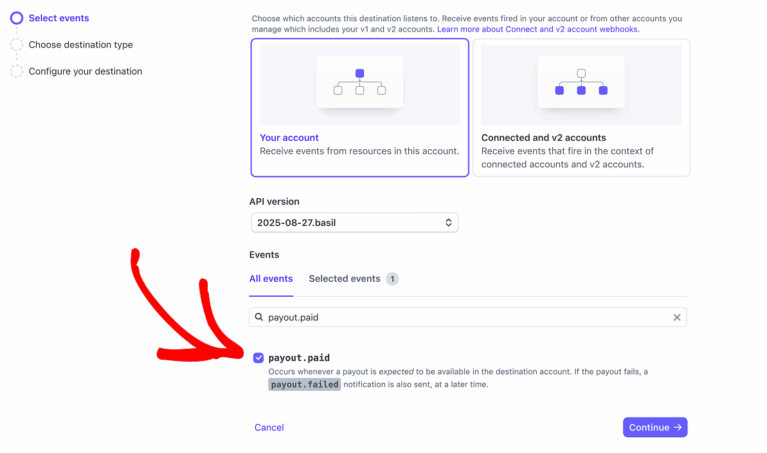
Once all events are selected, proceed by clicking the Selected events tab to review your selections.
Once all events are selected, click Continue to proceed to the next step.
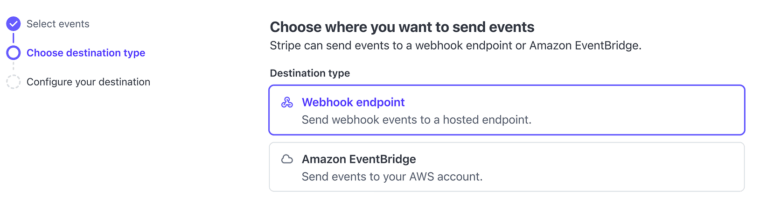
On the Choose destination type screen, ensure that Webhook endpoint is selected. This option is pre-selected by default and allows Stripe to send event notifications to your specified webhook URL.
On the Configure destination screen, Stripe will ask where to send the selected events. In the Destination name field, enter a recognizable name to help you identify this webhook later. In the Endpoint URL field, paste the webhook URL provided in your WordPress admin under: AffiliateWP » Settings » Payouts » Stripe Payouts. Optionally, you can add a Description to provide more context about this webhook’s purpose. Once everything is filled in, click Create destination to complete the setup.
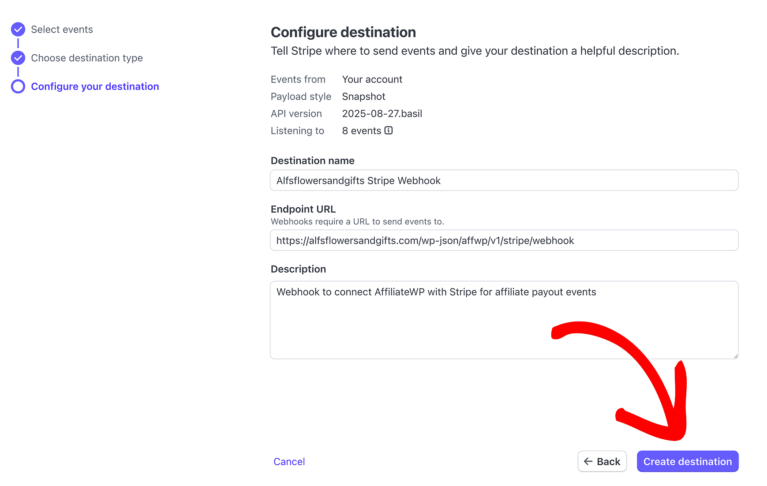
Once everything is filled in, click Create destination to complete the setup.
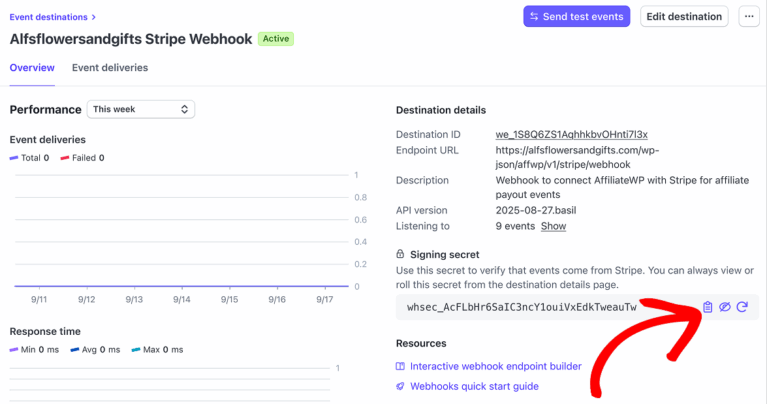
After clicking the Create Destination button, Stripe will automatically redirect you to the newly created webhook’s details page. In the Signing secret section, click the eye icon to reveal the secret key.
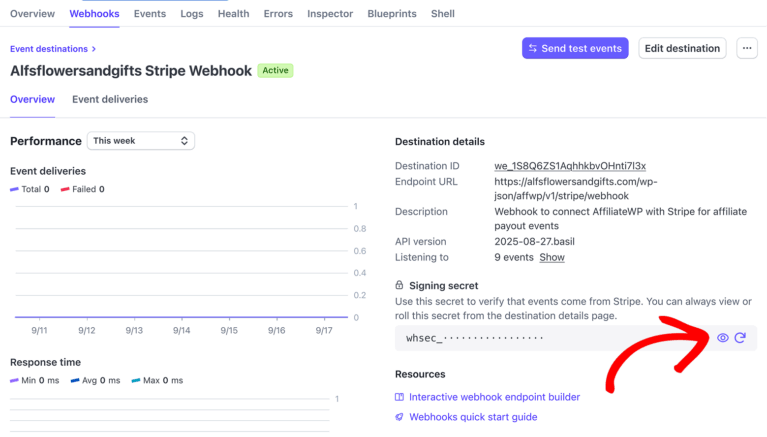
Then click the copy to clipboard icon to copy it.
Next, return to your WordPress admin and paste the copied key into the Webhook Signing Secret field under AffiliateWP » Settings » Payouts » Stripe Payouts.
If you’re working in test mode, use the test Webhook URL and test Signing Secret. For live payouts, use your live credentials. Each mode has its own unique keys and webhook settings.
Email Notifications
AffiliateWP’s Stripe Payouts integration includes built-in email notifications that keep both site admins and affiliates informed of key payout events.
To configure these notifications, navigate to AffiliateWP » Settings » Emails, and then open the Stripe Payout Emails tab.
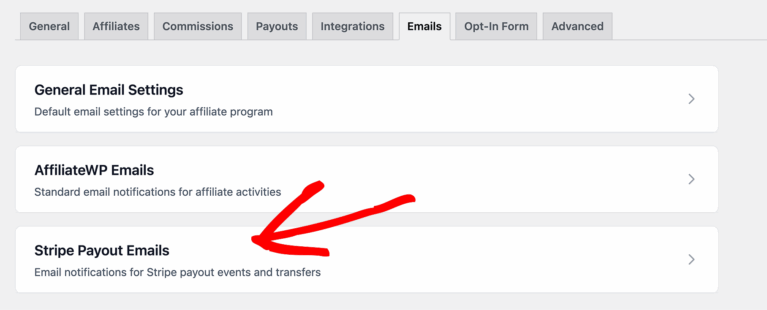
The interface is divided into two sections: Affiliate Manager Emails and Affiliate Emails.
Stripe Payouts email notifications require webhooks to be configured in your Stripe Dashboard. You can find Stripe’s official webhook configuration guide here. Webhooks allow AffiliateWP to receive real-time updates from Stripe and trigger these notifications automatically.
Affiliate Manager Emails
These notifications are sent to the site admin (or whoever manages affiliate payouts) when Stripe reports a change in payout or account status.
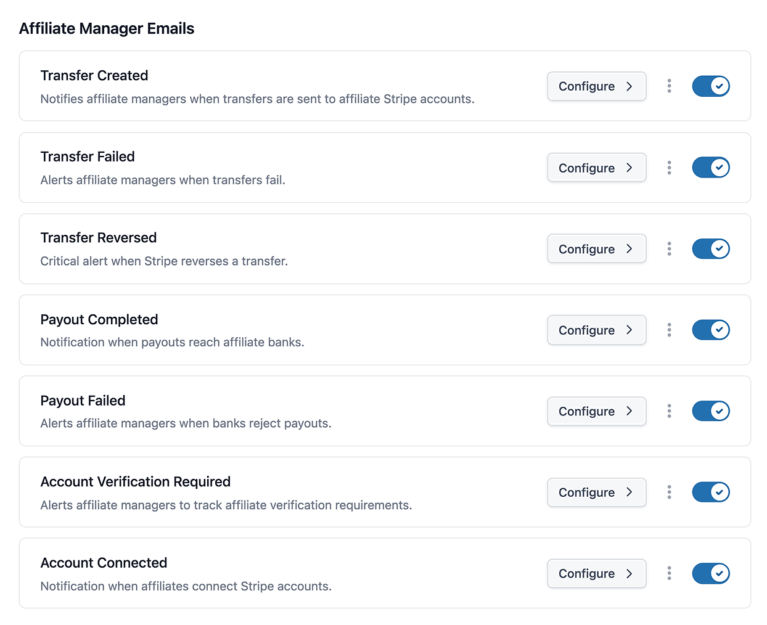
Each notification has a Configure button that lets you customize the subject line, body content, and add dynamic tags. You can also preview or send a test email from this screen.
Here are the available notifications:
- Transfer Created Notifies admins when a transfer is successfully initiated to an affiliate’s Stripe account.
- Transfer Failed Alerts admins when a transfer attempt to Stripe fails.
- Transfer Reversed Critical notification when Stripe reverses a previously successful transfer.
- Payout Completed Sent when Stripe confirms that funds have successfully reached the affiliate’s bank account.
- Payout Failed Sent when a payout fails to reach the affiliate’s bank due to an issue (e.g., invalid bank account).
- Account Verification Required Alerts you when an affiliate needs to complete additional verification steps to be eligible for payouts.
- Account Connected Notifies you when an affiliate successfully connects their Stripe account.
Affiliate Emails
These are sent directly to affiliates, helping them stay updated on their account and payout statuses.
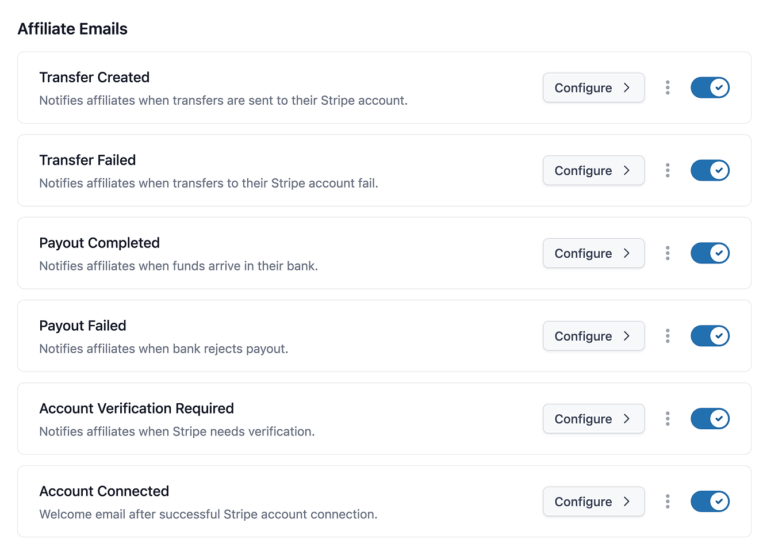
Available notifications include:
- Transfer Created Informs affiliates that a transfer has been initiated to their Stripe account.
- Transfer Failed Notifies them if the transfer failed.
- Payout Completed Lets affiliates know the funds have reached their bank account.
- Payout Failed Alerts the affiliate that the payout could not be completed by their bank.
- Account Verification Required Notifies the affiliate if Stripe requires additional identity or bank information to enable payouts.
- Account Connected A welcome message confirming their Stripe account was successfully connected.
Each email can be customized with its own subject, message, and template tags. These are accessed by clicking the Configure button next to each notification
Connecting as an Affiliate
To receive payouts via Stripe, affiliates must connect their own Stripe account. This is a self-service process and can be completed either from the Affiliate Area or from the Affiliate Portal, depending on which interface your site uses. Once connected, payouts can be sent automatically to the affiliate’s bank account through Stripe.
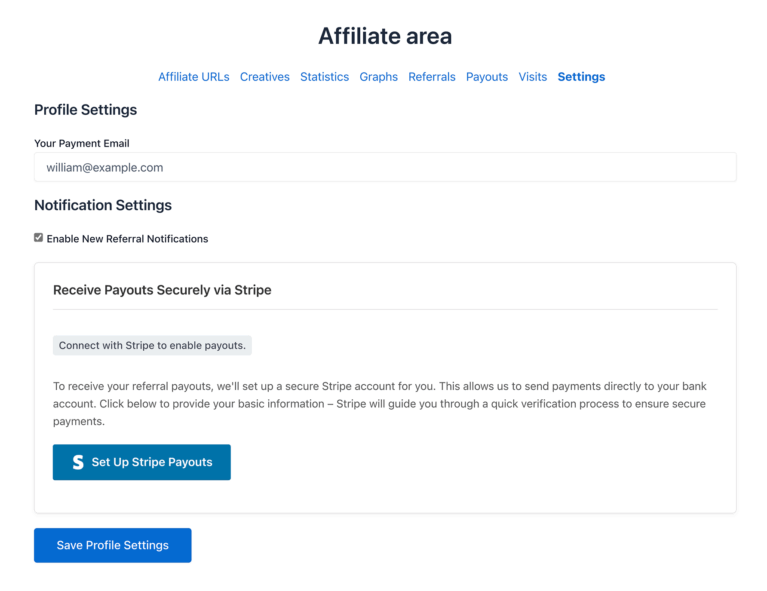
Affiliate Area
If your site uses the Affiliate Area, affiliates can connect to Stripe by following these steps:
- Log in to the Affiliate Area on your site
- Go to Settings » Stripe Payouts, and click Set Up Stripe Payouts button.
Affiliate Portal
If your site uses the Affiliate Portal, once an affiliate is logged in, they can click the profile icon in the top-right corner and click Settings.
In the Settings screen, locate the Stripe Payouts section and click Set Up Stripe Payouts.
Stripe onboarding process
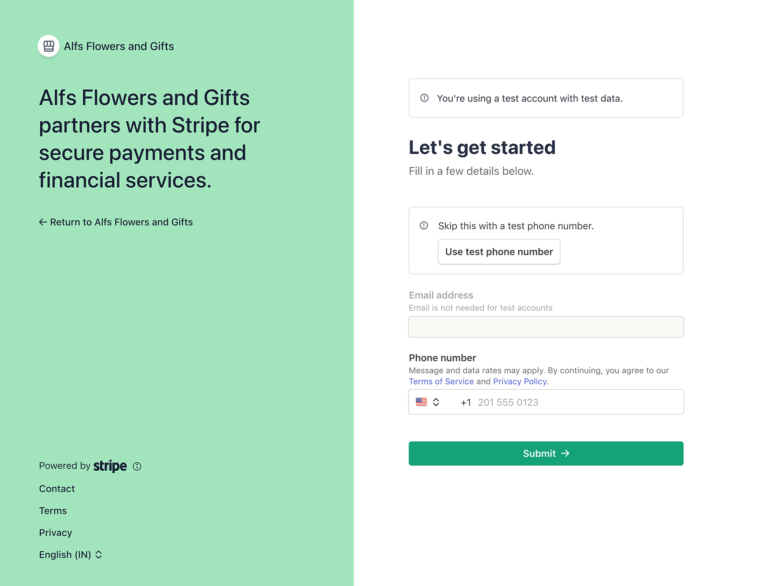
After clicking Set Up Stripe Payouts, affiliates will be redirected to Stripe’s secure onboarding flow. This is where they’ll be prompted to provide identity verification, banking information, and accept Stripe’s terms.
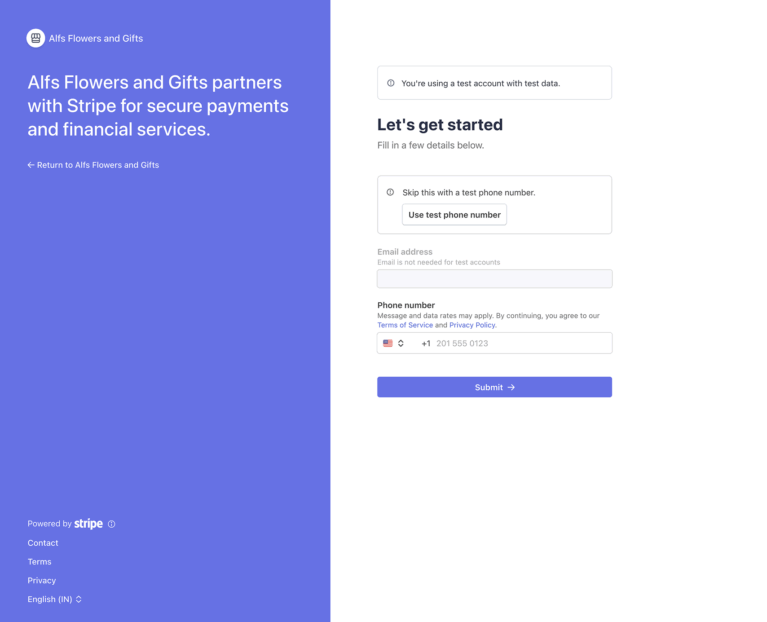
Once completed, the affiliate’s Stripe account is linked to your site.
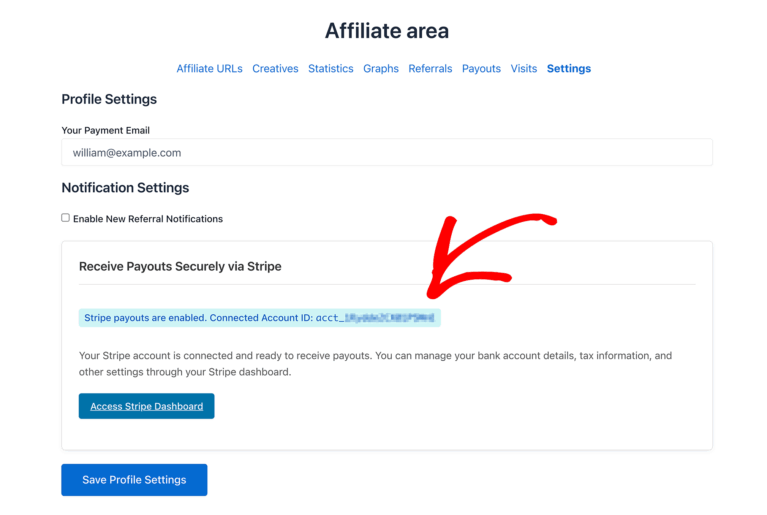
In the Affiliate Area, the affiliate will then see their connected Account ID, along with options to access their Stripe Dashboard.
Customizing the Affiliate Onboarding Page
As the site admin, you can customize the Stripe-hosted onboarding experience that affiliates see when connecting their account. To set your brand color for the Stripe onboarding page:
- Log in to your Stripe Dashboard
- Go to Settings » Connect » Onboarding interface, and click Customize
- Set your logo, brand color, and accent options
- Save changes — they’ll reflect on the hosted onboarding pages
Stripe allows you to customize only the onboarding page that affiliates see while connecting their Stripe account. These settings do not affect your Affiliate Area or other Stripe pages. For a full guide on customizing the onboarding page, refer to Stripe’s Hosted Onboarding documentation.
Managing Affiliate Connections
As the site admin, you can view and manage each affiliate’s connection status from the AffiliateWP » Affiliates screen. Here you’ll see a Stripe Status column, which lets you quickly check the connection status of each affiliate at a glance, without needing to open their individual profile.
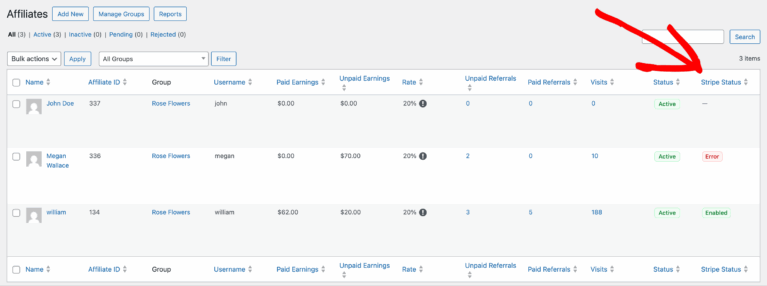
Hovering over any status badge will display a tooltip with more details about the connection.
- If the affiliate hasn’t connected their account, you’ll see an em dash (—). Hovering over it will reveal a tooltip that says, “Affiliate has not connected their Stripe account.”
- If the connection is successful, you’ll see Enabled, along with the affiliate’s account ID, connection status (e.g., “Payouts: active, Payments: active”), and a View Details link.
- If something’s wrong with the connection (e.g., incorrect keys or revoked access), you’ll see Error, along with the specific error message.
- A Restricted status means the affiliate’s account is connected, but something is preventing payouts — often due to missing verification or country restrictions.
You can click the View Details link (only available when the status is “Enabled”) to open the full Stripe Connection panel within the affiliate’s profile.
Clicking on any affiliate’s name will take you to their profile. Here, you’ll find a Stripe Payouts section that shows more detailed information based on their connection status.
What you see here depends on the affiliate’s connection:
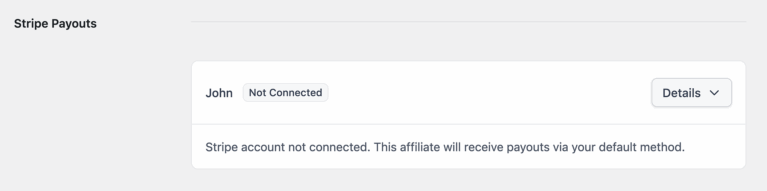
If the affiliate is not connected:
If the affiliate is not connected to Stripe, their profile will display their name, a status badge labeled Not Connected, and a message stating: “Stripe account not connected. This affiliate will receive payouts via your default method.”
If the affiliate is connected:
Their connection details will display, including:
- Name and Stripe Account ID
- Connection status (Enabled)
- Account details (always “Express”), country, and connection date
- Payouts and Payments status
- A View in Stripe button to open their profile in your Stripe Dashboard
- A Disconnect button to reset their connection
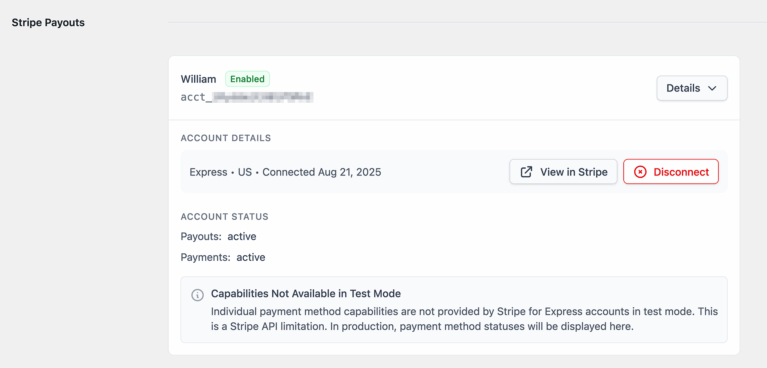
This view is helpful for troubleshooting, managing affiliate connections, and ensuring everyone is properly set up to receive payouts.
Sending Payouts
Once your Stripe account is connected and affiliates have linked their accounts, payouts can be sent directly from your WordPress admin.
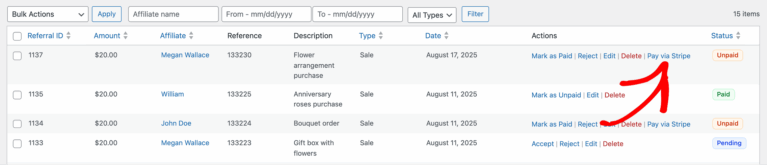
Option 1: Pay from the Referrals screen
Go to AffiliateWP » Referrals. Next to each unpaid referral, you’ll see a Pay via Stripe link.
Clicking the Pay via Stripe link will display a confirmation lightbox, allowing you to review the payout details before sending. This lightbox shows the affiliate’s name, the payout amount, and confirms the payment will be sent to the affiliate’s connected Stripe account.
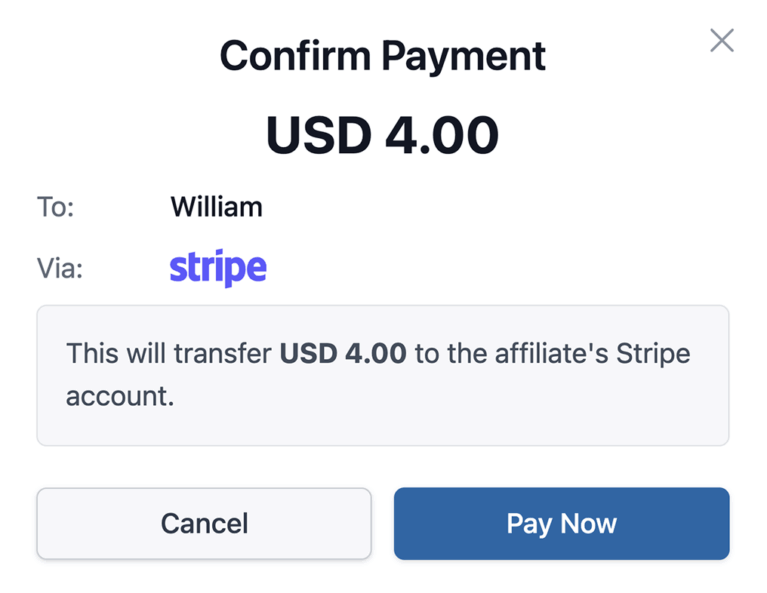
To complete the payout, click Pay Now. To cancel, simply close the popup or click Cancel.
To pay multiple referrals at once:
- Select the referrals using the checkboxes.
- Open the Bulk Actions dropdown.
- Choose Pay Now via Stripe, then click Apply.
Option 2: Use the Payouts Screen
Navigate to AffiliateWP » Payouts » Pay Affiliates. Here you can filter payouts by affiliate, date range, or minimum earnings. Choose Stripe as the Payout Method, then click to process the batch payout.
Once a referral is marked as paid, you cannot pay it again. If an admin marks a referral as unpaid after paying, the payout will not be duplicated — this is a built-in Stripe security rule in AffiliateWP.
When a payout is initiated, Stripe performs two actions:
- The funds are transferred from your Stripe account to the affiliate’s connected Stripe account.
- From there, Stripe deposits the funds directly into the affiliate’s linked bank account.
Supported Countries
Stripe Payouts in AffiliateWP supports any country where Stripe Express is available.
To view the full list of supported countries and their payout requirements, visit Stripe’s supported countries page.
Keep in mind:
- Affiliates must be located in a supported country to connect their Stripe account.
- Some countries may require additional verification steps (e.g., government-issued ID, proof of address).
Frequently Asked Questions
Can I test Stripe Payouts before going live?
Yes. Enable Sandbox Mode in your settings and use Stripe’s test credentials. You can also simulate transactions using the Create Test Charge tool.
What happens if a payout fails?
You’ll be notified via the configured email alerts (if webhooks are set up), and you can take action accordingly — such as asking the affiliate to update their bank details or reinitiate the payout.
Can I customize the look of the onboarding experience for affiliates?
Yes! Stripe lets you brand the onboarding pages your affiliates see. To do this:
1. Log into your Stripe Dashboard
2. Go to Settings » Branding
3. Set your logo, colors, and accent styling
4. Save — changes will reflect automatically on the hosted onboarding page
Can I use a different currency in AffiliateWP than what’s set in my Stripe account?
No. Stripe Payouts will only process transactions using your Stripe account’s default currency. To avoid issues, make sure AffiliateWP is set to the same currency.
Does this support cross-border payments?
Currently, Stripe Payouts only supports domestic payouts — the affiliate must be based in the same country as your Stripe account. If you need to pay international affiliates, consider using PayPal Payouts instead.
Where can I view connected affiliates in my Stripe dashboard?
Log in to your Stripe account, and from the left-hand menu, click Connected Accounts to see all affiliates who have connected.
Are there any fees involved in sending payouts?
Stripe Connect charges standard transaction fees for each payout, but AffiliateWP does not charge anything extra. To view the Stripe Connect fees for your country, refer to Stripe’s official pricing page
Does Stripe Payouts support the Affiliate Portal addon?
Yes. If your site is using the Affiliate Portal addon, Stripe Payouts is fully supported. Affiliates can connect their Stripe account, view connection status, and access their Stripe dashboard — all from within the Affiliate Portal interface.
What happens if I change my Stripe API key?
If you generate a new API key within the same Stripe account, no action is needed — all affiliates remain connected. However, if you switch to a different Stripe account, all affiliates must reconnect using the new onboarding flow.
What if I reverse a payout in Stripe?
If you reverse a transfer via Stripe, the funds are returned to your Stripe account, and the referral in AffiliateWP will be marked as Unpaid again.
What can affiliates do in their Stripe Dashboard?
Once connected, affiliates can access their Stripe Express Dashboard using the link provided in their Affiliate Area. This dashboard allows them to:
- View payout history and upcoming payments
- Update personal or bank account information
- Manage tax details
- Upload identification if needed for verification
For more information on the Stripe Express Dashboard, see Stripe’s documentation here.