





Would you like to know exactly what your members see when they open your store’s rewards program? The rewards widget appears on your storefront. In it, members check their points balance, find ways to earn and redeem, review products they bought, share their referral link, and see their activity.
In this guide, we’ll walk you through each panel of the widget and what guests see. We’ll also show you how to link straight to a panel and change the widget’s look. All you need is RewardsWP installed on your WooCommerce or Easy Digital Downloads store.
- Exploring the Home Panel
- Browsing Ways to Earn
- Redeeming Rewards
- Sharing Referral Links
- Reviewing Rewards Activity
- Previewing the Guest Experience
- Linking to a Widget Panel
- Customizing the Widget
- FAQ
Before you get started, make sure RewardsWP is installed and activated on your WordPress site.
Exploring the Home Panel
The rewards widget embeds itself on your store’s customer-facing pages, so members can use it without leaving the page they’re on. It has two parts:
- Launcher: a floating button that customers click to open and close the widget.
- Slide-out window: holds every panel of the widget, such as the home panel and Ways to earn.
The home panel is what members see when they first open the widget. It gives a quick snapshot of their status, with a section for each of the widget’s other panels.

The home panel includes:
- Points balance: the member’s current redeemable points total, shown at the top.
- Your rewards: how many redeemed rewards the member has ready to use. It opens the list of their coupons.
- Ways to earn: opens the list of every action that earns points.
- Ways to redeem: opens the list of rewards members can claim with their points.
- Refer your friends: when the Referrals Program is on, this section gives members their referral link and sharing buttons.
- Your activity: opens Rewards Activity, the member’s full points and referral history.
The home panel adapts to the programs you have turned on. If only the Points Program is on, the referral sections don’t appear. If only the Referrals Program is on, the points sections are hidden.
To turn a program on or off, read Enable or disable the points program and Referral program overview.
To learn how points work, read Understanding the points program.
To see every panel with sample data before you set yours up, try RewardsWP live.
To see every panel with sample data before you set yours up, try the rewards widget live.
VIP Status
With the VIP Program on, the home panel shows a VIP status section with the member’s tier and their progress to the next one. Clicking the tier opens the VIP Status panel, with the tier’s benefits, welcome gifts, and a ladder of every tier. On the widget’s inner panels, the header also shows the member’s tier name under their balance. Running VIP tiers is available on the Pro plan.
For more on VIP status in the widget, read Showing VIP Status in the Rewards Widget.
Next, we’ll look at the ways members earn points.
Browsing Ways to Earn
Ways to earn shows every action that earns points. Each entry shows the action’s icon, what the member needs to do, and the number of points they’ll receive. Some entries also have a button, such as Shop for Make a purchase, or Review for Leave a review.

Once a member completes a one-time action, such as creating an account, its entry shows when they earned it and how many points they got.
The list mirrors the Ways to Earn section at RewardsWP » Settings » Points. When you turn an earn action on or off in the admin, the widget’s list updates to match.
To set up points for signups, reviews, and first orders, read Earning points from signups, reviews, and first orders.
Make a purchase can earn only on the items you pick, with Specific items in its Earns on setting. Its entry then names the item that earns, or says “selected items” when you’ve picked several. Earning on only the items you pick is available on the Plus and Pro plans.
For more on purchase points, read Earning points from purchases.
For more on choosing what earns points, read Excluding products from rewards and points.
Reviews are one of the ways to earn points, and customers can write them from the widget.
Reviewing a Product From the Widget
When review points are on, customers can review the products they bought without leaving the widget.
The Review button on Leave a review opens a list of their bought products that are open for reviews, newest order first. A product they already reviewed shows its status: Awaiting approval, Not published, or Reviewed.

Picking a product opens a short review form with a star rating and the review text. The form tells the customer how many points the review earns once approved.

After they send it, the widget thanks them and says what happens next. A product they already reviewed opens a read-only Your review view instead.
Points arrive when the review is approved, never on submit alone. Customers earn the same points for any honest review, good or bad.
Reviews in the widget work with WooCommerce reviews. On Easy Digital Downloads, they need the EDD Reviews extension.
Note: Some customers don’t see a Review button. Visitors who are signed out don’t get one. Guest members who joined with only an email don’t get one either. Members with no paid order and no guest orders also get none. On WooCommerce, Leave a review doesn’t appear in the widget when your store has product reviews turned off. Orders a customer placed as a guest join their review list once they confirm their email.
Also, tell your customers that reviewers earn points, near your reviews and the average rating. For what the rules ask, read the FTC’s Consumer Reviews and Testimonials Rule Q&A. This isn’t legal advice.
For the full review flow and its settings, read Earning points from product reviews.
Next, we’ll look at how members redeem their points for rewards.
Redeeming Rewards
Ways to redeem shows every reward members can claim with their points. Each reward displays its title, its points cost, and a Redeem button.
When a member has enough points for a reward, the Redeem button is active. When they don’t have enough points yet, the button is disabled. The panel then shows how many more points they need.

The rewards listed here match the Ways to Redeem section on the Points tab, at RewardsWP » Settings. A discount reward’s Applies to setting decides which items it discounts.
To add rewards to this list, read Choosing reward types.
Next, we’ll look at what happens after a member clicks Redeem.
Confirming a Redemption
When a member clicks Redeem, a confirmation step opens before any points are spent. Under “Before you redeem”, it lists the reward’s terms, including what the reward applies to. It also shows how many points the member will have left. Clicking Not now goes back to Ways to redeem without spending any points.

Once the member confirms, their points are deducted right away and a coupon code is generated. The new coupon appears under Your rewards on the home panel, ready to apply to their cart.

The coupon’s terms say what the reward applies to and whether sale items keep their price. When a reward covers or leaves out specific items, the terms list up to five of their names.
Next, we’ll look at how members share their referral link.
Sharing Referral Links
The Refer your friends section gives members everything they need to share their referral link. It appears on the home panel when the Referrals Program is on.
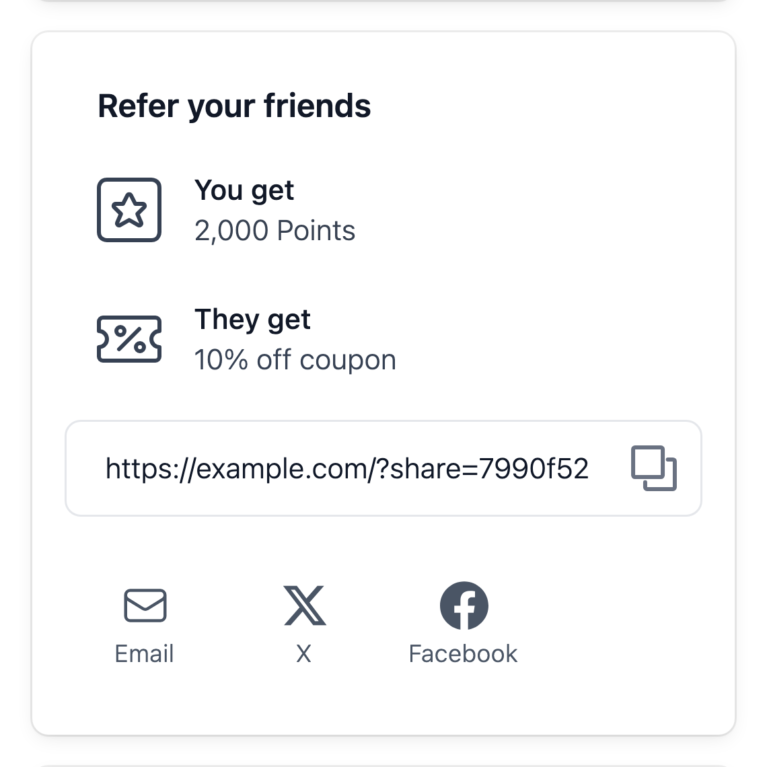
This section includes:
- Rewards: what the member gets for a referral and what their friend gets.
- Referral link: the member’s own referral URL, which they can copy with one click. A confirmation briefly appears when the link is copied.
- Sharing buttons: ready-made buttons for sharing by email, X, and Facebook.
To set what each side gets, read Setting up advocate rewards and Setting up friend rewards.
The Sharing Options settings on the Widget tab control which sharing buttons appear. We cover them in Sharing Options Settings below.
Next, we’ll look at where members check their points and referral history.
Reviewing Rewards Activity
Rewards Activity gives members a clear view of their points history and referral activity. Members open it from the Your activity section at the bottom of the home panel.

When more than one program is on, members see tabs to switch between Points, VIP, and Referrals activity. If only one program is on, its activity appears without the tabs.
We’ll start with the Points tab.
Points Tab
The Points tab shows a list of every points transaction, newest first. Each entry displays what happened, the number of points added or deducted, and when it happened.

Earned points appear in green with a + prefix. Spent or deducted points appear in gray with a – prefix. Pending points show an amber Pending badge.
For what each status means, read Understanding points statuses.
Next, we’ll look at the VIP tab.
VIP Tab
The VIP tab lists the member’s tier changes over time, such as when they reached or moved to a tier.

The VIP tab appears while the VIP Program is on.
Next, we’ll look at the Referrals tab.
Referrals Tab
The Referrals tab shows every friend the member has referred. At the top, a summary line shows the count of completed and pending referrals. Each entry displays the friend’s name (first name and last initial, for privacy), what they did, a status badge, and when it happened.
Until a friend shops through the member’s link, the tab shows “No referrals yet” with an Invite friends button.

Next, we’ll look at what visitors see before they join your program.
Previewing the Guest Experience
Visitors who haven’t joined your rewards program see a preview of the widget built to encourage sign-ups. Instead of member-only features, it gives guests a taste of the program.

Guests see:
- Join our rewards program: a short description of the benefits of joining, with a Join now button and a Sign in link for existing members.
- Points: how the points program works, with links to Ways to earn and Ways to redeem.
- Refer your friends: what a member and their friend get from a referral, when the Referrals Program is on.
Guests can browse Ways to earn and Ways to redeem to see what’s available. Each panel shows a join prompt instead of active buttons. Guests can’t redeem rewards or open Rewards Activity until they create an account.
With the VIP Program on, guests also see a VIP tiers overview listing what each tier unlocks and what it takes to reach it.
When a guest makes a purchase and later creates an account, RewardsWP links their orders and awards the points for them. This way, guests don’t miss out on points they would have earned if they’d been logged in.
Next, we’ll look at how to link straight to a panel.
Linking to a Widget Panel
You can link straight to any widget panel by adding a hash link to any page where the widget appears. Hash links open the widget without reloading the page. This makes them a good fit for navigation menus, buttons, and in-page links.
#rewardswp-home: Home panel#rewardswp-earn: Ways to earn#rewardswp-redeem: Ways to redeem#rewardswp-rewards: Your rewards#rewardswp-activity: Rewards Activity#rewardswp-activity-points: Rewards Activity, on the Points tab#rewardswp-activity-referrals: Rewards Activity, on the Referrals tab#rewardswp-vip: VIP Status panel#rewardswp-vip-tier-1: one VIP tier’s panel, counted from the lowest tier#rewardswp-join: registration form#rewardswp-login: login form
The VIP links work when the VIP Program is on. To open a different tier, change the number at the end: #rewardswp-vip-tier-1 is your lowest tier. #rewardswp-vip-tier-2 is the next one up, and so on. A member doesn’t see tiers whose conditions they don’t meet. For that member, the numbers skip those tiers.
For example, a menu item linking to yourstore.com/shop/#rewardswp-earn opens the shop page and slides open Ways to earn.
Note: Hash links don’t work in emails, because email clients strip the # part of the link. In an email, replace #rewardswp- with ?rewardswp=, for example yourstore.com/shop/?rewardswp=earn.
Two more links open the review flow. They use the ?rewardswp= form:
?rewardswp=earn-review: the customer’s list of products to review?rewardswp=earn-review-{product ID}: one product’s review form, using the WooCommerce product ID, or the Easy Digital Downloads download ID with the EDD Reviews extension
Both review links still work when the customer has to sign in or join first.
To look up a product’s ID, see How to Find Product ID in WooCommerce for a step-by-step guide.
Here are a few common ways to use these links:
- Navigation menus: add a “My Rewards” menu item linking to
#rewardswp-home. - Buttons on landing pages: link to Ways to earn with
#rewardswp-earn. - Email campaigns: link to Rewards Activity with
?rewardswp=activity. - Review request emails: link to the customer’s review list with
?rewardswp=earn-review. The same link works for every customer, because the widget knows who is signed in. To do this, send it in a follow-up email from your email tool, a week or two after the order. The WooCommerce Completed order email is too early, because it arrives when the order ships, or at payment for a download. If your email tool can insert a product ID, link to one product’s form with?rewardswp=earn-review-{product ID}. - VIP promotions: link to the VIP Status panel with
#rewardswp-vip, so members see their tier and what the next one gives them.
Next, we’ll cover the settings that change how the widget looks.
Customizing the Widget
You can change the widget’s colors, wording, launcher, and sharing buttons.
From your WordPress admin sidebar, go to RewardsWP » Settings. On the Settings page, click the Widget tab.

The settings are grouped into three sections: General, Rewards Launcher, and Sharing Options. A preview beside them shows the widget. The Guest, Member, Friend, and Friend (claimed) buttons under the preview switch between what each kind of visitor sees.
We’ll start with the General settings.
General Settings
The General settings control the widget’s colors and wording.

- Brand color: sets the main accent color across the widget, including buttons, badges, and highlighted elements.
- Text & icons on brand color: controls whether button text, the launcher icon, and the header text on your brand color are light or dark. Auto, the default, picks light or dark based on your brand color. Light suits a dark brand color. Dark suits a light one.
- Welcome heading: the welcome message in the panel header, such as “Welcome to” or “Hey there,”.
- Program name: the label for your rewards program in the widget, such as “My Rewards” or “Loyalty Program”.
Next, we’ll look at the Rewards Launcher settings.
Rewards Launcher Settings
The Rewards Launcher settings control how the floating button looks and where it sits on your site.

- Display: choose what the launcher shows. Icon with text, the default, shows the widget icon beside a text label. Text only shows just the label. Icon only shows just the icon for a more compact look.
- Text: the label on the launcher button. It’s turned off when Display is set to Icon only.
- Position: choose whether the launcher sits on the right, the default, or the left side of the screen.
The launcher stays in a fixed position. It remains visible as customers scroll down the page.
Next, we’ll look at the Sharing Options settings.
Sharing Options Settings
Sharing Options control how members share their referral links from the widget. You can turn on the channels you want to offer. You can also edit the ready-made messages to match your brand’s voice. These settings only apply when the Referrals Program is on.

- X: shows or hides the X sharing button in the Refer your friends section.
- X Message: the ready-made message members post when they share on X, up to 280 characters. Available placeholders:
{site_name},{advocate_name},{reward_name}, and{referral_link}. - Facebook: shows or hides the Facebook sharing button.
- Email: shows or hides the Email sharing button.
- Email Subject: the text that appears as the title of each referral email. Available placeholders:
{site_name},{advocate_name},{reward_name}, and{referral_link}. - Email Message: the body of referral emails. Available placeholders:
{site_name},{advocate_name},{reward_name}, and{referral_link}.
If you leave X Message or Email Subject blank, RewardsWP uses the default shown under the field.
Note: Facebook doesn’t allow ready-made messages. When a member shares their link on Facebook, Facebook asks them to write their own message.
When the widget looks the way you want, click Save Changes in the save bar at the bottom of the screen.

That’s it! You know what each panel of the rewards widget shows your members and guests, and how to change its look. Next, to choose which products earn points or get a reward’s discount, read Excluding products from rewards and points.
FAQ
Below, we’ve answered some of the most common questions about the rewards widget.
Can I link to the widget from a navigation menu?
Yes. You can use a hash link, such as #rewardswp-home, as the link of any menu item. To add a custom link to a menu, see How to Add a Navigation Menu in WordPress. Hash links work well in menus because they open the widget without reloading the page.
See Linking to a Widget Panel for every link you can use.
What’s the difference between the launcher and the widget?
The launcher is the floating button customers click to open the widget. The rest of the widget is the slide-out window that holds every panel in this guide. You can change both on the Widget tab, at RewardsWP » Settings.
Do my guests and members see different things?
Yes. Members see their own points balance, referral link, and full activity history. Guests see a preview of the program with prompts to join. Both can browse Ways to earn and Ways to redeem. Only members can redeem rewards.
Why does my member’s balance show a negative number?
When you refund an order, RewardsWP takes back the points the order earned, even if the member already spent them. If that takes the balance below zero, the rewards widget and the Members list show it as a negative number. The member can redeem again once they earn those points back.
Can I change the name of points to something else?
Yes. From your WordPress admin sidebar, go to RewardsWP » Settings. On the Settings page, click the Points tab.
Under Points Branding, set the Plural and Singular names in Points Currency, such as “Stars” and “Star”. The new name appears throughout the widget and Rewards Activity. Renaming your points is available on the Basic, Plus, and Pro plans.