





Looking for a fast, secure, and seamless way to pay your affiliates directly into their bank accounts? Paying affiliates with Stripe makes that possible. With a one-time setup, you can send affiliate earnings directly through Stripe, without ever needing spreadsheets or manual processing.
In this guide, we’ll walk you through how Stripe payouts work, how to set them up, and how to send them.
Overview of Stripe
AffiliateWP includes a built-in Stripe integration that lets you pay your affiliates using Stripe.
You connect Stripe by entering your secret key in AffiliateWP’s payout settings. Affiliates then set up payouts from their affiliate area, and AffiliateWP creates a Stripe Express account for each of them, connected to your own Stripe account. Once your key is in place and an affiliate has finished their setup, you can pay them in one click.
When you send a payout, funds move from your Stripe account to your affiliate’s connected Stripe account. Stripe then sends them on to the affiliate’s own bank.
New to Stripe? Learn how to create your Stripe account here.
Setting up Stripe payouts
To get started, go to AffiliateWP » Settings » Payouts and click Configure on the Stripe row.

International Affiliate Payouts: Two options for paying affiliates in other countries in their local currency. Bank payouts (via Stripe account) pays through a Stripe Express account. Bank payouts (direct) reaches more countries and pays the bank directly, and needs a US- or UK-based Stripe account.
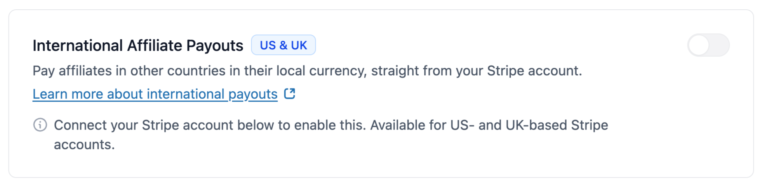
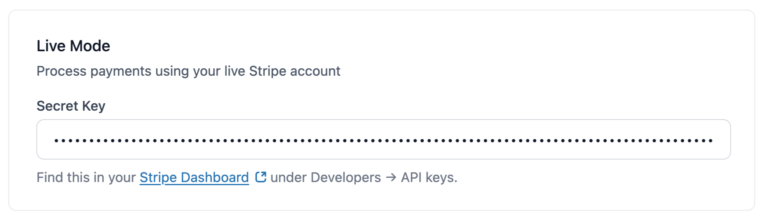
Live Mode: Where you connect your live Stripe account to send real payouts.
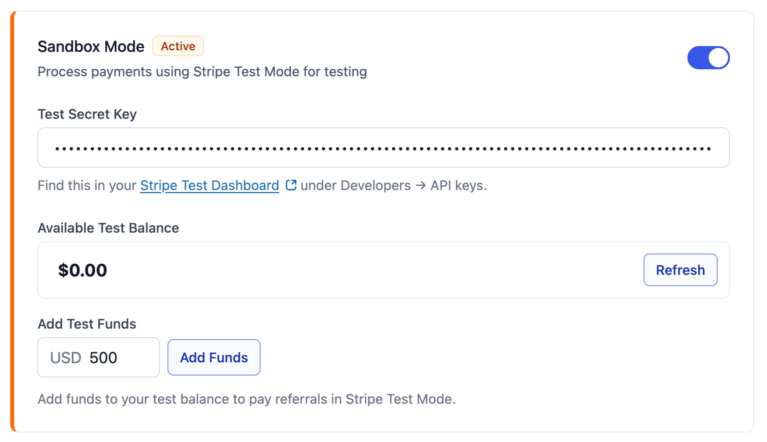
Sandbox Mode: A test environment where you can run payouts without real money. It shows a test payments balance, and a test Financial Account balance once the bank option is on, each with its own control for adding funds.
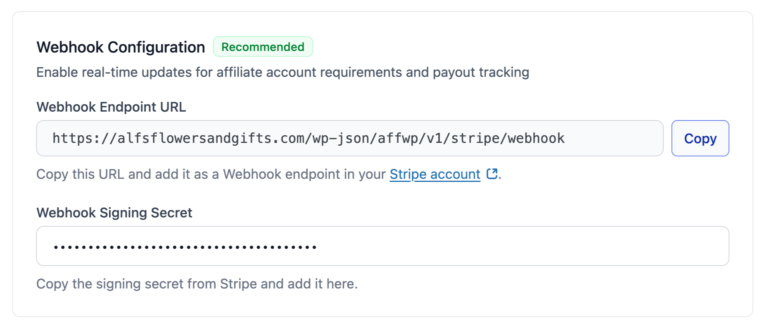
Webhook Configuration: The endpoint and signing secret that let Stripe tell AffiliateWP when an affiliate finishes setup, when Stripe needs more information from them, or when a payout fails. Payouts still run without it, but nobody is emailed about those events.
Let’s walk through each section.
International Affiliate Payouts
Two options here pay affiliates in other countries in their local currency, straight from your Stripe account. Which one pays a given affiliate depends on the country they declare, and AffiliateWP picks it for them.
Turning them on, the countries each one reaches, what Stripe charges, and what your affiliates see are all covered in paying affiliates internationally.
Live Credentials
To process real payouts, you’ll need to connect your live Stripe account by entering your Live Secret Key. If the connection is successful, a green checkmark will appear next to your credentials.
Not sure where to find your keys? Log in to your Stripe Dashboard and go to Developers » API Keys.
After entering your key, toggle to on and click Save Changes. Once enabled, Stripe will be available as a payout method.
Sandbox Mode (Test Environment)
Sandbox Mode lets you simulate payouts without processing real transactions. This is especially helpful for testing your Stripe payouts configuration and ensuring that everything works as expected before going live.
To enable Sandbox Mode:
- Enable Sandbox Mode by toggling it on.
- Enter your Test Secret Key found in your Stripe Test Dashboard under Developers » API Keys.
New to Stripe? Learn how to create your Stripe account here.
The card then shows two test balances, because the two Stripe options are funded from different places. Each has its own Add Funds control and its own Refresh.
- Payments balance pays affiliates through their own Stripe accounts. Topping it up puts a test card charge through, the same way a real sale would.
- Financial Account balance pays affiliates straight to their bank. Test funds here land immediately, so you can pay a bank transfer as soon as you add them.
Fund the one you are testing. A healthy payments balance does nothing for a bank transfer, and an affiliate paid that way fails for insufficient funds while the other balance sits full.

Test funds do not involve real money. They’re only used in Stripe’s test environment for simulating payouts.
Webhook Configuration (recommended)
Webhooks keep AffiliateWP in sync with Stripe by providing real-time updates when an affiliate’s account changes status or when a payout is sent.
Once it is set up the card tells you whether events are actually arriving, so you can see it is working rather than assume it. This section includes:
- A Webhook Endpoint URL that you can copy into Stripe
- A field to paste the Webhook Signing Secret from Stripe
These steps are optional but highly recommended for better reliability and debugging.

Setting up webhook events
To make sure Stripe can send real-time updates back to AffiliateWP, we recommend configuring the following events when setting up your webhook:
Start by logging in to your Stripe Dashboard. In the bottom-left corner of the dashboard, click on Developers. Then, from the side menu, select Webhooks.
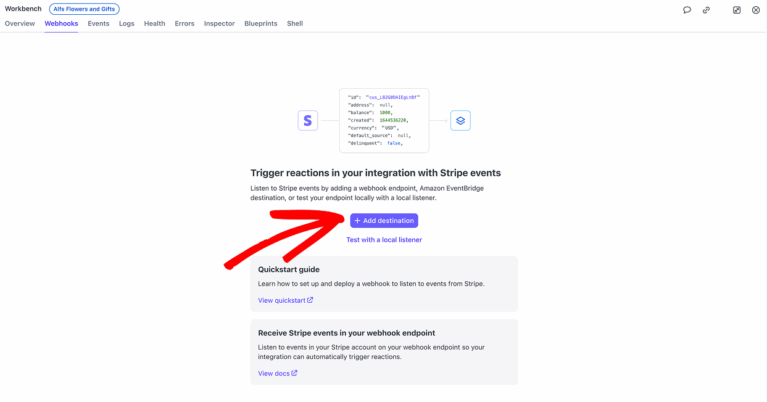
On the Webhooks page, click the Add Destination button to begin setting up a new webhook.
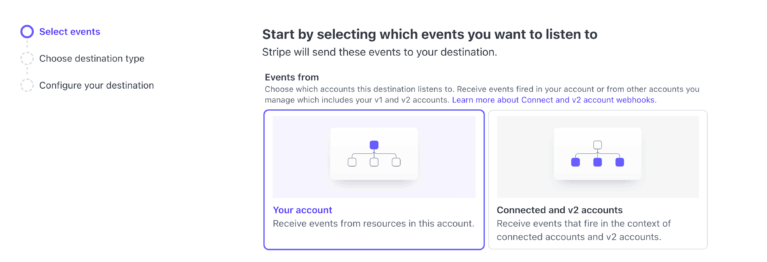
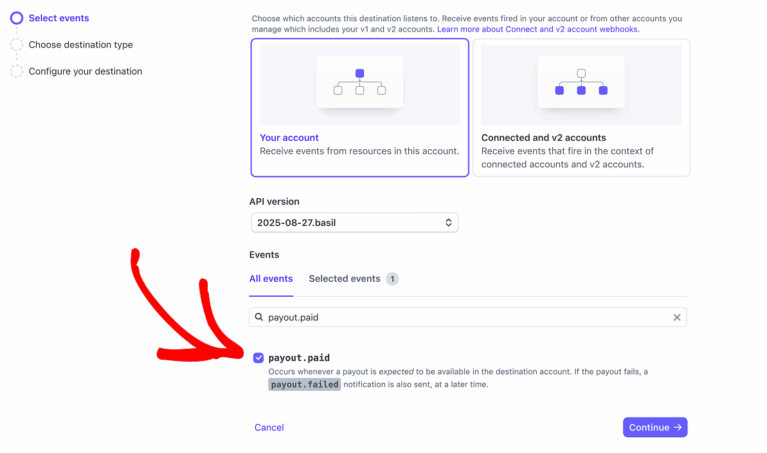
On the Select events page, Stripe will ask you to choose which account should trigger events. Under the Events from section, ensure that Your account is selected. This is pre-selected by default and ensures that events triggered from your Stripe account are sent to AffiliateWP.
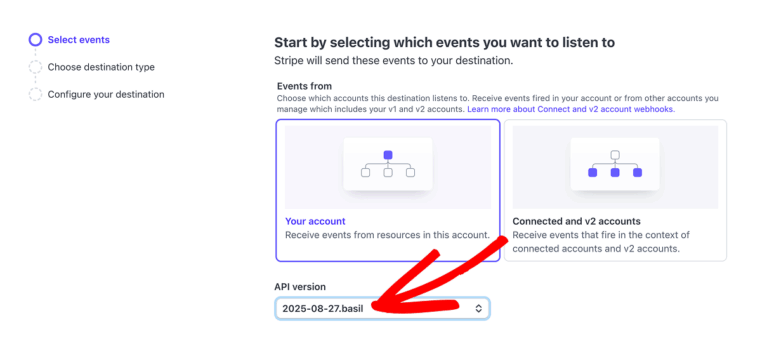
Just below that, you’ll see the API version field. From the dropdown, select the latest available version to ensure compatibility with the most recent Stripe features and improvements.
Next, under the All events tab, use the Find event by name or description field to search for specific event names.
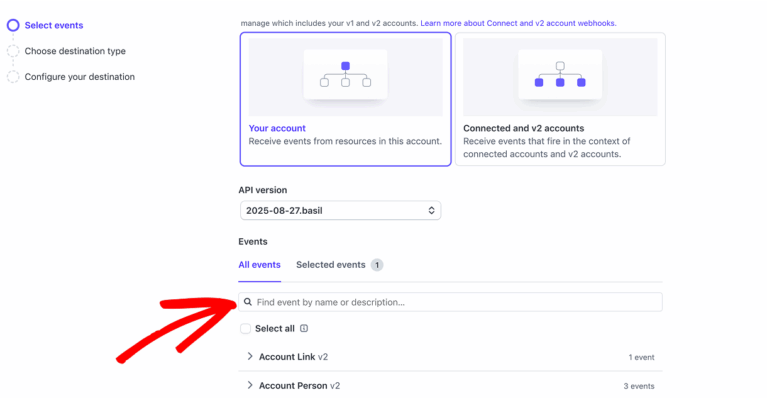
Then, select the following events to ensure AffiliateWP receives the necessary updates from Stripe:
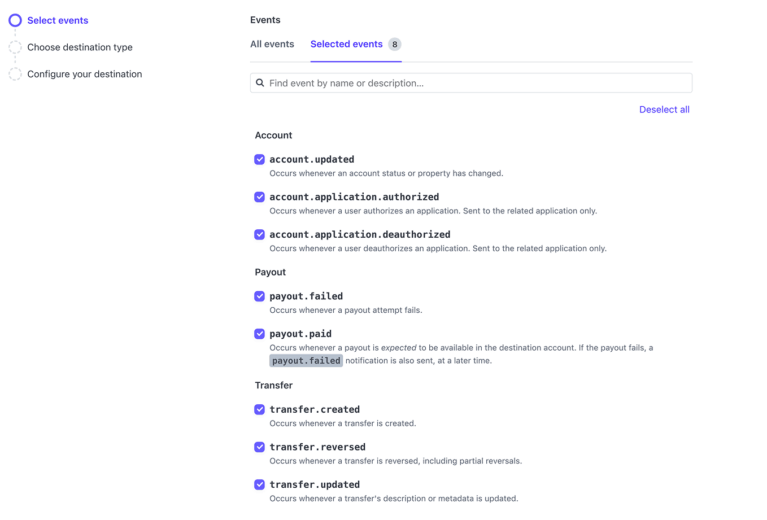
payout.paid– Notifies when Stripe has sent a payout on to the affiliate’s bank. This is the last step Stripe can report: no bank tells it the money arrivedpayout.failed– Notifies when a payout fails to reach the affiliate’s banktransfer.created– Notifies when a transfer is initiated to the affiliate’s Stripe accounttransfer.reversed– Notifies when a previously sent transfer is reversedtransfer.updated– Notifies when the transfer status or metadata is updatedaccount.updated– Tracks changes in the affiliate’s account (e.g., status or verification info)account.application.authorized– Confirms when an affiliate connects their Stripe accountaccount.application.deauthorized– Triggers if the affiliate disconnects from your Stripe account
Once all events are selected, proceed by clicking the Selected events tab to review your selections.
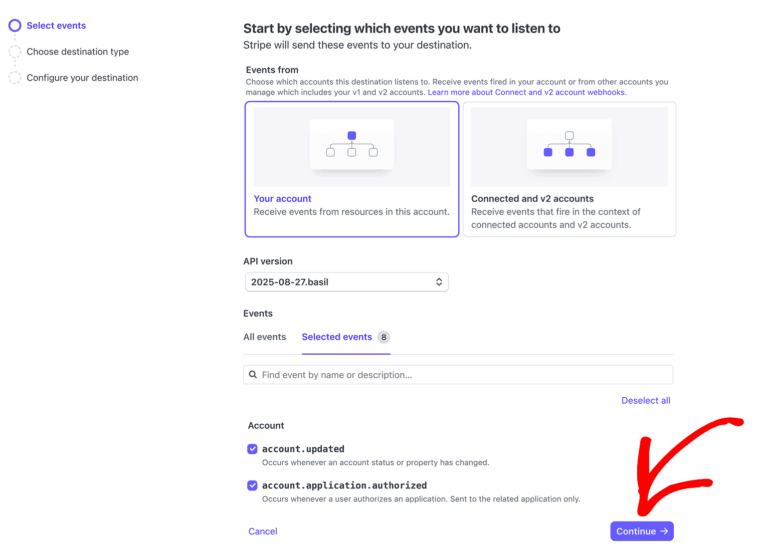
Once all events are selected, click Continue to proceed to the next step.
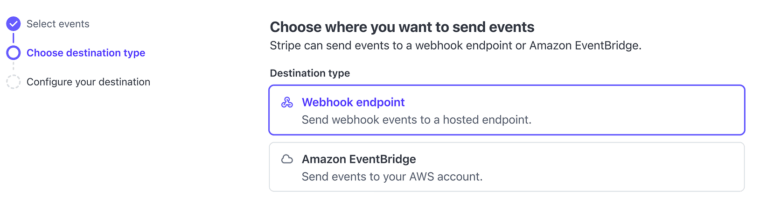
On the Choose destination type screen, ensure that Webhook endpoint is selected. This option is pre-selected by default and allows Stripe to send event notifications to your specified webhook URL.
On the Configure destination screen, Stripe will ask where to send the selected events. In the Destination name field, enter a recognizable name to help you identify this webhook later. In the Endpoint URL field, paste the webhook URL provided in your WordPress admin under: AffiliateWP » Settings » Payouts » Stripe Payouts. Optionally, you can add a Description to provide more context about this webhook’s purpose. Once everything is filled in, click Create destination to complete the setup.
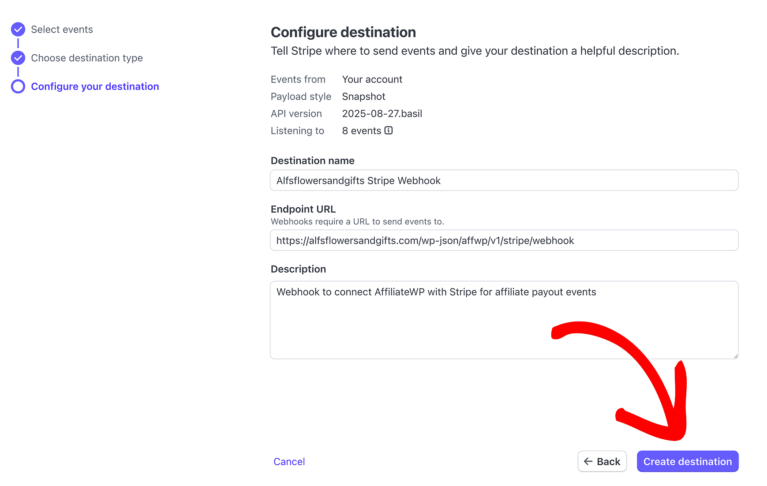
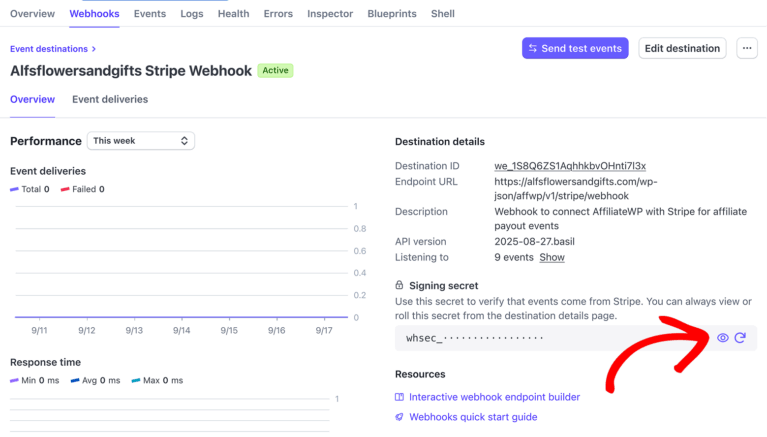
After clicking the Create Destination button, Stripe will automatically redirect you to the newly created webhook’s details page. In the Signing secret section, click the eye icon to reveal the secret key.
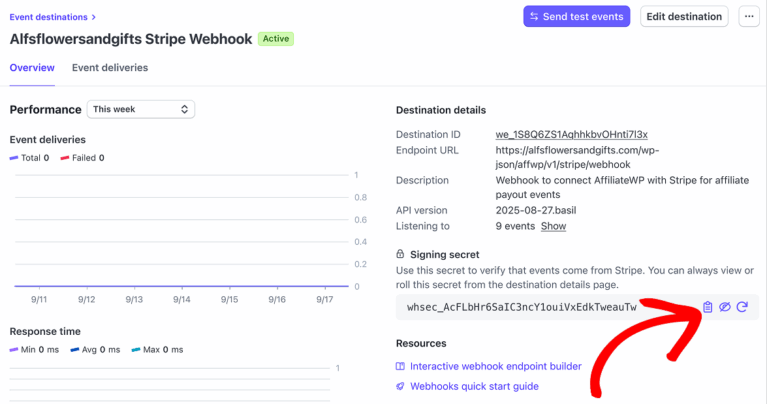
Then click the copy to clipboard icon to copy it.
Next, return to your WordPress admin and paste the copied key into the Webhook Signing Secret field under AffiliateWP » Settings » Payouts » Stripe Payouts.
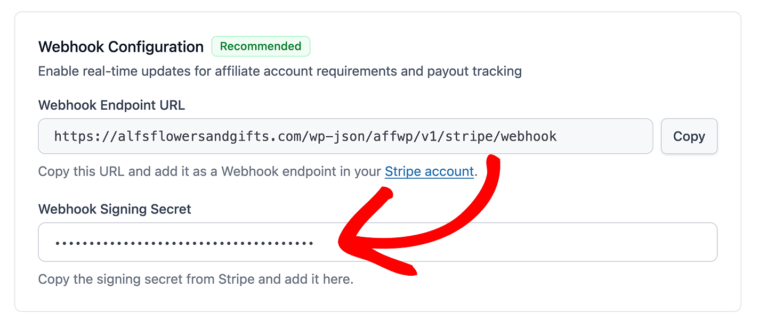
If you’re working in test mode, use the test Webhook URL and test Signing Secret. For live payouts, use your live credentials. Each mode has its own unique keys and webhook settings.
Email notifications
AffiliateWP’s Stripe payouts include built-in email notifications that keep both site admins and affiliates informed of key payout events.
To configure these notifications, go to AffiliateWP » Settings » Emails and expand the Stripe Payout Emails card. Every email in it has its own on/off switch and a Configure button for the wording.

The interface is divided into two sections: Affiliate Manager Emails and Affiliate Emails.
Stripe payout email notifications require webhooks to be configured in your Stripe Dashboard. You can find Stripe’s official webhook configuration guide here. Webhooks allow AffiliateWP to receive real-time updates from Stripe and trigger these notifications automatically.
Affiliate Manager Emails
These notifications are sent to the site admin (or whoever manages affiliate payouts) when Stripe reports a change in payout or account status.
Each notification has a Configure button that lets you customize the subject line, body content, and add dynamic tags. You can also preview or send a test email from this screen.
Here are the available notifications:
- Transfer Created Notifies admins when a transfer is successfully initiated to an affiliate’s Stripe account.
- Transfer Failed Alerts admins when a transfer attempt to Stripe fails.
- Transfer Reversed Critical notification when Stripe reverses a previously successful transfer.
- Payout Completed Sent when Stripe has sent the money to the affiliate’s bank. Nothing confirms that it arrived, so this is the last step anyone is told about.
- Payout Failed Sent when a payout fails to reach the affiliate’s bank due to an issue (e.g., invalid bank account).
- Account Verification Required Alerts you when an affiliate needs to complete additional verification steps to be eligible for payouts.
- Account Connected Notifies you when an affiliate successfully connects their Stripe account.

Affiliate Emails
These are sent directly to affiliates, helping them stay updated on their account and payout statuses.
Available notifications include:
- Transfer Created Informs affiliates that a transfer has been initiated to their Stripe account.
- Payout Completed Lets affiliates know the funds have reached their bank account.
- Payout Failed Alerts the affiliate that the payout could not be completed by their bank.
- Account Verification Required Notifies the affiliate if Stripe requires additional identity or bank information to enable payouts.
- Account Connected A welcome message confirming their Stripe account was successfully connected.
Each email can be customized with its own subject, message, and template tags. These are accessed by clicking the Configure button next to each notification
The email an affiliate gets when a payout fails is not in this card. It is Payout Failed — Action Required, under AffiliateWP Emails on the same screen, because it covers every payout method rather than Stripe alone. One subject is shared, and the body has a separate version per method, so you can word the Stripe one differently from PayPal. Only the methods you have turned on appear there. Its switch follows your failed-payout email setting under AffiliateWP » Settings » Payouts, so turning it off there turns it off here too.

How affiliates set up their payouts
Your affiliates do the setup themselves, on one screen. They pick Stripe as their payout method and answer which country they receive payouts in, meaning the country of the bank account where the money lands. AffiliateWP then shows the setup for whichever Stripe option covers that country. The country list deliberately includes every country, so an affiliate gets a clear answer instead of starting a setup that cannot finish.
Where affiliates find the setting
The panel is the same on both affiliate interfaces, reached a different way.
- The affiliate opens Settings. In the Affiliate Area that is the Settings tab; in the Affiliate Portal it is Settings in the sidebar.
- Under Payout method, they choose Stripe.
- They answer the payout country question below it. This is the country of the bank account the money lands in, not where they live.
- They click Set up payouts.
They do not need to save first. Set up payouts carries the country they chose with it, so they can go straight from the dropdown to Stripe.
An affiliate with only one method available never sees the dropdown. In its place is a line reading Paid via Stripe, and they start at the country question.

What the affiliate sees at each stage
The screen changes as an affiliate progresses, so what they see is also how you tell how far they have got.
Setting up for the first time
If their country can be paid, they see Set up payouts.
On the bank option, the page tells them they will finish on a secure Stripe page, that no Stripe account is needed, and that payouts go straight to their bank in their local currency.
On the Stripe-account option, Stripe walks them through its own checks. They confirm their identity, give their banking details, and accept Stripe’s terms, and Stripe creates a Stripe Express account that pays out to their bank. Only this option involves a Stripe account, so only this option asks them to accept anything from Stripe.
Part-way through setup
If they started and did not finish, they see Continue setup on the bank option, or Complete Setup on the Stripe-account option.
On the Stripe-account option, an affiliate who has not finished can use Choose a different country to start over.
Set up and getting paid
Once the bank option is ready they see Ready to receive payouts, the last four digits of the bank account, and Update bank details.
Affiliates who are already set up and getting paid do not need to do anything when you turn these options on.
When something blocks setup
If Stripe needs more information, they see Fix your setup.
If Stripe cannot reach their country, they see that Stripe is not available for payouts there, with a Switch to action for another method you have turned on. See paying affiliates internationally for which countries each option reaches.
Customizing the affiliate onboarding page
As the site admin, you can customize the Stripe-hosted onboarding experience that affiliates see when connecting their account. To set your brand color for the Stripe onboarding page:
- Log in to your Stripe Dashboard
- Go to Settings » Connect » Onboarding interface, and click Customize
- Set your logo, brand color, and accent options
- Save changes, which then apply to the hosted onboarding pages
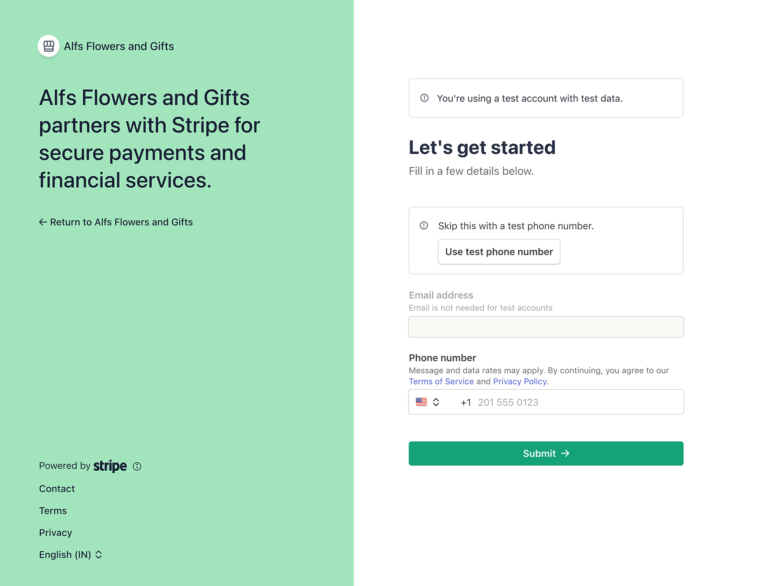
Stripe allows you to customize only the onboarding page that affiliates see while connecting their Stripe account. These settings do not affect your Affiliate Area or other Stripe pages. For a full guide on customizing the onboarding page, refer to Stripe’s Hosted Onboarding documentation.
Checking an affiliate’s setup
There are two places to look. The Affiliates list tells you where everyone stands at a glance. An affiliate’s own Edit Affiliate screen tells you which Stripe option pays them, and what is blocking it if anything is.
On the Affiliates list
Go to AffiliateWP » Affiliates. The Payout Method column names each affiliate’s method, and flags the ones you cannot pay. It reports on Stripe and on PayPal, from the same check the Pay Affiliates preview runs, so the list and the preview cannot disagree.
A coloured dot means that affiliate needs attention. Everyone else shows the bare method name, so the few you cannot pay are the only marked rows on the screen. Hover any cell, marked or not, to see where the money goes: the masked bank account and how it is delivered, the payment email, or when Stripe last confirmed the account.

| Flagged as | What it means |
|---|---|
| Not set up | They have not started, so Stripe has nowhere to send the money. |
| Awaiting setup | They were invited or started on the bank option and have not finished. |
| Pending | Stripe is still verifying their Stripe account. Payouts are paused until it finishes. |
| Action required | Stripe has asked them for something. They cannot be paid until they provide it. |
| Restricted | Their Stripe account cannot receive payouts. |
| Suspended | Their Stripe account is suspended. |
| No valid email | A PayPal affiliate with no usable payment email and no valid account email, so the payout has nowhere to land. |
Each flag is a link to the field that clears it, so you land on the payout country, the payment email, or that affiliate’s Stripe section rather than the top of their screen.
Two of these are worth knowing about in advance. Awaiting setup, Pending, Restricted and Suspended only apply to one Stripe option each, because the two work differently: an affiliate can be waiting to finish on the bank option, while only the Stripe-account option has an account for Stripe to verify or restrict. And a PayPal affiliate with no payment email is not flagged, because PayPal pays their account email instead and the payout still goes through.
An affiliate no method can reach at all reads Unavailable.
On the Edit Affiliate screen
Open an affiliate from AffiliateWP » Affiliates with the Edit Affiliate row action. A Stripe section holds three things.
- The payout country, which decides which Stripe option pays the affiliate. It is editable until they set up. After that Stripe owns it: the country came from the account Stripe created, and the screen tells you to disconnect that account before the affiliate can be paid in a different one. See changing an affiliate’s payout country for what that costs an affiliate who is already set up.
- The option that will pay them, as a read-only line, worked out from the country rather than stored, so it changes when you save a different country. There is no separate control for it. Once an affiliate has connected a Stripe account of their own the line reads Paid through Stripe Connect whatever country they are in, because that account is what pays them. The other values describe an affiliate who has not set up yet: Stripe Connect (cross-border payouts) or Stripe Global Payouts, naming the option their country will route them to.
- A Payout setup card for that option, and only that one. It leads with a status badge, and Details expands the rest: the connected account with its type, country and connection date, what Stripe currently reports about payouts and payments, and the controls for it. An affiliate paid through the Stripe-account option does not also show a bank-option card.
Two messages appear in place of an option name. No payout country set means the affiliate has not answered the country question yet. Not available in this country means neither Stripe option reaches the country they chose, so they need one of your other payout methods instead.

If they have not finished setup
The section says so, and states what happens instead: the affiliate is paid by your site’s default payout method until they finish. That is worth reading carefully if your default is Manual Payout, because a manual payout is recorded as paid whether or not you have actually sent the money.
If they are set up
On the Stripe-account option you get the account’s own details, what Stripe currently reports about it, a View in Stripe button that opens it in your Stripe dashboard, and a Disconnect button.
Disconnecting cannot be undone. The affiliate cannot reconnect the same Stripe Express account afterwards. To be paid through Stripe again they have to go through setup and let Stripe create a new one, so treat it as removing the account rather than resetting it.
Getting an affiliate to finish setup
To nudge someone who has not finished, open their Edit Affiliate screen from AffiliateWP » Affiliates. The reminder button there emails them a link to their own payout settings. Its label changes to reflect how far the affiliate has got and whether you have sent one already, so it is the same button either way.
Once the bank option is on, a Payout Setup Reminder email appears at AffiliateWP » Settings » Emails. Edit the wording there, or switch the email off. Turn it off and the reminder button is replaced by a note saying so, with a Copy link action so you can send the affiliate their payout settings link yourself.
Sending payouts
Once your Stripe account is connected and affiliates have linked their accounts, payouts can be sent directly from your WordPress admin.
Pay a batch from the Payouts screen
Navigate to AffiliateWP » Payouts » Pay Affiliates. On the Configure step, set your date range, optional minimum earnings threshold, and any affiliate filters. Under Payout method, either use each affiliate’s configured method, which sends Stripe affiliates through Stripe automatically and lets you restrict the batch to chosen methods, or pay everyone in the batch through one method regardless of what each affiliate picked. A Holding period toggle decides whether commissions still inside the holding period are included. The footer keeps a running count of eligible affiliates and the total, and Preview payout takes you to the grouped summary to confirm.

A referral that is already paid cannot be paid again. AffiliateWP refuses the second attempt, not Stripe, so this holds for every payout method rather than Stripe alone.
When a payout is initiated, Stripe performs two actions:
- The funds are transferred from your Stripe account to the affiliate’s connected Stripe account.
- From there, Stripe sends the funds on to the affiliate’s linked bank account.
Pay specific referrals from the Referrals screen
Go to AffiliateWP » Referrals. Next to each unpaid referral, you’ll see a Pay link.
Clicking Pay opens a popup so you can check the payout before it goes. It names the affiliate, the amount, the method, and where the money is going, and it blocks the send if anything is wrong, such as an amount below Stripe’s minimum for that country.

The confirm button names the amount you are about to send. To stop, click Cancel or close the popup.
To pay multiple referrals at once:
- Select the referrals using the checkboxes.
- Open the Bulk Actions dropdown.
- Choose Pay, then click Apply.
Frequently asked questions
Can I pay international affiliates with Stripe?
Yes. Affiliates in other countries can be paid in their own local currency, straight from your Stripe account. Which countries you can reach depends on where your own Stripe account is based. See paying affiliates internationally for the current list and the setup.
Can I test Stripe payouts before going live?
Yes. Enable Sandbox Mode in your settings and use Stripe’s test credentials. Top the test balances up from the same card, and note there are two of them, one per Stripe option. If a payout is blocked because its balance is short, an Add test funds button appears on the payout itself so you can fix it without leaving the screen.
What happens if a payout fails?
The payout itself shows the failure and what to do about it, so you see it whether or not webhooks are set up. Webhooks add the email alerts on top. From there you can ask the affiliate to update their bank details, or run the payout again.
Can I customize the look of the onboarding experience for affiliates?
Yes! Stripe lets you brand the onboarding pages your affiliates see. To do this:
1. Log into your Stripe Dashboard
2. Go to Settings » Branding
3. Set your logo, colors, and accent styling
4. Save. The changes then apply automatically on the hosted onboarding page
Can I use a different currency in AffiliateWP than what’s set in my Stripe account?
AffiliateWP sends every payout in your store currency (set in AffiliateWP’s settings), not your Stripe account’s currency, and doesn’t check the two against each other. Your Stripe account does need to be able to pay out in that store currency, so set your store currency to one your account supports. What each affiliate receives is separate: when you pay an affiliate in another country, Stripe converts the payout into their own local currency automatically.
Where can I view connected affiliates in my Stripe dashboard?
Log in to your Stripe account, and from the left-hand menu, click Connected Accounts to see all affiliates who have connected.
Are there any fees involved in sending payouts?
Stripe Connect charges standard transaction fees for each payout, but AffiliateWP does not charge anything extra. To view the Stripe Connect fees for your country, refer to Stripe’s official pricing page
Does the Affiliate Portal addon support Stripe payouts?
Yes. If your site is using the Affiliate Portal addon, Stripe payouts are fully supported. Affiliates can connect their Stripe account, view connection status, and access their Stripe dashboard, all from within the Affiliate Portal.
What happens if I change my Stripe API key?
Generate the new key in Stripe, then paste it into the Stripe card at AffiliateWP » Settings » Payouts and save, or AffiliateWP keeps using the old one. If the new key belongs to the same Stripe account, that is all there is to it and every affiliate stays connected. However, if you switch to a different Stripe account, all affiliates must reconnect using the new onboarding flow.
What if I reverse a payout in Stripe?
If you reverse a transfer in Stripe, the funds return to your Stripe account and AffiliateWP marks the referral Unpaid again.
Timing matters. Stripe only allows the reversal while the money is still in the affiliate’s Stripe balance. Once Stripe has paid it on to their bank, that balance is gone and the reversal has nothing to take back, so recovering it becomes a conversation with the affiliate rather than something you can do in Stripe.
What can affiliates do in their Stripe Dashboard?
Once connected, affiliates can access their Stripe Express Dashboard using the link provided in their Affiliate Area. This dashboard allows them to:
- View payout history and upcoming payments
- Update personal or bank account information
- Manage tax details
- Upload identification if needed for verification
For more information on the Stripe Express Dashboard, see Stripe’s documentation here.