





Would you like to ask an AI assistant who your top advocates are, or have it add points to a member’s balance for you? RewardsWP works with AI assistants such as Claude, ChatGPT, and Cursor. You can look up your loyalty program data and manage members, points, referrals, and rewards in plain English.
In this guide, we’ll walk you through connecting an AI assistant to RewardsWP, turning on write access, and trying your first prompts. All you need is WordPress 6.9 or later and RewardsWP 1.6.0 or later.
Requirements: AI assistants work with every RewardsWP license level, including RewardsWP Lite. Some actions need the license level that includes the matching feature. Your site needs WordPress 6.9 or later, which includes the WordPress Abilities API.
Before you get started, make sure RewardsWP is installed and activated on your WordPress site.
What can AI assistants do with RewardsWP?
AI assistants connect to your site through the Model Context Protocol (MCP). It’s an open standard that lets an AI tool use an app on your behalf. RewardsWP gives them a set of abilities. Each one is a single task, such as listing members or adding points. Your assistant picks the right ability from what you ask, so there are no commands to learn.
Assistants can always look things up. They read program totals and reports, every program setting, and members with their points history. They see referrals, rewards and their coupon codes, VIP tiers, and referral link activity too. They can also explain why a member’s balance changed and what an order earned.
With write access turned on, assistants can also make changes. They add, edit, include, or exclude members, and add or deduct points. They complete or cancel pending referrals, and cancel or extend unused rewards. They also change your settings, from ways to earn and redeem to VIP tiers and emails. They can start a CSV export too, and RewardsWP emails you a download link.
Assistants can’t change your license, and they never delete a points entry. To undo points, they add a reversal entry, so the full history stays on the member’s record.
Installing WPVibe
To get started, we’ll install WPVibe, a free plugin from SeedProd that connects your WordPress site to AI assistants over MCP. RewardsWP can install it for you from its AI MCP tab.
From your WordPress admin sidebar, go to RewardsWP » Tools. Then click the AI MCP tab.
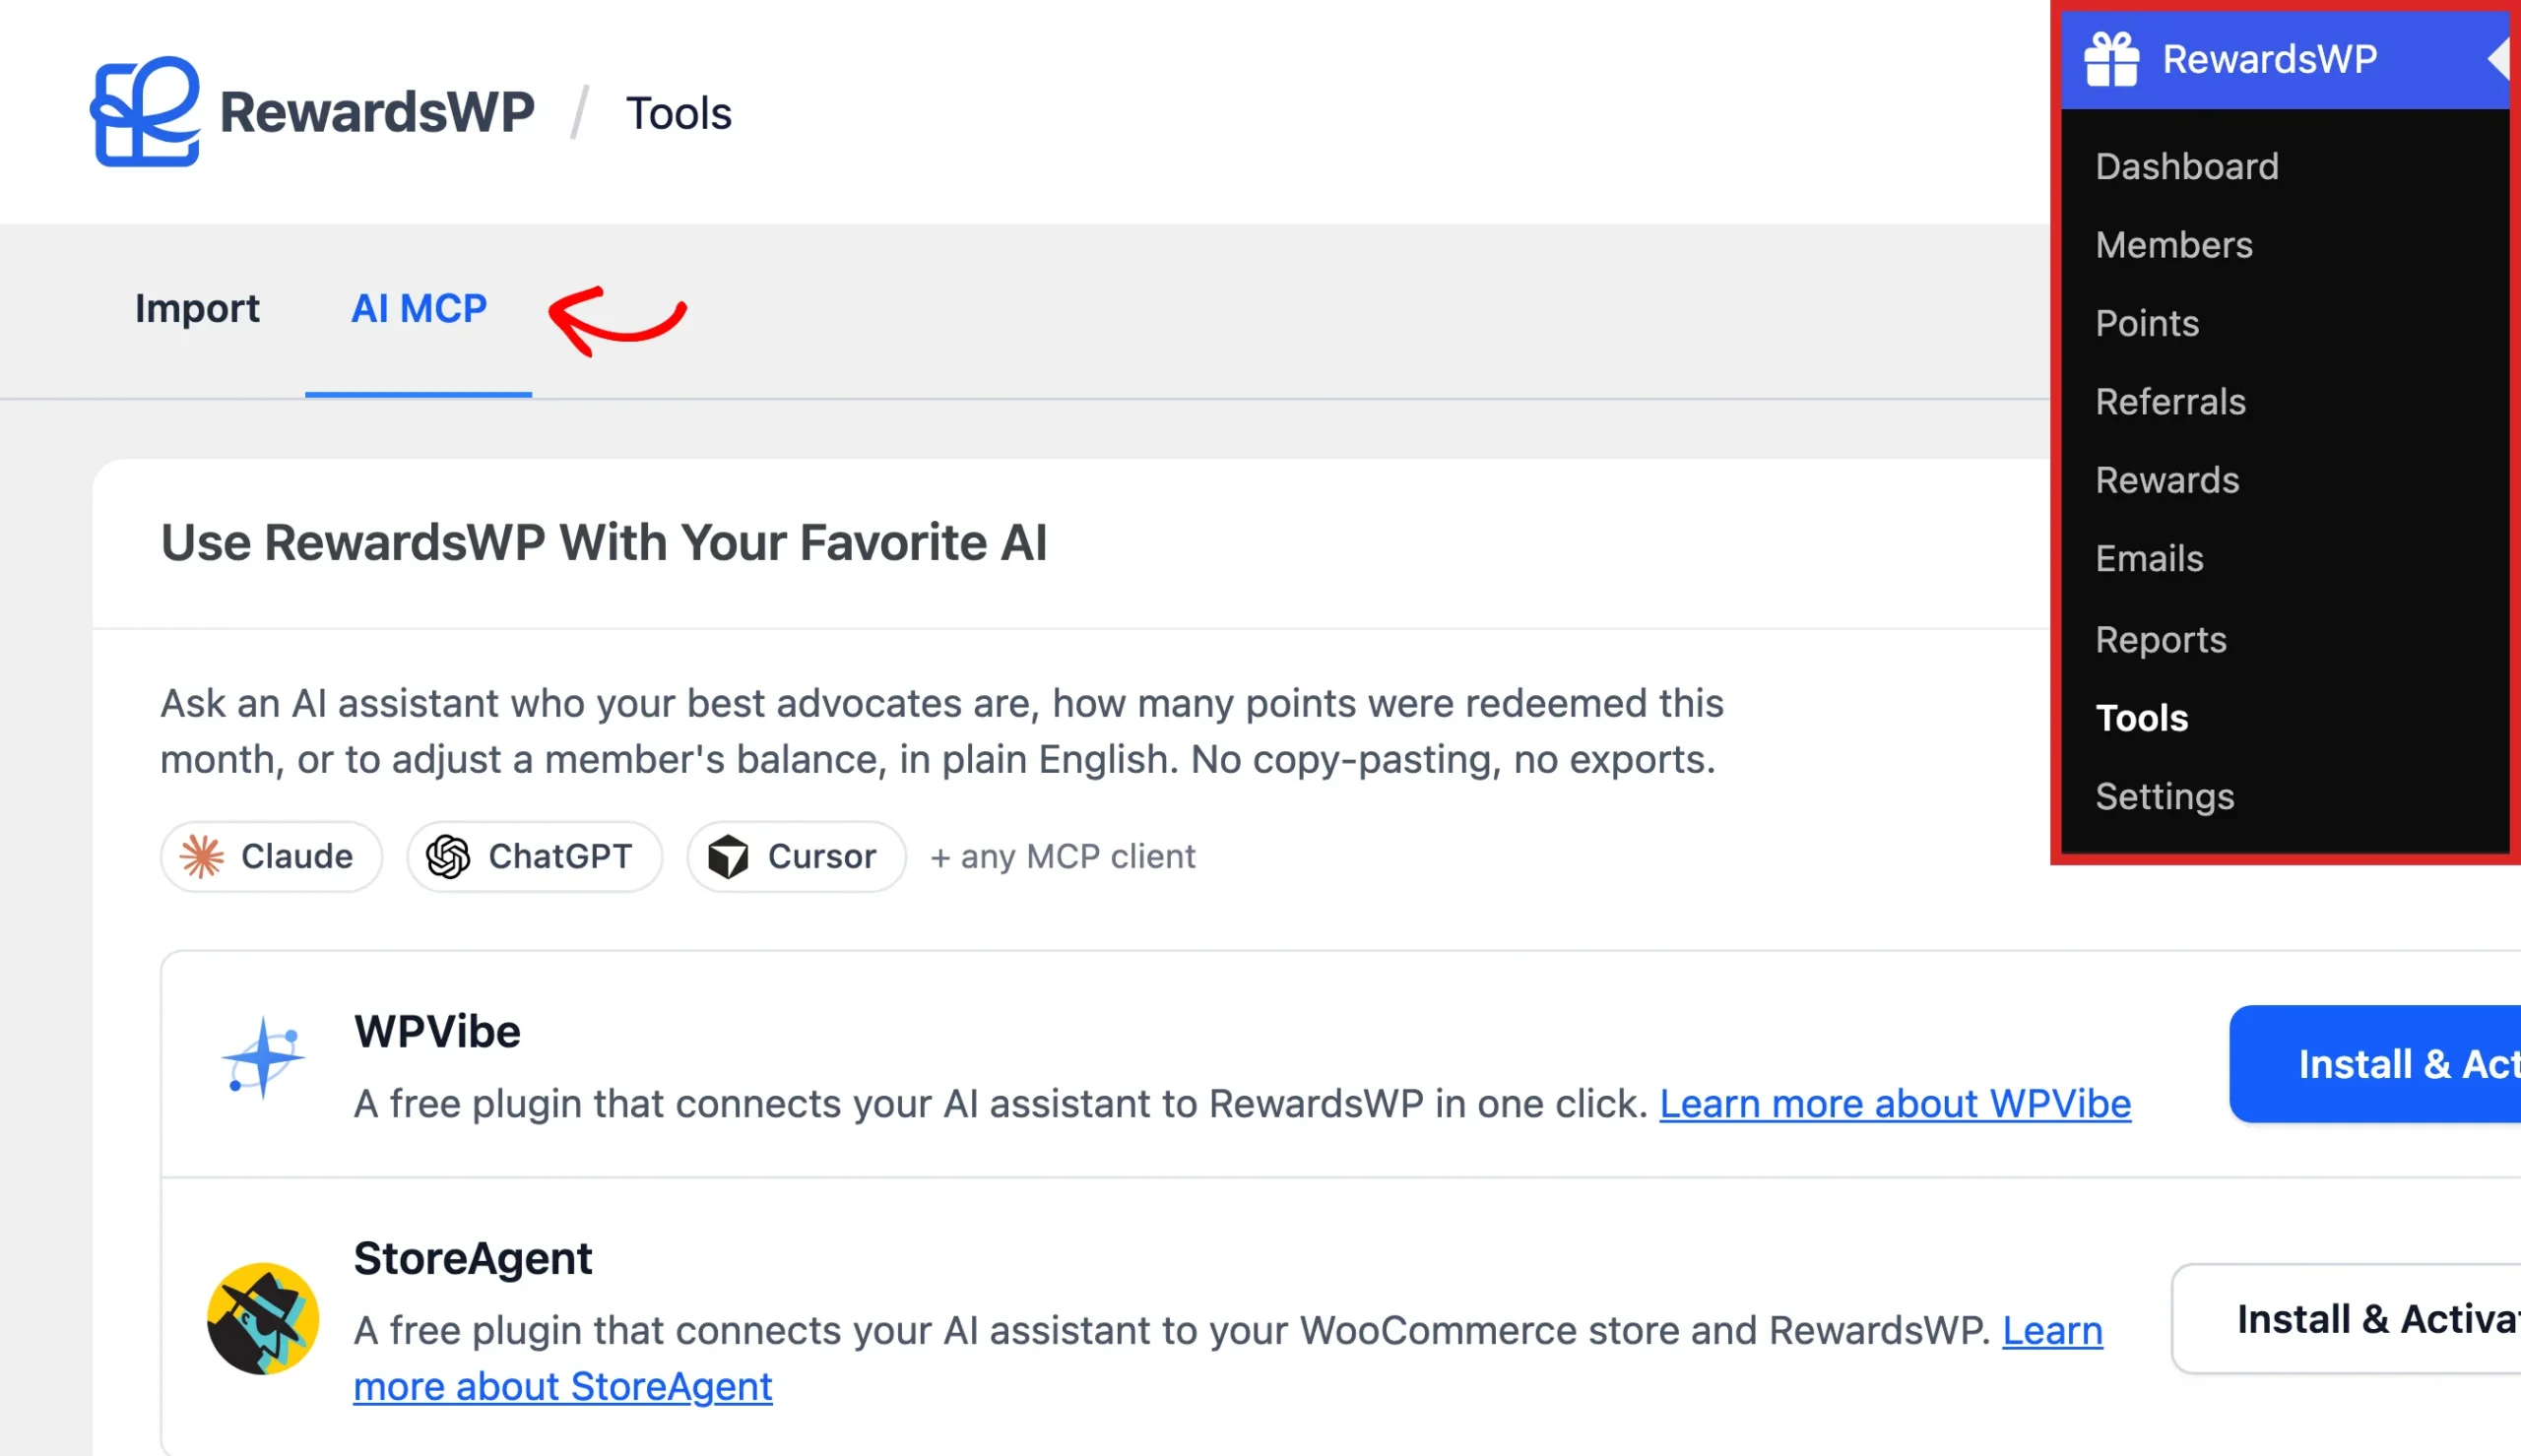
This tab brings together everything for AI in RewardsWP. It installs a connector plugin for you, holds the write access setting, and lists what assistants can do with your program.
Note: The AI MCP tab only appears on WordPress 6.9 or later.
On the AI MCP tab, click Install & Activate WPVibe.
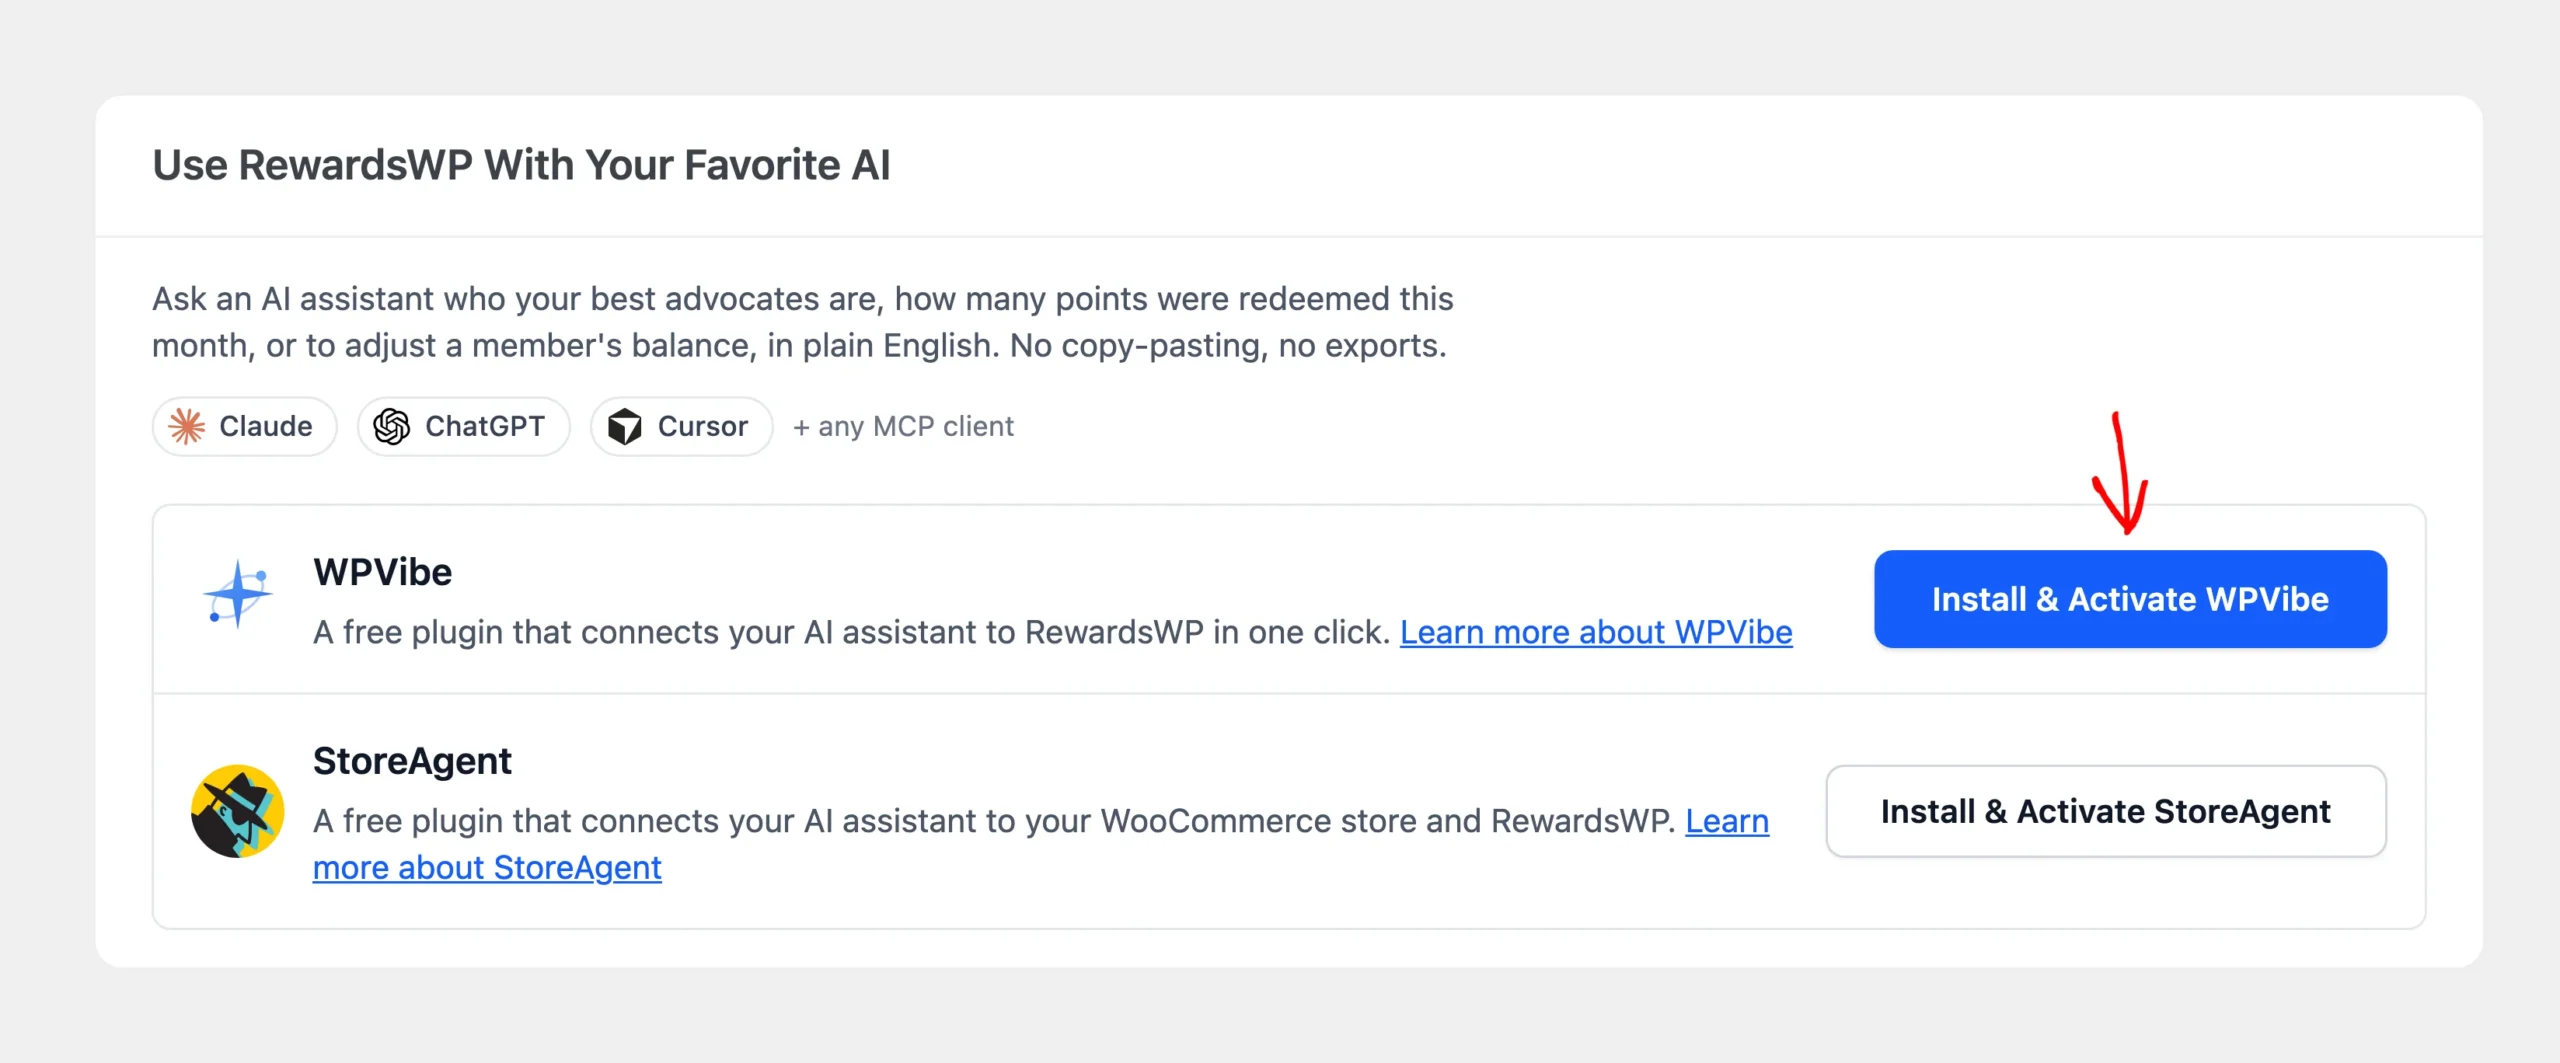
If your WordPress user can’t install plugins from the dashboard, the button reads Install from WordPress.org instead. It opens WPVibe’s page on WordPress.org, where it’s listed as Vibe AI. From there, install and activate it the same way as any other plugin.
See How to Install a WordPress Plugin.
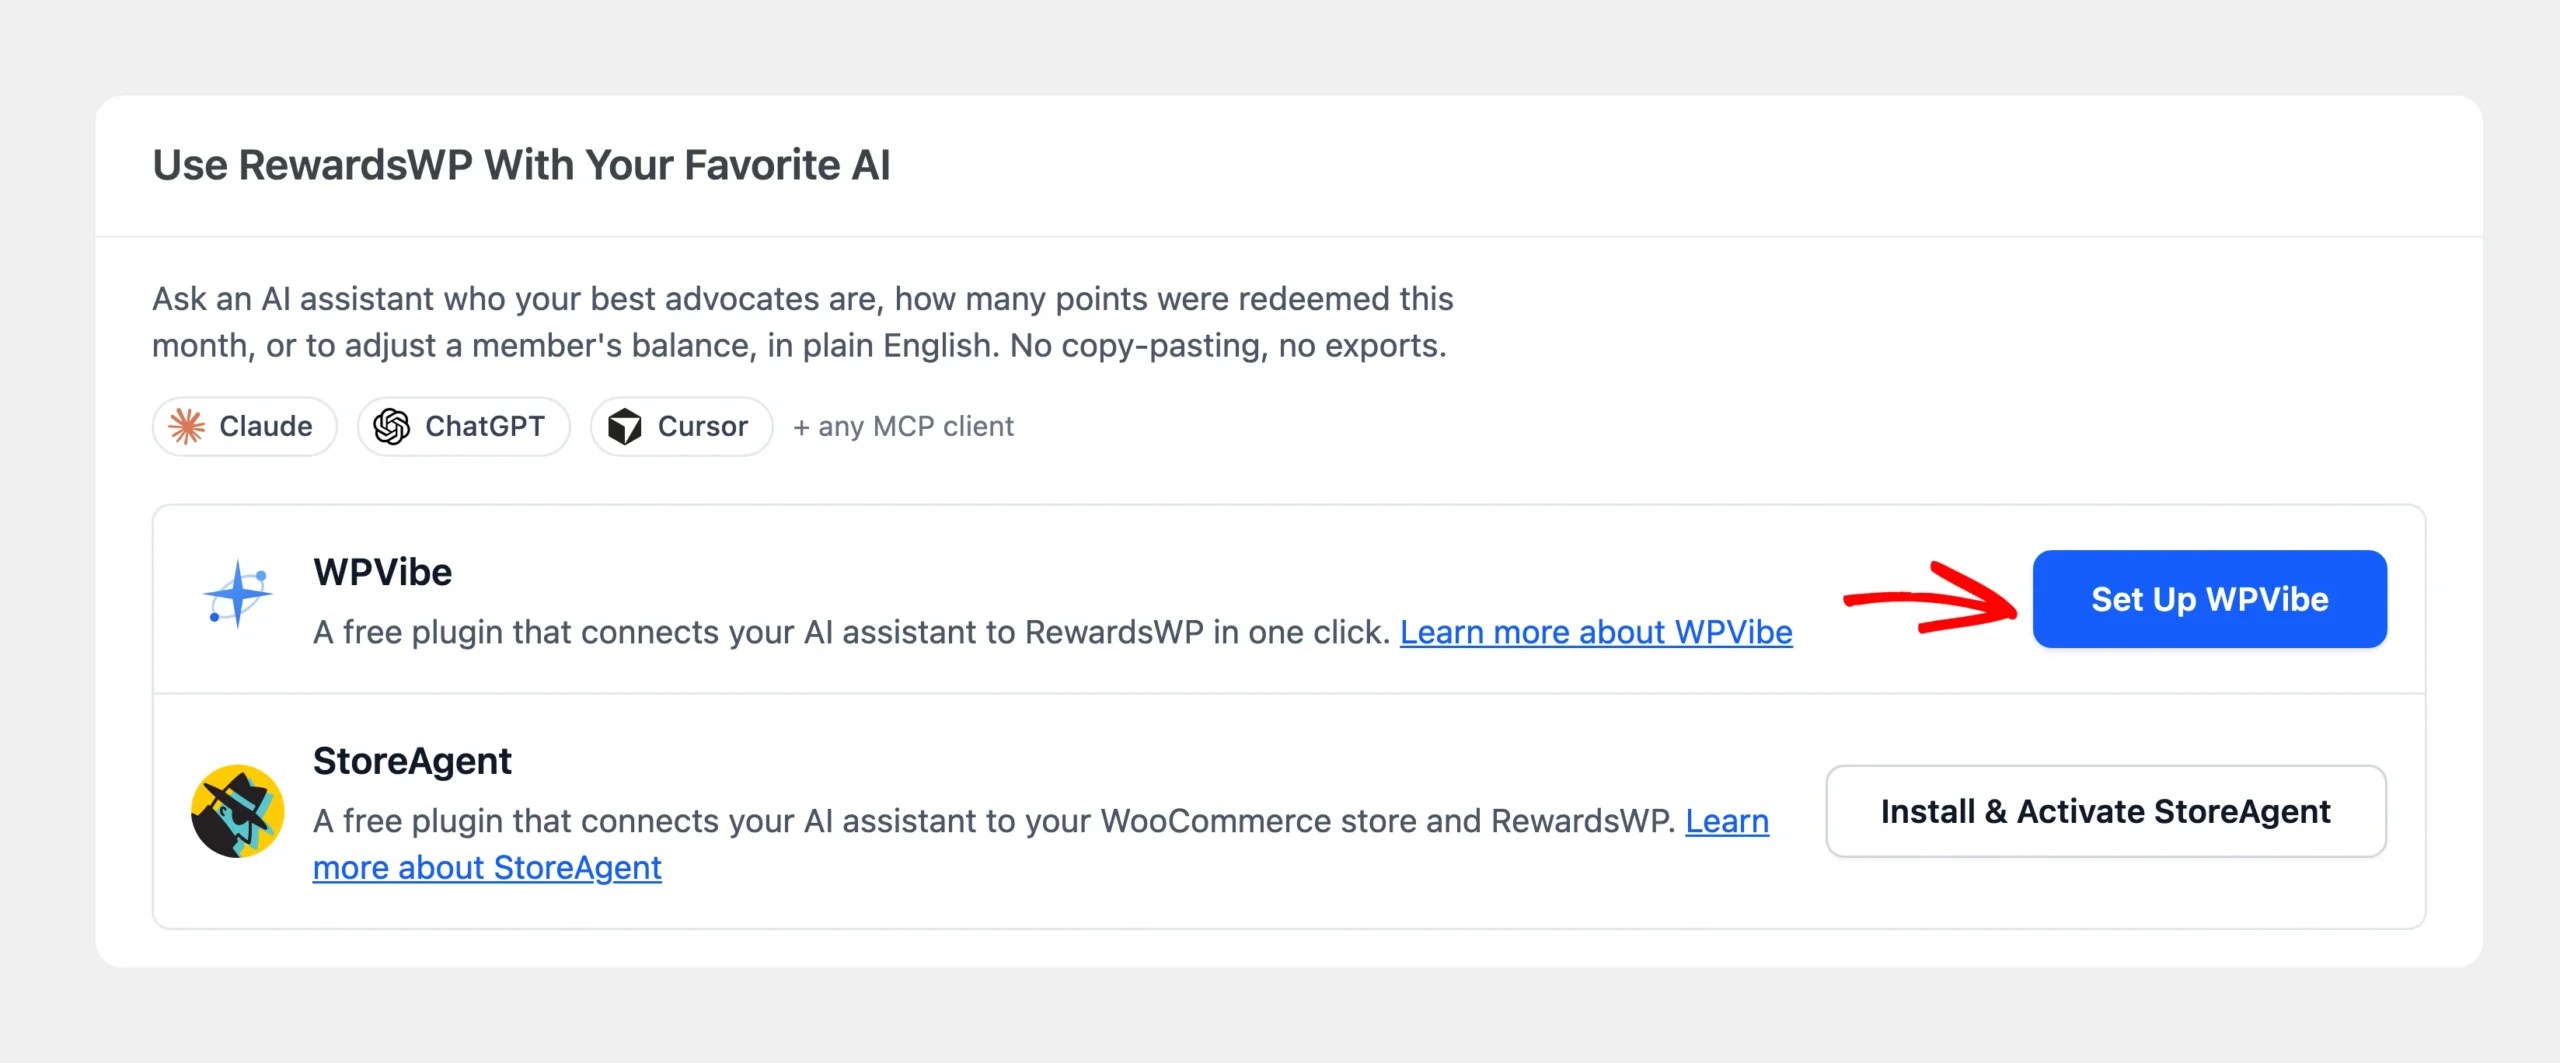
Once WPVibe is active, its button changes. Next, click Set Up WPVibe to open the WPVibe page in your dashboard.
Using StoreAgent with WooCommerce
If you run a WooCommerce store, StoreAgent is another great option. It’s a free plugin that connects your AI assistant to your WooCommerce store and RewardsWP. Its row sits below WPVibe on the AI MCP tab, as in the screenshot above. To use it, click Install & Activate StoreAgent.
Once StoreAgent is active, its button changes to Connect StoreAgent, which opens the StoreAgent dashboard to finish the connection.
The rest of this guide follows the WPVibe setup, and the write access steps are the same for StoreAgent.
Connecting your AI assistant
The WPVibe page walks you through the connection as a short checklist. It checks that WPVibe can reach your site, asks you to approve the connection, and gives you a prompt to paste into your AI assistant.
For the steps in Claude, ChatGPT, Cursor, and other assistants, see the WPVibe AI client setup guide.
Once your assistant has used the connection, the WPVibe row on the AI MCP tab shows a Connected badge. Its button also changes to Manage WPVibe.
To check that everything works, ask your assistant a simple question, such as “How many members does my loyalty program have?” It answers with the totals from your program.
Enabling MCP write access
At this point, your assistant can read your program data but can’t change anything. RewardsWP keeps write access off by default, so nothing in your program changes until you decide it should. AI assistants can make mistakes, and this keeps that decision with you.
To let your assistant make changes, turn on the Enable MCP Write Access toggle in the AI Permissions section. A Settings saved successfully message appears when the change takes effect.
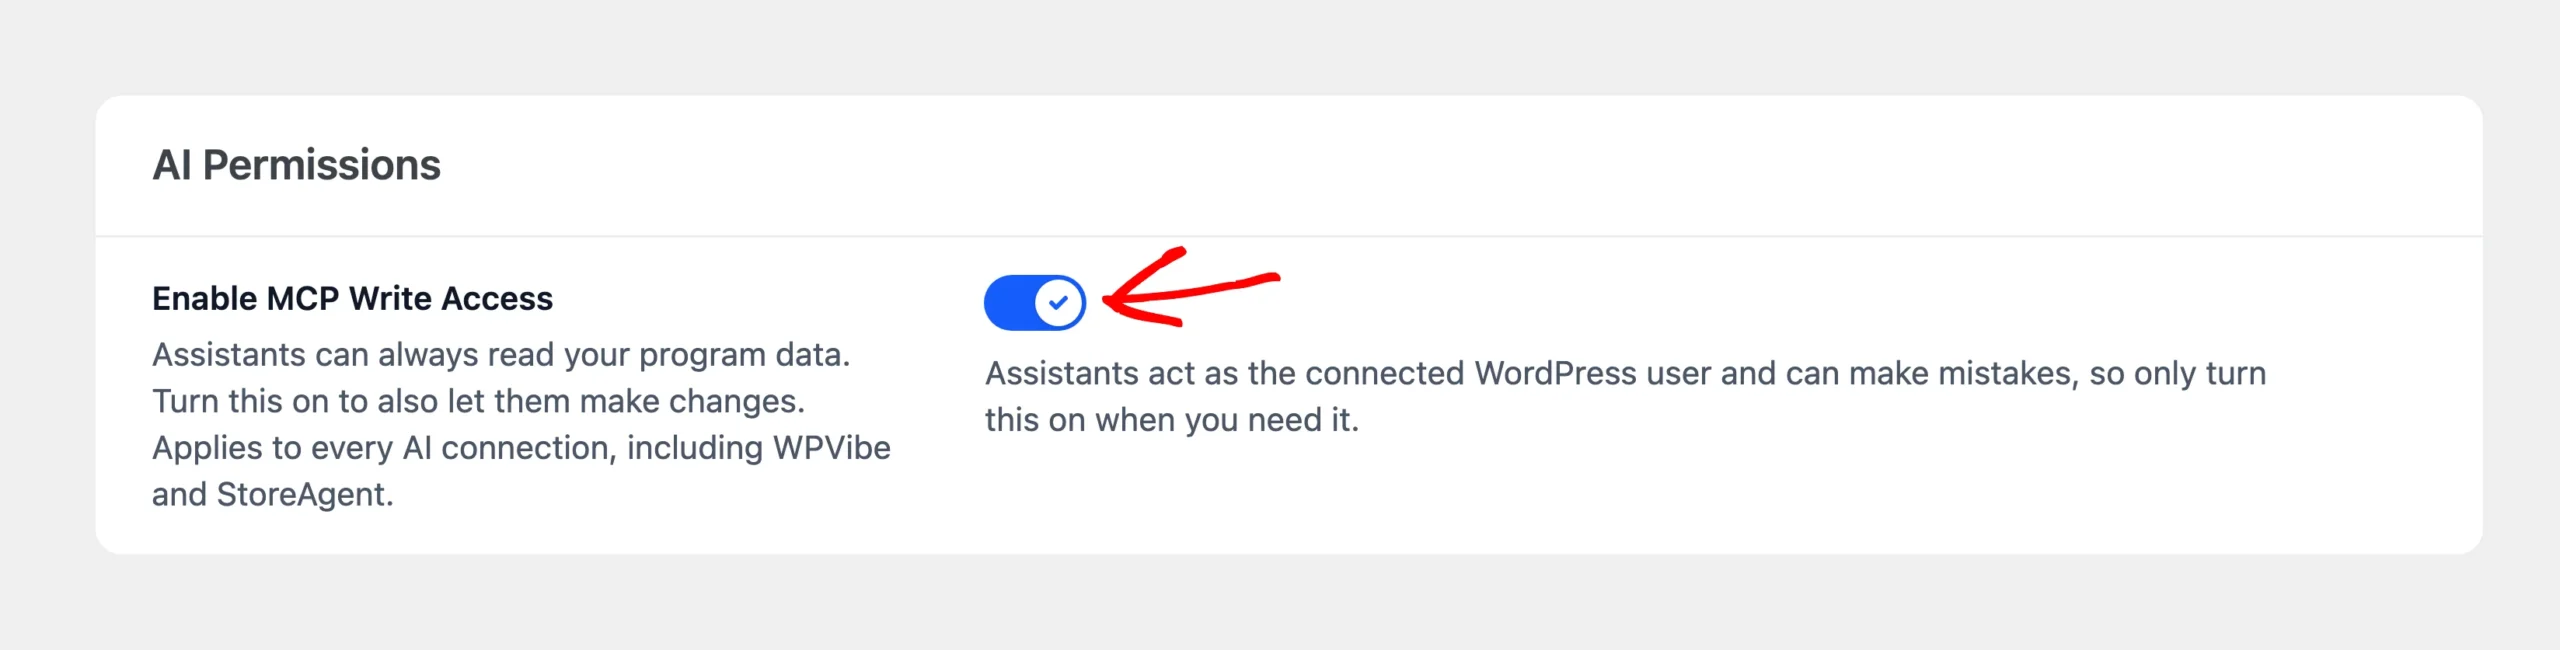
The toggle works the same whichever connector you use. Your assistant acts as the WordPress user who connected it. Every RewardsWP ability needs a user who can manage your site’s settings, such as an administrator.
Below the toggle, the capability cards list what assistants can do. Actions with a Write badge need write access.
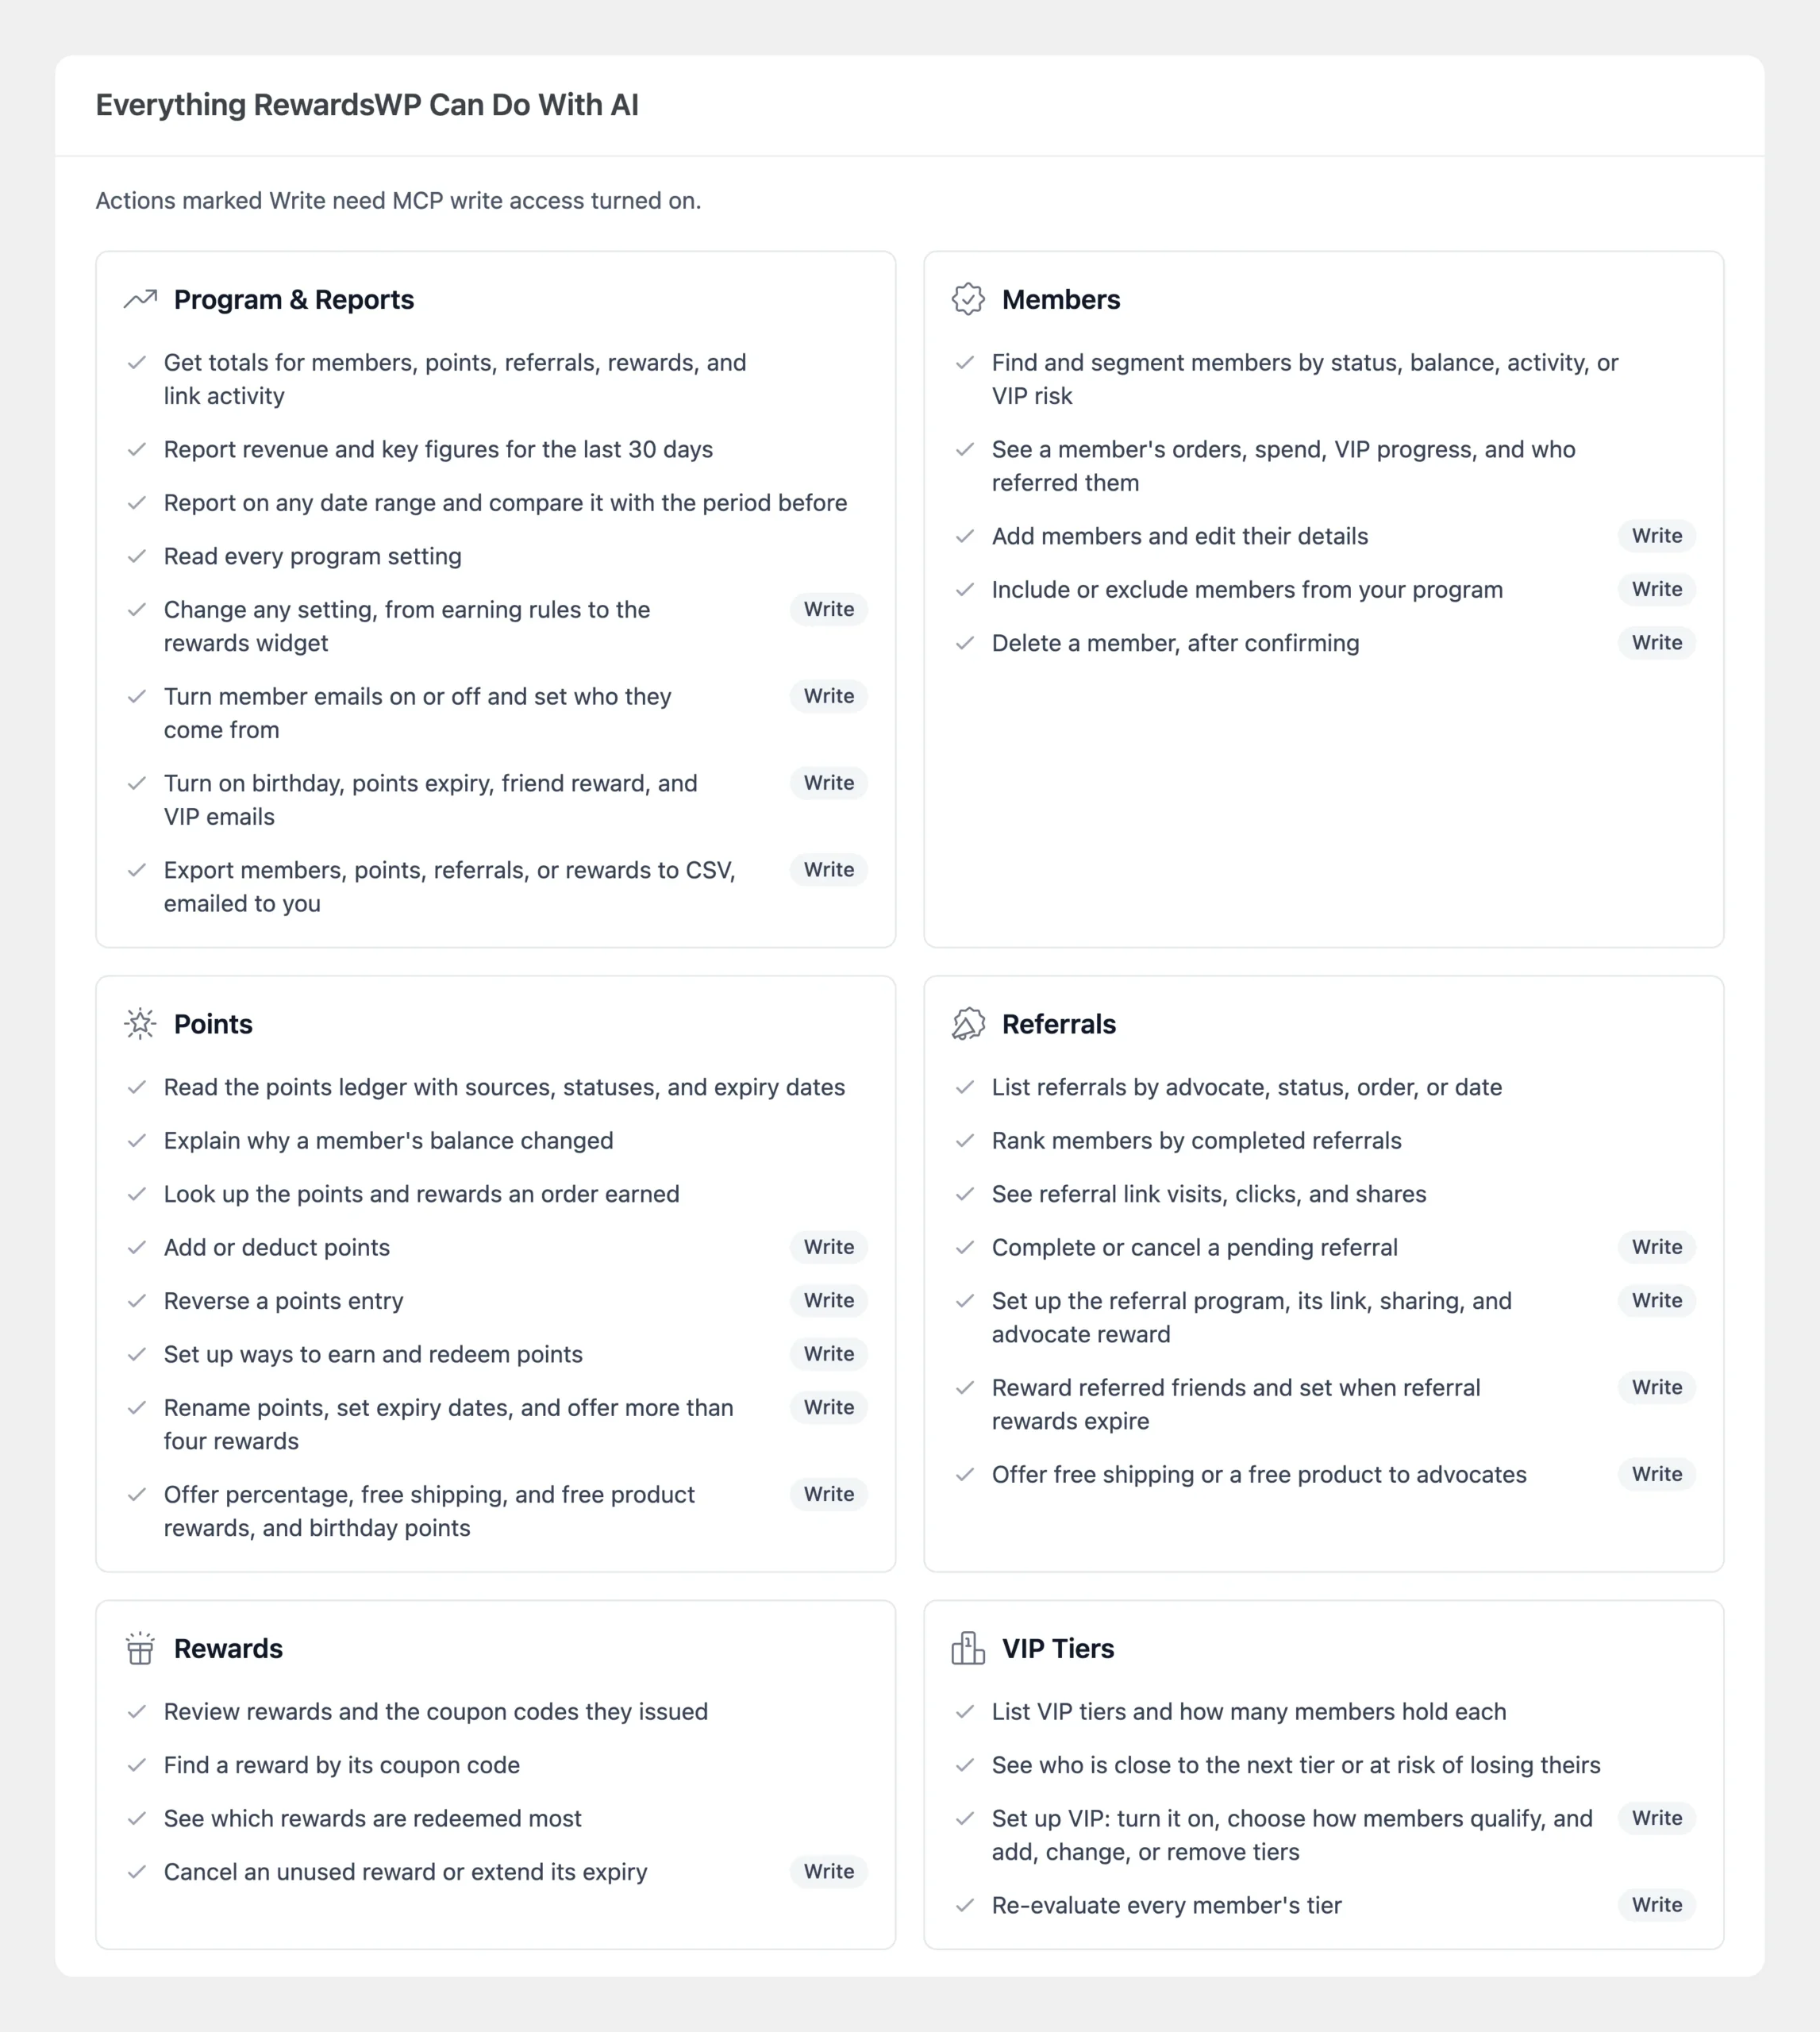
If your license level doesn’t include a feature, its actions move to an Available with an upgrade list at the bottom of the card. Clicking it shows which license level adds them.
Your assistant gives a reason for every change it makes. When it adds or deducts points, the member’s points history on the Members screen shows that reason. It also names the assistant and the user it acted as. Members don’t see the reason.
You can turn write access off again at any time. The change applies right away. While it’s off, your assistant either doesn’t see the actions that make changes or gets a message telling it where to turn write access on.
Note: With write access on, your assistant makes real changes to your live program, and some of them reach your customers. For example, points that move a member up a VIP tier send the tier email, and completing a referral sends the advocate their reward. You can review each change on the matching RewardsWP screen, such as Members or Referrals.
Trying your first prompts
The best way to start is with a question and then a small change. Here are some prompts to try:
- “How did my loyalty program do this month compared with last month?” Your assistant compares totals for both date ranges.
- “Who are my top five advocates by completed referrals?” It ranks members by the referrals they completed.
- “Which rewards do members redeem most?” It ranks your rewards by how often members redeem them.
- “Why did this member’s points balance change last week?” Name the member, and it explains each entry in their points history.
- “Add 200 points to this member as a thank-you for their review.” A change that needs write access.
- “Extend this member’s unused reward by 30 days.” This also needs write access.
That’s it! Your AI assistant can now answer questions about your loyalty program and, when you allow it, manage members, points, and rewards for you. Next, read the Points Program overview to see how members earn and spend points.
FAQ
Below, we’ve answered some of the most common questions about using RewardsWP with AI assistants.
Is it safe to give an AI assistant write access?
Write access is off by default, and only a user who can manage your site’s settings can turn it on. Your assistant acts as the WordPress user who connected it. It can’t change your license, and it never deletes a points entry. To delete a member, it has to preview the member first and then confirm the delete in a second step. AI assistants can make mistakes, so turn write access on only when you need it.
What if my assistant makes a wrong change?
Ask your assistant to reverse it. For points, it adds a reversal entry, so the member’s balance goes back and both entries stay in their points history. If the member has already spent those points, RewardsWP refuses the reversal, so deduct the points instead. You can also adjust points yourself from the Members screen.
A settings change can be changed back the same way, by your assistant or on the matching RewardsWP screen. Deleting a member is the one change that can’t be undone.
Can I choose which changes an assistant can make?
No. Write access is a single setting. When it’s on, your assistant can make every change marked Write on the AI MCP tab, as long as your license level includes the feature.
What happens when I ask for something my license level doesn’t include?
Your assistant tells you which license level the feature needs, which license level your store has, and where to upgrade. Nothing changes. On RewardsWP Lite, reports cover the last 30 days, and your assistant tells you when an answer is limited to that period.
Can an AI assistant export my members?
Yes, on a paid license level and with write access on. Your assistant starts a CSV export of members, points, referrals, or rewards. RewardsWP emails the download link to you or to your site’s admin email, and the assistant never receives the file.
Why don’t I see the AI MCP tab?
The tab needs WordPress 6.9 or later, because that version added the WordPress Abilities API. If your site runs an older version of WordPress, update it. The tab then appears under RewardsWP » Tools.
See How to Safely Update WordPress.
Which AI assistants work with RewardsWP?
Any AI tool that supports the Model Context Protocol works with RewardsWP, including Claude, ChatGPT, and Cursor. Some AI platforms only offer custom connectors on certain plans, so check your assistant’s own documentation.
Can I use this on a local or staging site?
WPVibe and StoreAgent reach your site over the internet. They need a site that’s publicly reachable. For a local site, connect directly through the WordPress MCP Adapter instead. It can also run on your own computer through WP-CLI.
What data can an AI assistant see?
Your assistant sees the same program data as the WordPress user who connected it, including member names and email addresses. RewardsWP hides the email address of each referred friend, and leaves out visitor IP addresses, license keys, and other secrets.
I’m a developer. Can I use these abilities without WPVibe or StoreAgent?
Yes. RewardsWP registers every ability with WordPress whether or not a connector plugin is installed. To connect an MCP client directly, install the WordPress MCP Adapter. Then create an Application Password for a user with the manage_options capability. Your MCP server address is /wp-json/mcp/mcp-adapter-default-server on your site.
To call abilities without MCP, use the WordPress Abilities REST API at /wp-json/wp-abilities/v1/abilities. It lists every RewardsWP ability with its description and its input and output schemas. Every change except deleting a member accepts a dry_run flag that shows the result without saving it. To decide write access in code instead of with the toggle, use the rewardswp_abilities_allow_write filter.