El Widget de Recompensas es el centro del programa de fidelización de su cliente. Es donde los miembros consultan su saldo de puntos, descubren formas de ganar y canjear, comparten enlaces de referencia y revisan su historial de actividad.
Después de leer esta guía, comprenderá qué muestra cada panel a sus clientes, cómo los visitantes experimentan el widget y cómo utilizar las opciones de enlace profundo y colocación para impulsar la participación.
Descripción general del widget
El Widget de Recompensas es un panel que se incrusta automáticamente en las páginas de su tienda dirigidas a los clientes. Actúa como un panel de autoservicio donde los miembros pueden ver todo lo relacionado con sus recompensas en un solo lugar, sin salir de la página en la que se encuentran.
El widget tiene dos componentes principales:
- Lanzador: Un botón flotante en el que los clientes hacen clic para abrir el widget
- Panel: La interfaz deslizante que contiene todas las funciones del programa de fidelización
El widget está organizado en pantallas, cada una centrada en una tarea específica. Los miembros navegan entre ellas utilizando tarjetas en la pantalla de inicio.
Pantalla de inicio
La pantalla de inicio es lo que ven los miembros cuando abren el widget por primera vez. Proporciona una instantánea rápida del estado del miembro y navegación a todo lo demás.

La pantalla de inicio incluye:
- Saldo de puntos: El total de puntos canjeables actuales del miembro, que se muestra de forma destacada en la parte superior.
- Formas de ganar: Una tarjeta de navegación que abre Formas de ganar, donde los miembros pueden ver todas las acciones disponibles para ganar puntos.
- Formas de canjear: Una tarjeta de navegación que abre Formas de canjear, donde los miembros pueden buscar y reclamar recompensas.
- Recomienda a tus amigos: Cuando el programa de referidos está habilitado, esta sección aparece con opciones para compartir, de modo que los miembros puedan invitar amigos directamente desde la pantalla de inicio.
- Tu actividad: Una tarjeta de navegación que abre Actividad de recompensas, donde los miembros pueden revisar su historial completo de puntos y referidos.
La pantalla de inicio se adapta según los programas que tenga habilitados. Si solo el Programa de Puntos está activo, las secciones relacionadas con los referidos no aparecerán. Si solo el Programa de Referidos está activo, las secciones específicas de puntos estarán ocultas.
Formas de ganar
Formas de ganar muestra cada acción que genera puntos. Cada entrada muestra el icono de la acción, una descripción de lo que el miembro necesita hacer y la cantidad de puntos que recibirá.

Por ejemplo, una lista típica de ganancias podría incluir:
- Crear una cuenta — 100 puntos (una vez)
- Bono de primer pedido — 200 puntos (una vez)
- Realizar una compra — 5 puntos por cada $1 gastado
- Escribir una reseña de producto — 100 puntos por reseña
Las acciones que se muestran aquí reflejan lo que has configurado en RewardsWP » Ajustes » Puntos en la sección Formas de ganar. Cuando habilitas o deshabilitas acciones de ganancia en el administrador, la lista se actualiza automáticamente en el widget.
Formas de canjear
Formas de canjear muestra todas las recompensas disponibles que los miembros pueden reclamar con sus puntos. Cada recompensa muestra su título, el coste en puntos y un botón de Canjear. Cuando un miembro tiene suficientes puntos para una recompensa, el botón Canjear está activo. Cuando aún no tienen suficientes puntos, el botón está deshabilitado y el panel muestra cuántos puntos más necesitan.

Cuando un miembro hace clic en Canjear, aparece un aviso de confirmación pidiéndole que verifique su elección. Esto evita canjes accidentales. Después de confirmar, sus puntos se deducen inmediatamente y se genera un código de cupón. El nuevo cupón aparece en la sección “Tus recompensas” en la parte superior de la pantalla de inicio, listo para aplicarlo a su carrito.
Las recompensas listadas aquí corresponden a las acciones de gasto que has configurado en RewardsWP » Ajustes » Puntos en la sección Formas de canjear.
Cuando un miembro hace clic en Canjear, aparece un aviso de confirmación pidiéndole que verifique su elección. Esto evita canjes accidentales. Después de confirmar, sus puntos se deducen inmediatamente y se genera un código de cupón. El nuevo cupón aparece en la sección “Tus recompensas” en la parte superior de la pantalla de inicio, listo para aplicarlo a su carrito.
Recomienda a tus amigos
La sección Recomienda a tus amigos proporciona a los miembros todo lo que necesitan para compartir su enlace de recomendación. Aparece en la pantalla de inicio cuando el programa de recomendación está habilitado.

Esta sección incluye:
- Enlace de recomendación para copiar al portapapeles: Los miembros pueden copiar su URL de recomendación única con un solo clic. Un mensaje de confirmación aparece brevemente cuando se copia el enlace.
- Canales para compartir: Botones preconfigurados para compartir a través de Correo electrónico, X y Facebook
Los canales que se muestran aquí se controlan mediante los ajustes en RewardsWP » Ajustes » Widget en Opciones para compartir.
Actividad de Recompensas
Actividad de Recompensas ofrece a los miembros una vista transparente de su historial de puntos y actividad de recomendación. Los miembros acceden a ella haciendo clic en el enlace Tu actividad en la pantalla de inicio.

Si tanto el Programa de Puntos como el Programa de Recomendaciones están habilitados, los miembros ven una interfaz con pestañas para cambiar entre los dos tipos de actividad:
- Pestaña Puntos: Registro cronológico de cada transacción de puntos
- Pestaña Recomendaciones: Registro de todas las conversiones de recomendación
Si solo un programa está habilitado, aparece la única pestaña relevante sin el selector de pestañas.
Pestaña Puntos
La pestaña Puntos muestra una lista cronológica de cada transacción de puntos. Cada entrada muestra la acción que ocurrió, la fuente, el número de puntos añadidos o deducidos y una marca de tiempo relativa. Los puntos ganados aparecen en verde con un prefijo +, mientras que los puntos gastados o deducidos aparecen en gris con un prefijo -. Los puntos pendientes muestran una insignia ámbar de Pendiente.

Pestaña Recomendaciones
La pestaña Recomendaciones muestra a cada amigo que el miembro ha recomendado. En la parte superior, una línea de resumen muestra el recuento de recomendaciones completadas y pendientes. Cada entrada muestra el nombre del amigo (nombre y la inicial del apellido por privacidad), lo que hizo, una insignia de estado y cuándo ocurrió.

Experiencia del visitante
Los visitantes que no se han unido a su programa de fidelización ven una versión de vista previa del widget diseñada para fomentar las inscripciones. En lugar de mostrar funciones exclusivas para miembros, la vista previa ofrece a los invitados una muestra del programa.
Lo que ven los invitados:
- Descripción general del programa — Una descripción de los beneficios de unirse
- “Conviértete en miembro” CTA — Un botón de llamada a la acción destacado que fomenta la inscripción
- Vista previa del sistema de puntos — Un vistazo de cómo se ganan los puntos
- Recompensas disponibles — Una vista previa de lo que pueden canjear
Los invitados pueden explorar los paneles Formas de ganar y Formas de canjear para ver lo que está disponible, pero cada panel incluye una indicación para unirse en lugar de funcionalidad activa. Los invitados no pueden canjear recompensas ni acceder a la Actividad de recompensas hasta que creen una cuenta.
Vinculación de pedidos de invitados:
Cuando un invitado realiza una compra y luego crea una cuenta, RewardsWP vincula automáticamente sus pedidos y otorga puntos retroactivamente. Esto asegura que los invitados no pierdan puntos que habrían ganado si hubieran iniciado sesión.
Enlace profundo
Puede vincular directamente a cualquier panel del widget agregando un enlace hash a cualquier página donde el widget esté activo. Los enlaces hash abren el widget sin recargar la página, lo que los hace ideales para menús de navegación, botones y enlaces dentro de la página.
| Enlace hash | Abre |
#rewardswp-inicio | Pantalla de inicio |
#rewardswp-ganar | Formas de ganar |
#rewardswp-canjear | Formas de canjear |
#rewardswp-recompensas | Tus recompensas |
#rewardswp-actividad | Actividad de Recompensas |
#rewardswp-actividad-puntos | Actividad de recompensas (pestaña Puntos) |
#rewardswp-actividad-referidos | Actividad de recompensas (pestaña Referidos) |
#rewardswp-unirse | Formulario de registro |
#rewardswp-iniciar-sesion | Formulario de inicio de sesión |
Ejemplo:
Añadir un elemento de menú que enlace a tu-tienda.com/tienda/#rewardswp-earn abre la página de la tienda y desliza el panel Formas de ganar.
Uso de enlaces profundos en correos electrónicos: Los enlaces hash no funcionan en los correos electrónicos porque los clientes de correo eliminan el fragmento #. Reemplaza #rewardswp- con ?rewardswp= en su lugar. Por ejemplo, usa tu-tienda.com/tienda/?rewardswp=earn en un correo electrónico para enlazar a Formas de ganar.
Casos de uso comunes:
- Menús de navegación — Añadir un elemento de menú “Mis recompensas” que enlace a
#rewardswp-home - Botones en páginas de destino — Enlace a Formas de ganar con
#rewardswp-earn - Campañas de correo electrónico — Enlace a Actividad de recompensas con
?rewardswp=activity
Personalización de tu widget
El widget de recompensas se incrusta automáticamente en las páginas visibles para el cliente de tu tienda. Puedes controlar su apariencia y posición desde RewardsWP » Ajustes » Widget de recompensas.
Los ajustes están organizados en tres secciones: General, Lanzador de recompensas y Opciones para compartir.

Ajustes Generales
Los ajustes generales controlan la apariencia y la marca generales del panel del widget. Estos ajustes afectan a cómo se ve el widget y qué ven los miembros cuando lo abren.

Color de marca: Establece el color de acento principal en todo el widget. Esto afecta a los botones, las insignias y los elementos resaltados.
Texto e iconos sobre color de marca — Controla si el texto y los iconos sobre fondos de color son claros u oscuros. Opciones:
- Automático (predeterminado): Elige automáticamente claro u oscuro en función de la luminancia del color de marca
- Claro: Fuerza texto e iconos claros (úsalo con colores de marca oscuros)
- Oscuro: Fuerza texto e iconos oscuros (úsalo con colores de marca claros)
Encabezado de bienvenida: El mensaje de bienvenida que se muestra en la cabecera del panel (p. ej., “Bienvenido a”, “Hola,”).
Nombre del programa: El nombre de tu programa de recompensas que se muestra en todo el widget (p. ej., “Mis recompensas”, “Programa de fidelización”).
Ajustes del lanzador de recompensas
El lanzador de recompensas es el botón flotante que los clientes pulsan para abrir el widget. Estos ajustes controlan cómo aparece el botón lanzador y dónde se posiciona en tu sitio.
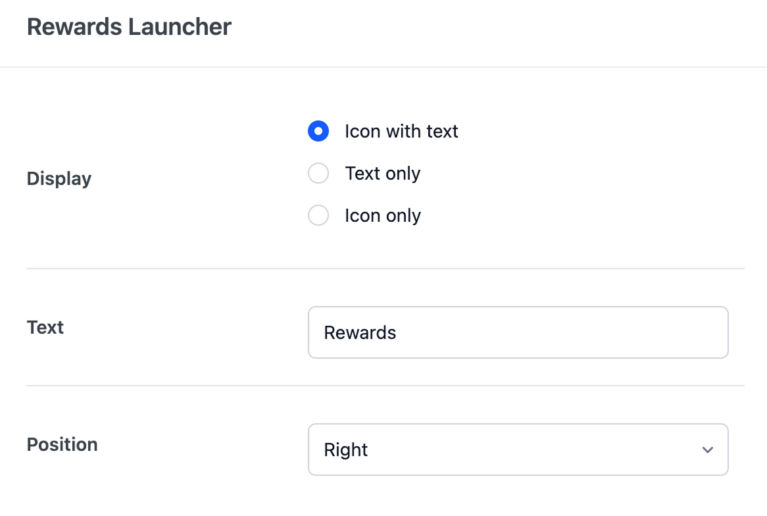
Mostrar: Controla lo que muestra el botón lanzador:
- Icono con texto (predeterminado): Muestra el icono del widget junto a una etiqueta de texto
- Solo texto: Muestra solo la etiqueta de texto
- Solo icono: Muestra solo el icono del widget para un aspecto más compacto
Texto: La etiqueta de texto que se muestra en el botón lanzador (deshabilitado cuando Mostrar está configurado como “Solo icono”).
Posición: Elige en qué lado de la pantalla aparece el lanzador:
- Derecha (predeterminado)
- Izquierda
El lanzador utiliza una posición fija, por lo que permanece visible mientras los clientes se desplazan por la página.
Ajustes de opciones para compartir
Las opciones para compartir controlan cómo los miembros pueden compartir sus enlaces de referencia directamente desde el widget de recompensas. Habilita los canales que deseas ofrecer y personaliza los mensajes prerellenados para que coincidan con la voz de tu marca. Estos ajustes solo se aplican cuando el programa de referencias está activo.

X: Activa/desactiva para habilitar/deshabilitar el uso compartido a través de X (anteriormente Twitter). Cuando está habilitado, los miembros pueden compartir su enlace de referencia en X.
Mensaje de X: Personaliza el mensaje predefinido que aparece cuando los miembros comparten a través de X. Máximo 280 caracteres. Marcadores disponibles: {site_name}, {advocate_name}, {reward_name}, {referral_link}.
Facebook: Activa/desactiva para habilitar/deshabilitar compartir a través de Facebook. Cuando esté habilitado, los miembros podrán compartir su enlace de referencia en Facebook.
Nota: Facebook no permite mensajes predefinidos. Cuando un promotor refiera a sus amigos a través de Facebook, se le pedirá que añada su propio mensaje.
Correo electrónico: Activa/desactiva para habilitar/deshabilitar compartir por correo electrónico. Cuando esté habilitado, los miembros podrán compartir su enlace de referencia por correo electrónico.
- Asunto del correo electrónico: Personaliza la línea de asunto de los correos electrónicos de referencia. Marcadores disponibles:
{site_name},{advocate_name},{reward_name},{referral_link}. - Mensaje de correo electrónico: Personaliza el cuerpo del correo electrónico para los correos de referencia. Marcadores disponibles:
{site_name},{advocate_name},{reward_name},{referral_link}.
Preguntas frecuentes
¿Puedo enlazar al widget desde un menú de navegación?
Sí. Utiliza un enlace hash (por ejemplo, #rewardswp-home) en cualquier enlace de página de tu menú. Los enlaces hash son preferibles para los menús porque abren el widget sin recargar la página.
¿Cuál es la diferencia entre el lanzador y el widget?
El lanzador es el botón flotante que los clientes hacen clic para abrir el widget. El widget es el panel deslizante completo que contiene todos los paneles descritos en esta guía. Puedes personalizar ambos de forma independiente en la configuración.
¿Los invitados y los miembros ven cosas diferentes?
Sí. Los miembros ven su saldo personal de puntos, su enlace de referencia y su historial de actividad completo. Los invitados ven una vista previa del programa con indicaciones para unirse. Ambos pueden explorar Formas de ganar y Formas de canjear, pero solo los miembros pueden realizar acciones.
¿Puedo cambiar el nombre de la moneda de "Puntos" a otra cosa?
Sí. Navega a RewardsWP » Ajustes » Puntos y actualiza los campos de Moneda en la configuración General. Puedes establecer un nombre singular (por ejemplo, "Estrella"), un nombre plural (por ejemplo, "Estrellas") y una abreviatura (máximo 4 caracteres). El nuevo nombre aparece en todo el widget y en la Actividad de Recompensas.